
Tutorials
Topics
Getting Started

Getting Started - Opening KOSMA for the first time
Launch the application and log in to KOSMA. To create an account, first visit http://www.kosma.io
Log in with your username and password.
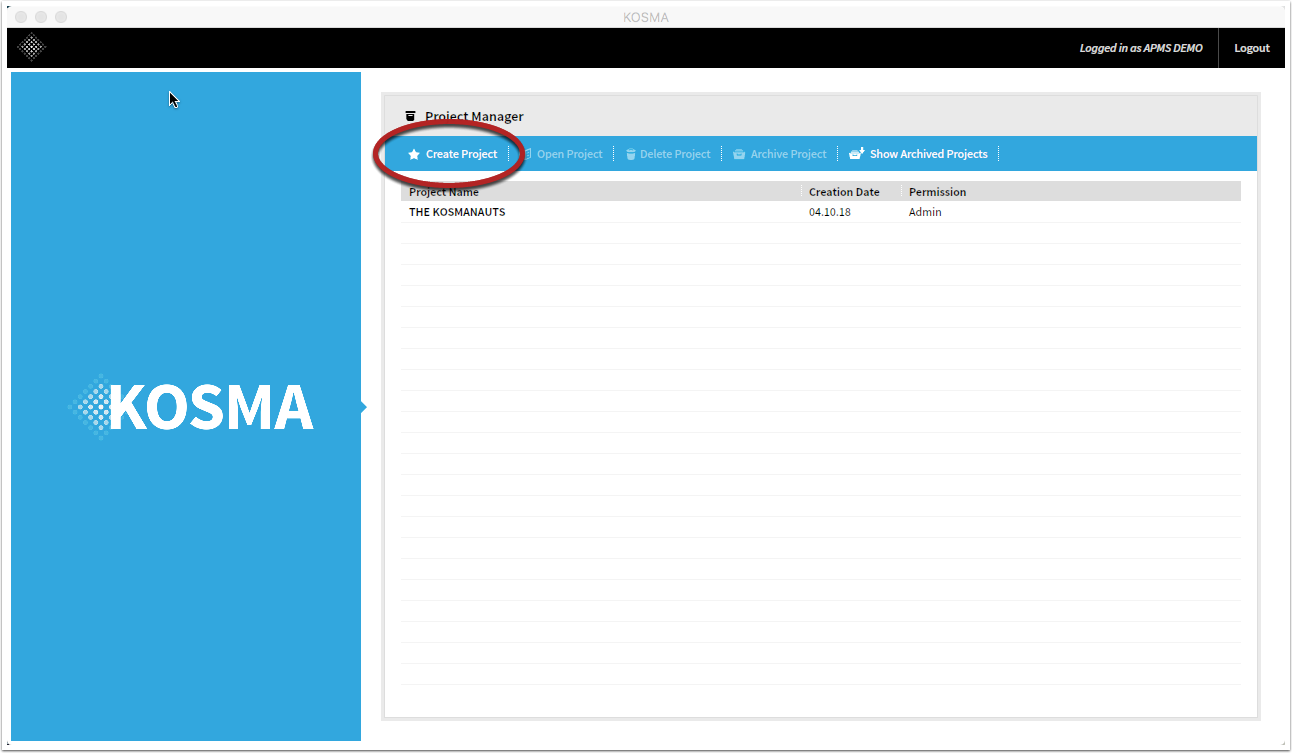
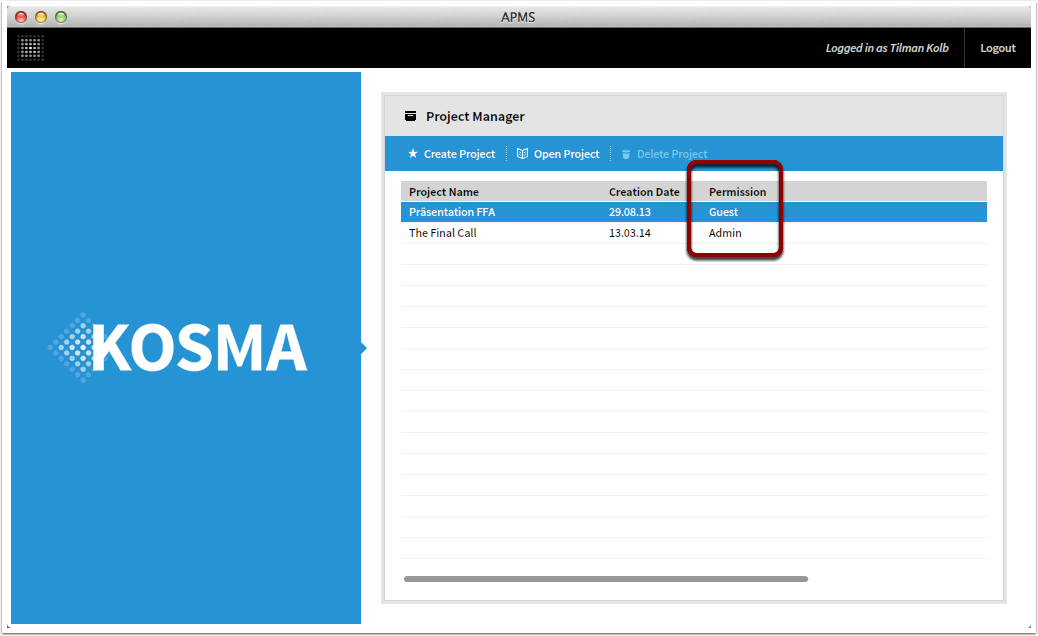
First you see the project manager
Here you can create new projects or open/delete/archive an existing ones. The "permission" column shows whether you are the administrator or a guest of a project.

Project Main Screen
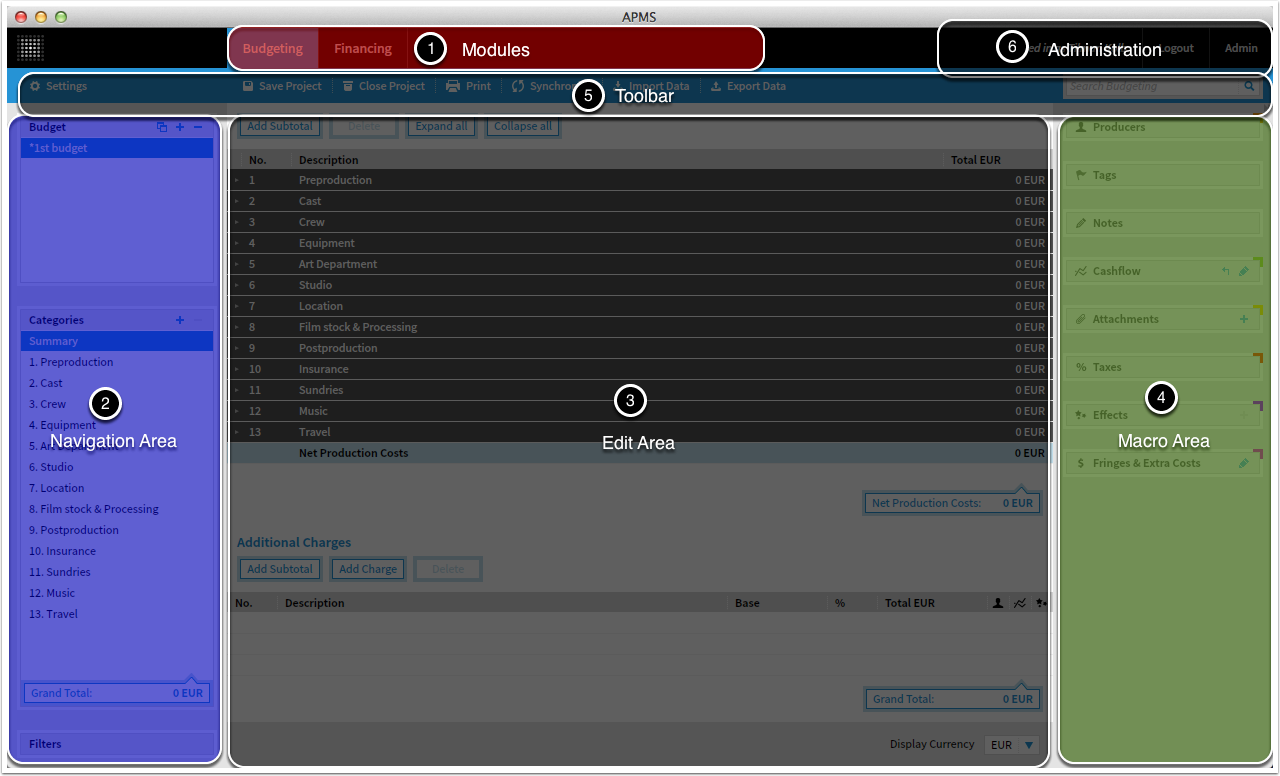
Let's get started with a simple overview of the KOSMA interface.
Projects always open in the Budgeting module. You can switch to other modules at the top of screen (1), depending on your license. Only if you have a PRO license you will see all modules including Financing, Cashflow and CostControl.
The KOSMA window is separated into 3 main areas:
- The Navigation Area (2) shows all available elements the selected module. For example, in KOSMA, one project can have several budgets.
- The Edit Area (3) will be your main workspace. Here you enter and edit account data.
- The Macro Area (4) allows to add and edit detail information to the selected items of the edit area.
The Toolbar (5) and the Administration tab (6) provide all project related functions.
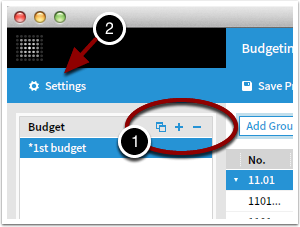
Toolbar & Administration
In Settings (1), all relevant project settings are edited. Note that the settings are individual for every budget you create.
The other buttons in the toolbar represent the basic functions and are pretty much self-explanatory:
To close a project and get back to the Project Manager, hit (3).
You can save (2) and sync to the KOSMA servers (5).
To log out completely, e.g. to change the current user, you can press (8).
To change project sharing settings and user rights, go to the Admin area (9).
Of course, there's also the possibility to print (4) as well as a search function (10).
Also you can import (6) and export (7) data...
Start new project / Load template
Start a new project / Load a template
Log in and click "Create Project"
Enter the project details...

Choose whether to create and empty budget or load a template. You can download some templates from our website in the support section. To create a budget template from one of your own budgets, use the "Save as Template" command in MENU->PROJECT (and not the export command).

…and start budgeting
The budget is empty since we chose "Create Empty Budget" in the last step. Your first budget appears in the list of budgets of this project (1). Start by adding a category (2) now.

Change menu language
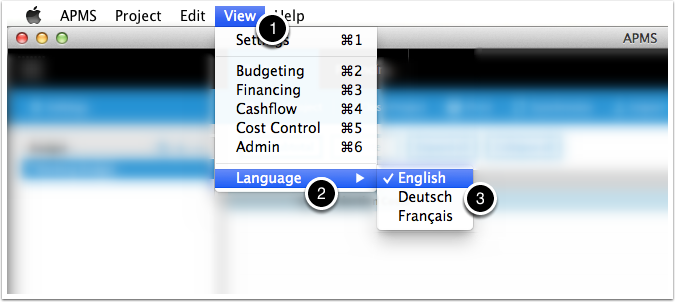
You can switch the menu language from the 'View' menu
Search function
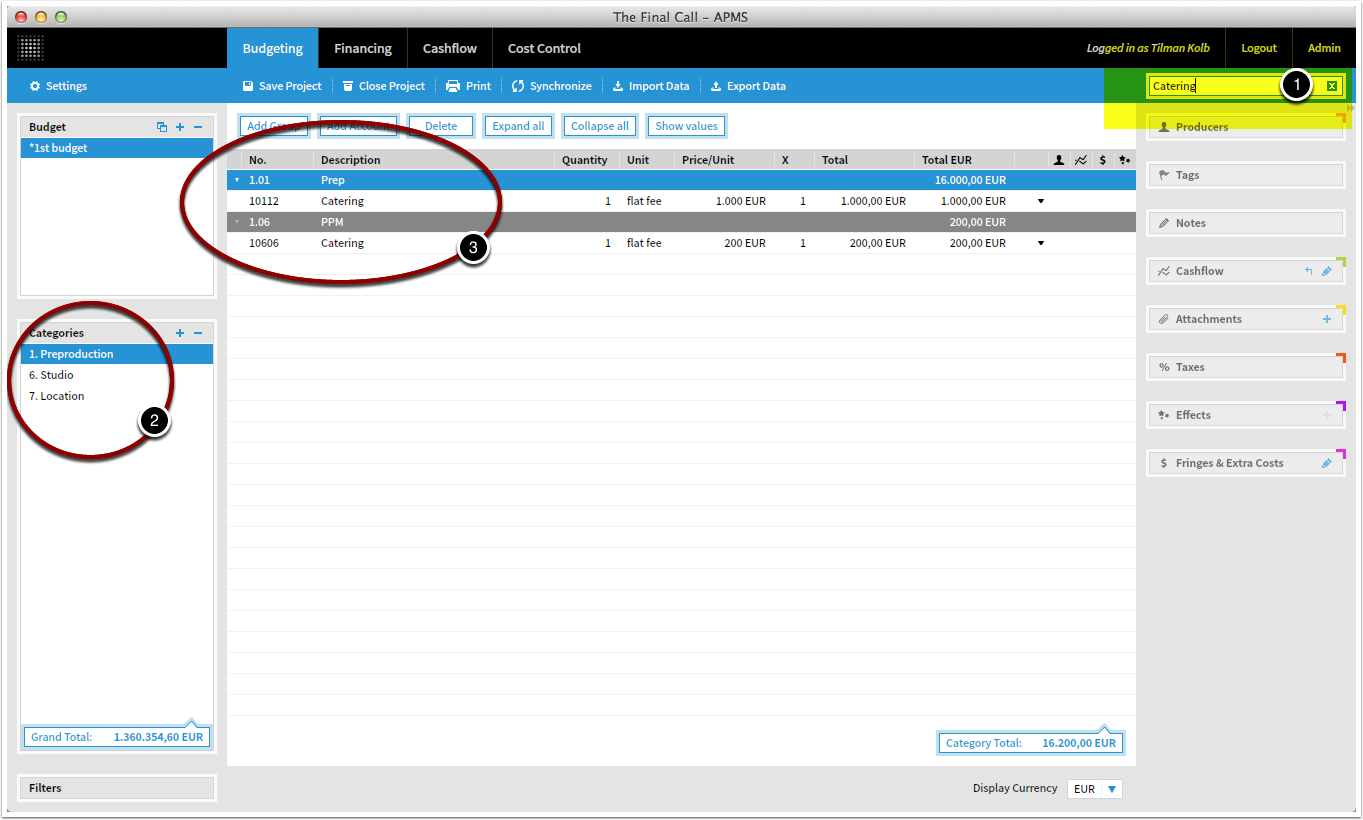
Searching for elements
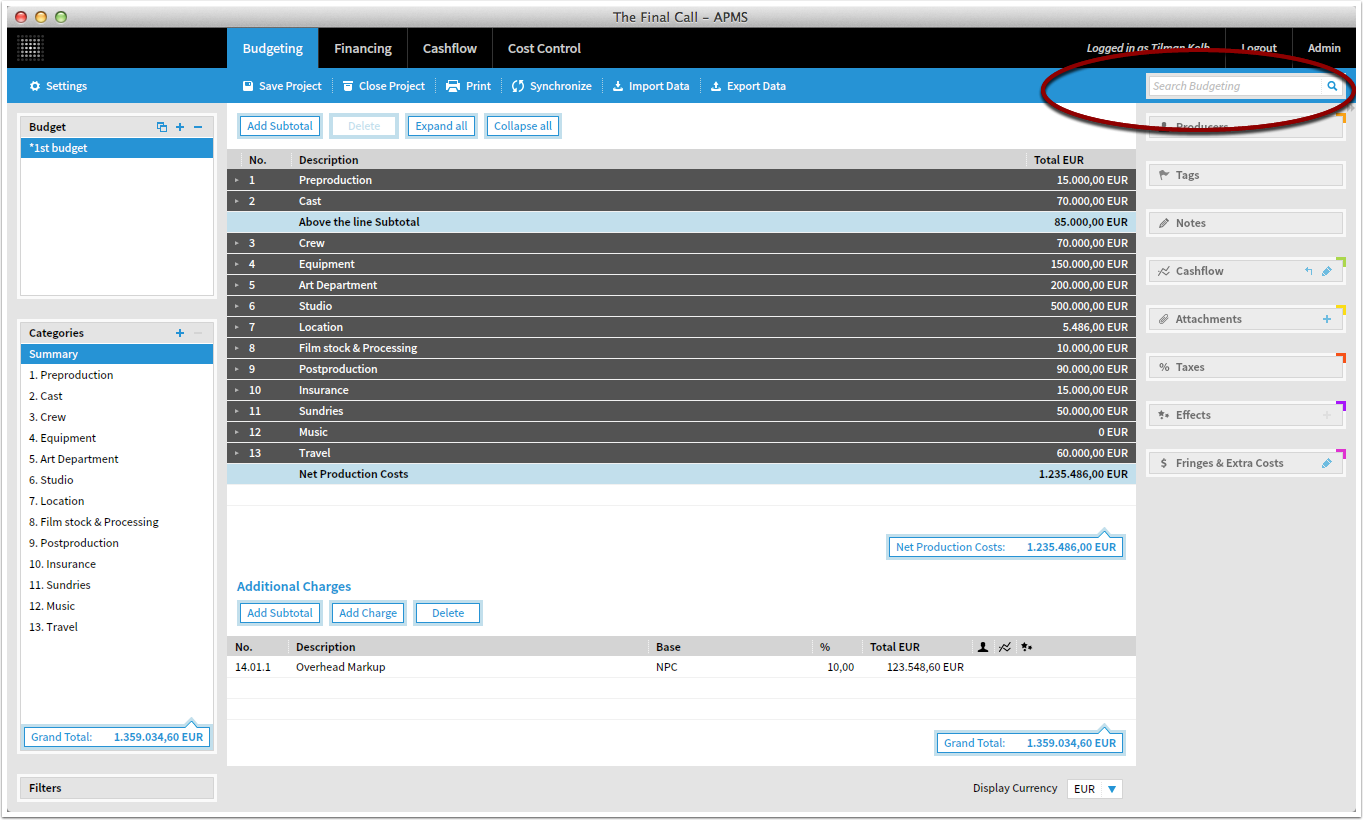
The search function is located in the upper right corner. You can search the whole active budget, financing plan or cost report.
Type in what you are looking for and hit Enter.
Search results
The navigation area will show only categories that contain matching accounts (2).
When you click a category, the edit area (3) will show them.
To reset the search and see the whole sheet again, click the small X (1).
Overview Budgeting module
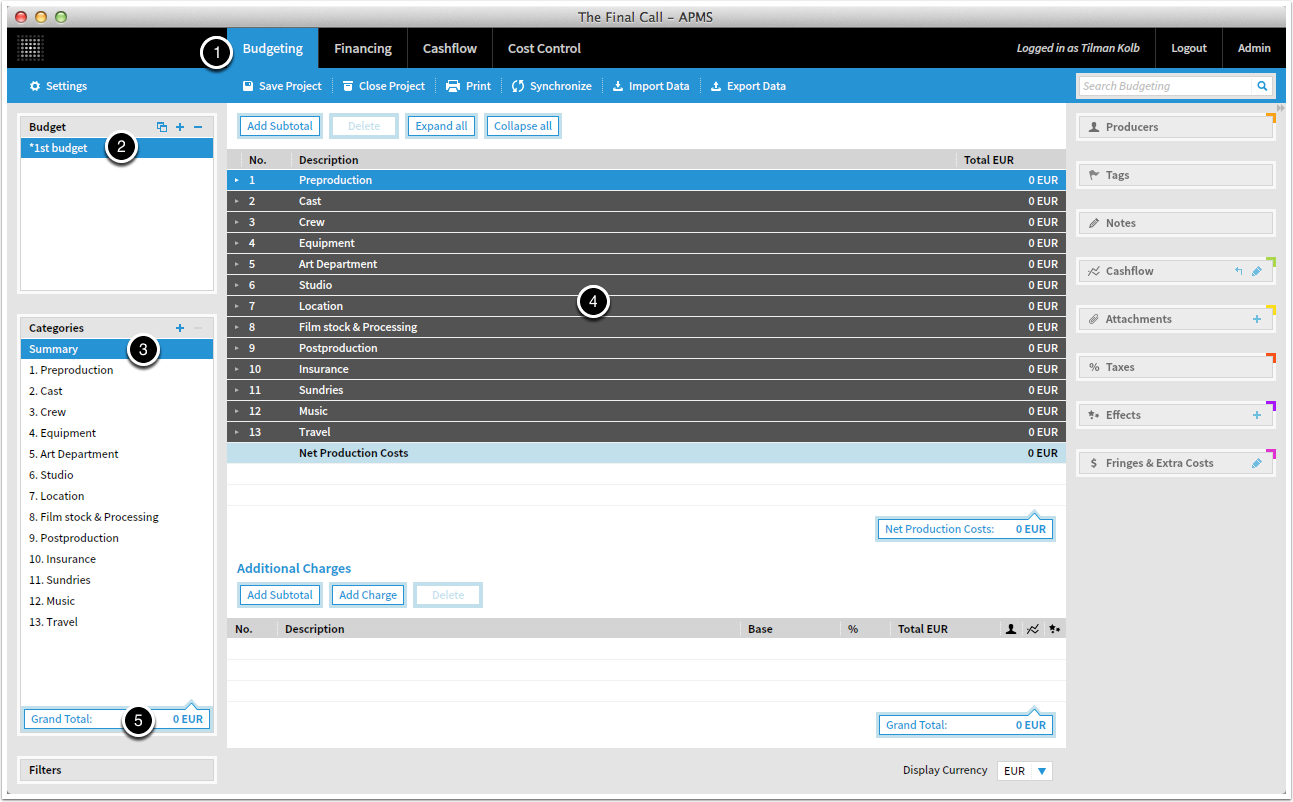
Overview
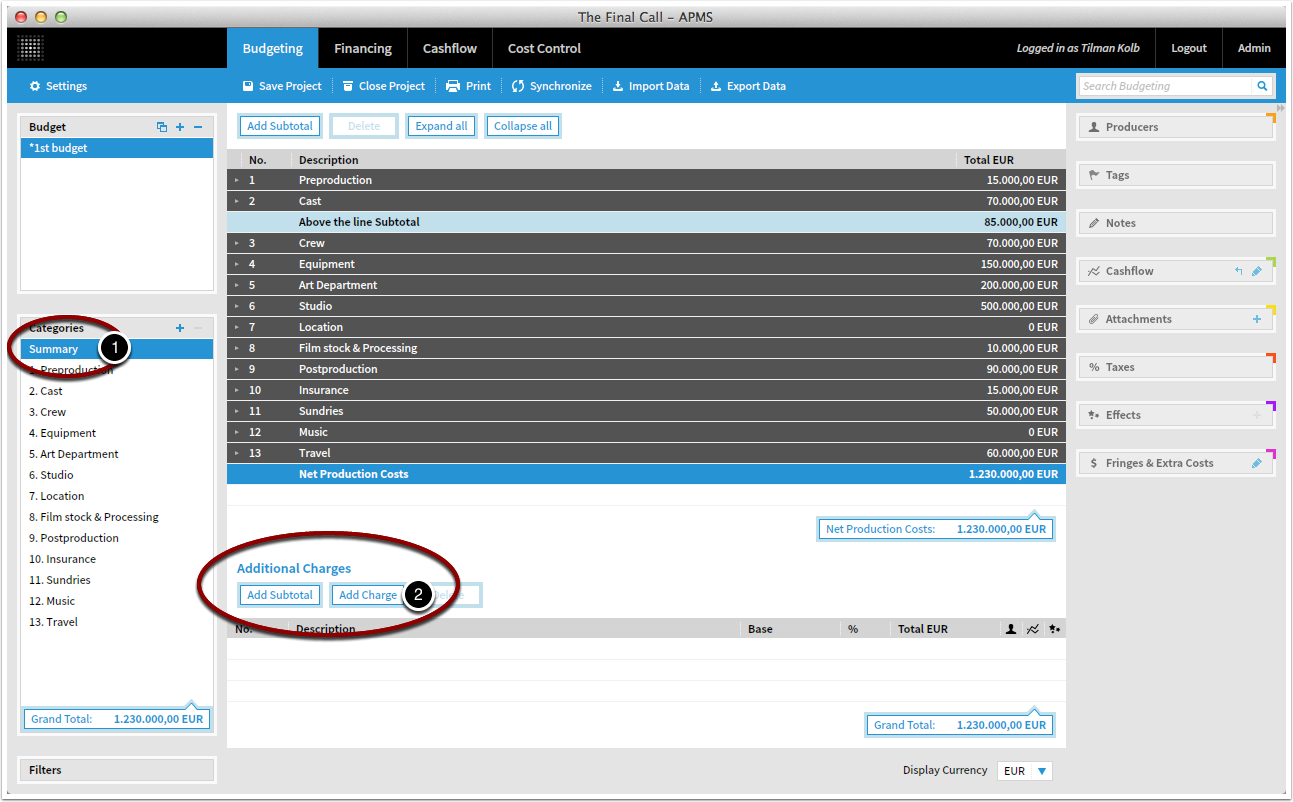
When you open a project for the first time, you will begin in the Budgeting module. (1) Note that depending on your license you will not see all available modules. Only Pro license offers all features.
The list on the top left (2) shows all budgets for your active project. In this case the only one existing is "1st budget".
In the categories field (3) all categories in the selected budget are listed. The "Summary" category is always there. Other categories are shown according to your budget.
Click in a category to show its content in the edit area (4). Since the Summary is currently selected, the edit area shows a summary of all categories and the edit area for Additional Charges.
Manage budgets
To add, delete or duplicate a budget, use the symbols above (1).
General settings like currencies, fringes, taxes, etc. can be set up in Settings (2). Please note that these settings apply to the selected budget only (and its linked financing plans, cash flows and cost reports), not to all budgets within the current project. This allows you to budget different scenarios.
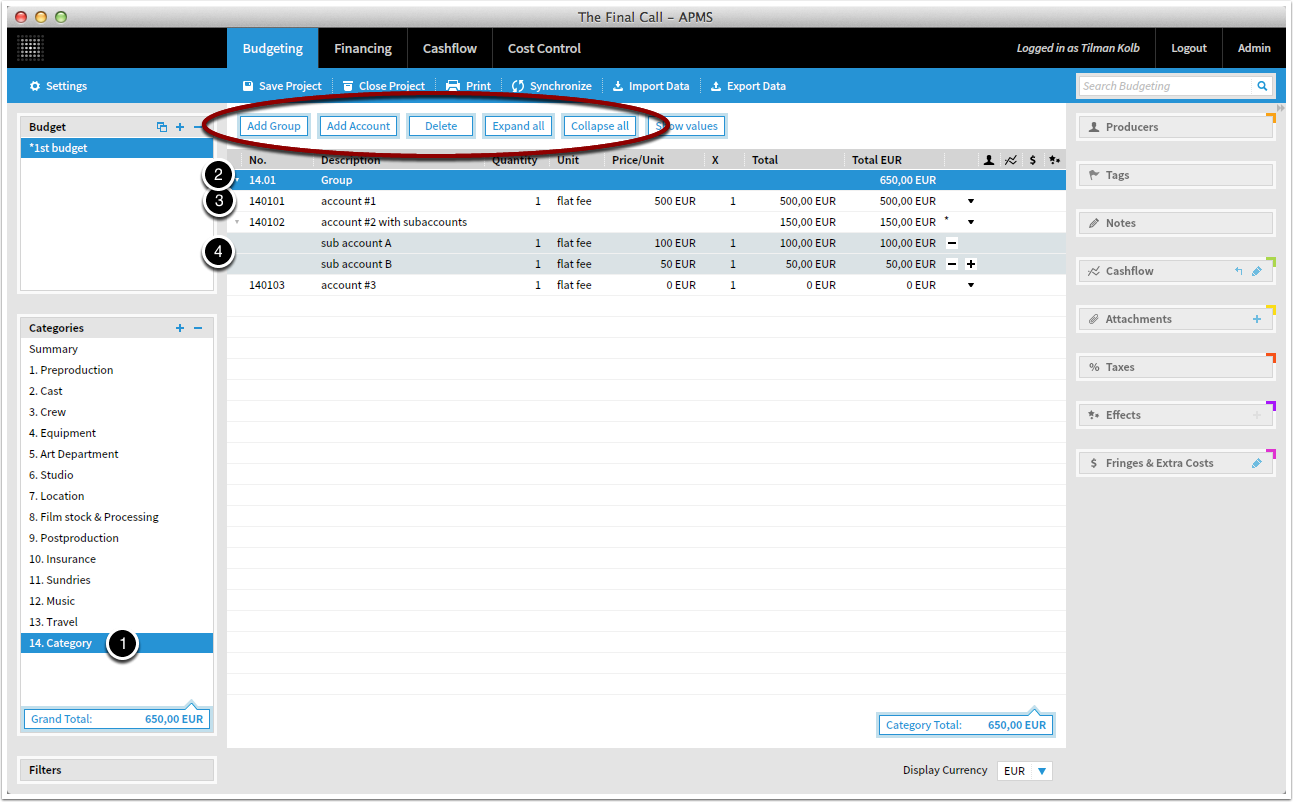
Understanding the budget concept
In KOSMA, budgets contain
Categories (1),
... Groups (2),
... Accounts (3),
... and Sub-Accounts (4)
Categories are auto-numbered and cannot be changed in order, but added and deleted. It can be renamed in the navigation area by double-click.
A group has to be within a category and is auto-numbered, beginning with the number of the category.
An account has to be within a group. Account numbers can be changed according to your budgeting or accounting needs.
Sub-accounts always belong to an account. Subaccounts do not have numbers.
The toolbar offers several options to navigate and manage your budget scheme.
Add and edit budget accounts
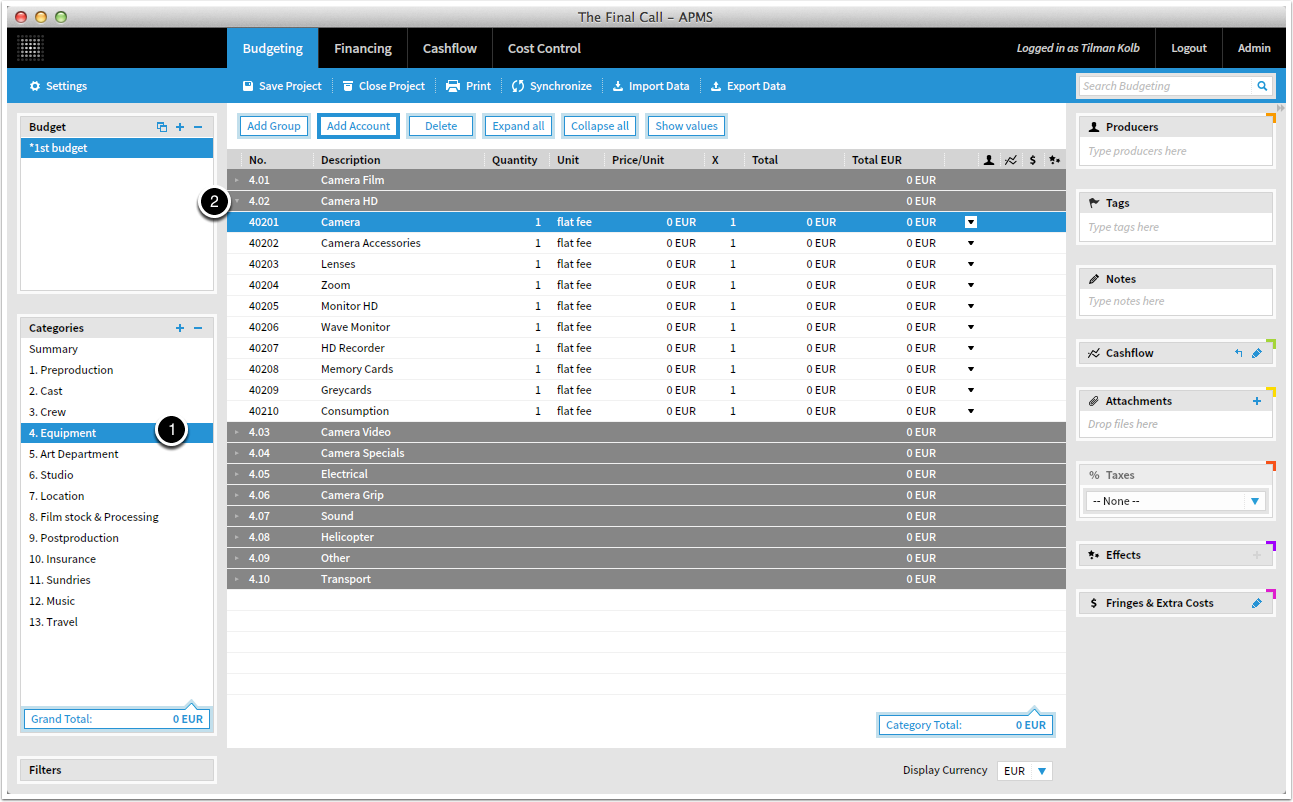

To add an account, navigate into category and group,...
Select the desired category (1).
Select a group (2) or first create one. Accounts have to be inside of a group.
...then click "Add Account"
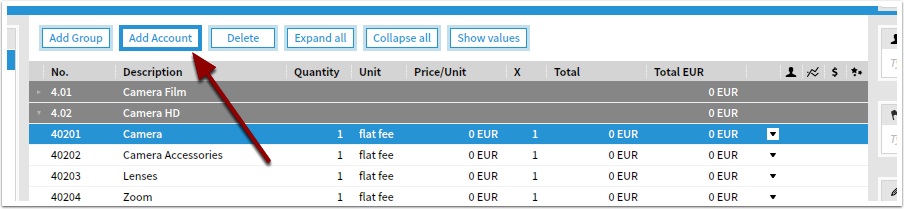
A new account shows up
The new budget account number can be changed manually. You can also renumber the whole budget automatically with the autonumber function in the edit menu.
Edit an account
Edit the account number (1), description (2), quantity and unit (3), price per unit (4), an additional factor (5)
You can also use formulas and variables instead of simple numbers (see "working with formulas" tutorial). Foreign currencies can be managed from budget settings.
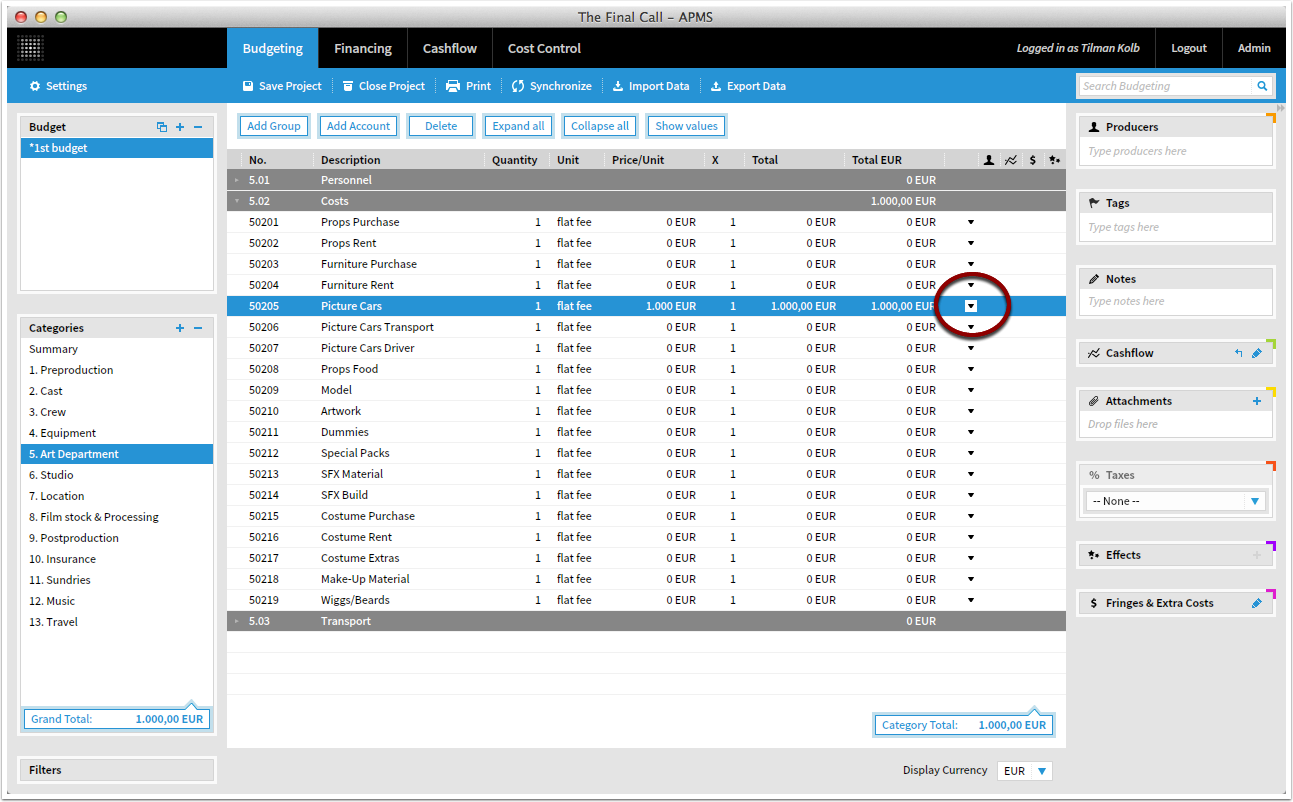
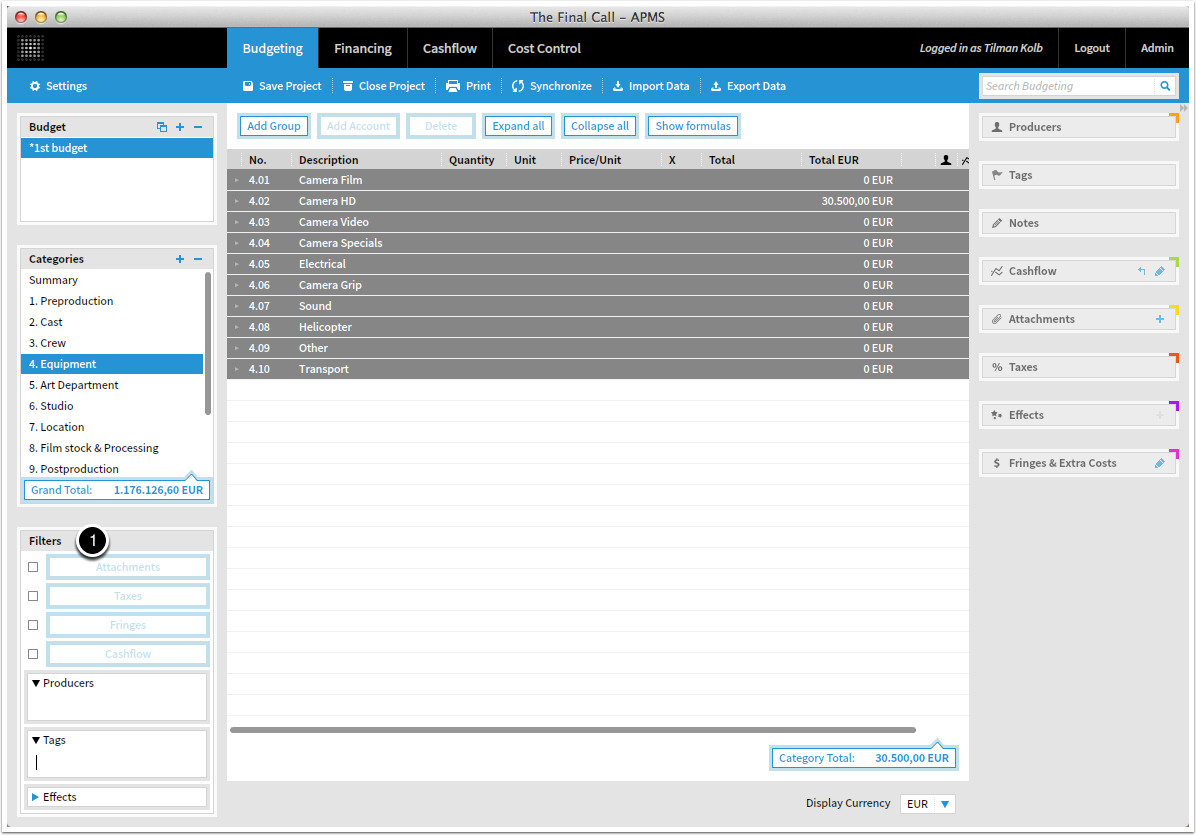
Check the sums
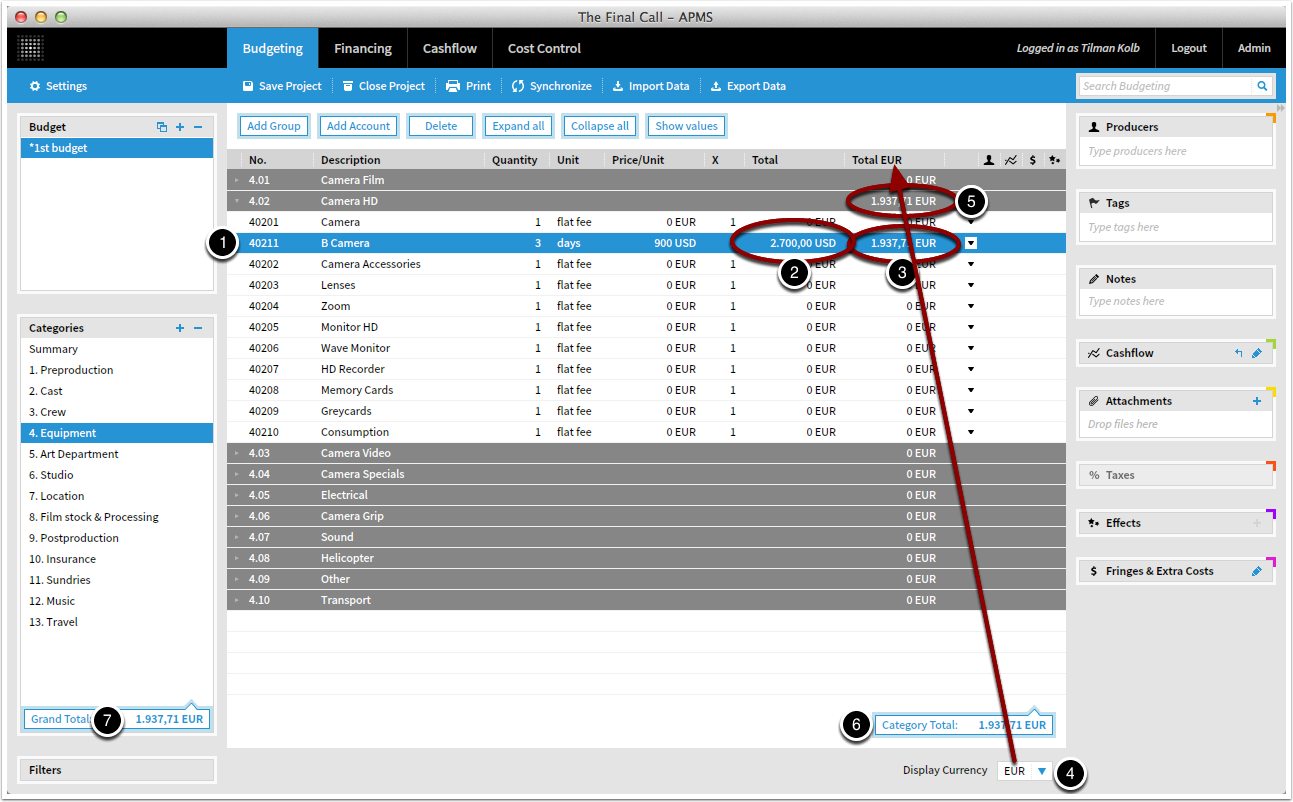
In this example, we budgeted 3 x $ 900 for our first budget item, account 40211 "B Camera" (1), which produces a total of $ 2.700 (2).
The second Total column (3) shows the amount in the display currency we select for our budget (4).
Please note that
- the sum of the group 4.02 "Camera HD" (5),
- the category total for "Equipment" (6) as well as
- the Grand Total (7)
update.
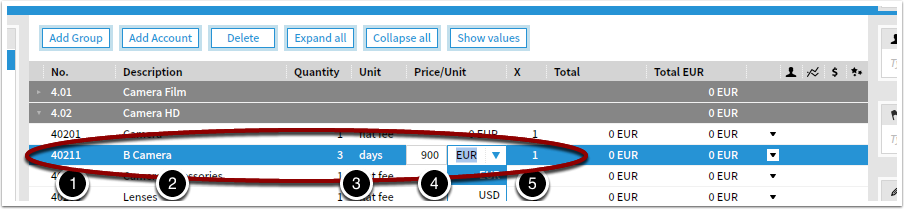
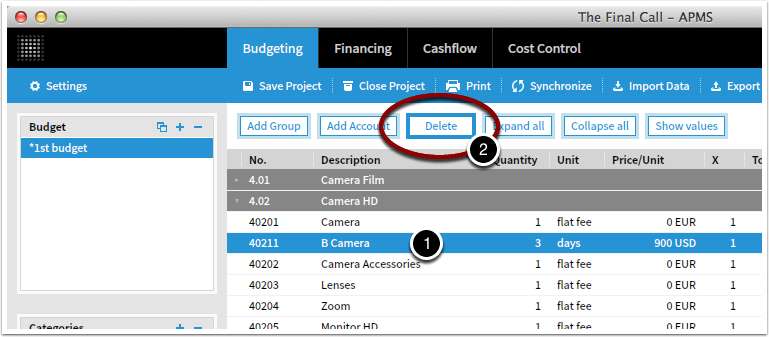
Delete an account
To delete an account, select it (1) and click "Delete" (2).
Working with subccounts
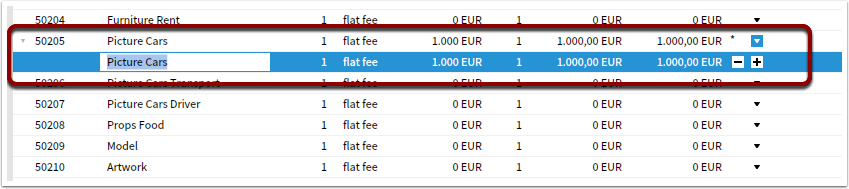


Sub-accounts
Subaccounts are mostly used to seperate working periods for a crew member or to create more sub-detail to an account.
To add a subaccount, click the small arrow.
A new sub-account shows up with the amount of the existing account.
Note that sub-accounts do not carry account numbers.
Edit sub-accounts like every other account.
Add or delete sub-items
Click + to add a new sub-account below.
Click - to delete a sub-account.
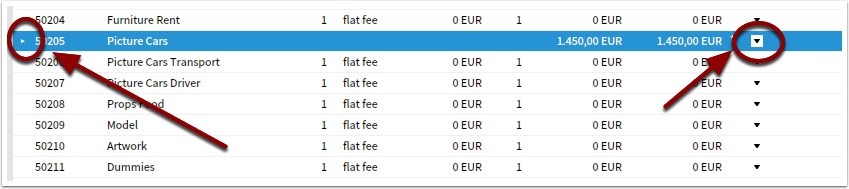
Collapse or expand accounts with sub-accounts for overview
The small arrow on the left identifies sub-accounts. Click this arrow or the arrow on the right to expand or collapse the list of sub-accounts.
Add additional charges, overhead, markups
Click Summary, then click Add Charge
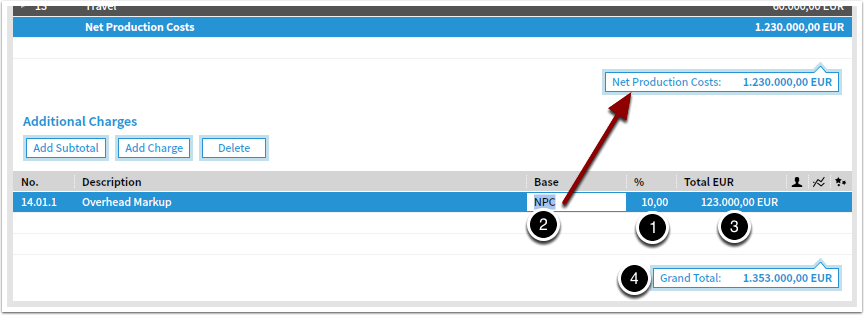
Click on Summary (1) in the navigation area to show the Additional Charges.
There, click Add Charge (2) to add a new additional charge like overhead, contingency or other markups.
Edit Additional Charges
You can change the description, base and percentage of your additional charge.
Base defines on which amount your charge is being calculated. Most likely you will use the built-in formula NPC to refer the Net Production Costs, but you can also refer subtotals, sums of tagged accounts or assigned producers. The same syntax applies as in budgeting.
In this example we want to have a 10% markup (1)
on net production costs of 1.23 mio € (2),
an amount of 123k €,
leading to a Grand Total of 1.353 mio € (3):
Other examples
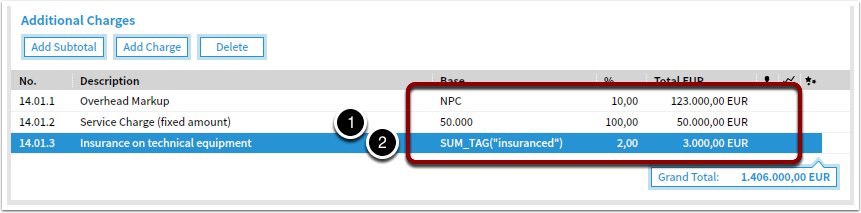
To add a fixed amount, set percentage to 100% and base to the desired amount (1)
You can also use formulas, e.g. to calculate a 2% technical insurance on all budget accounts with the tag "insuranced" (150.000), resulting in 3.000 €. (2)
Budgeting Macro Area
The panels in the macro area
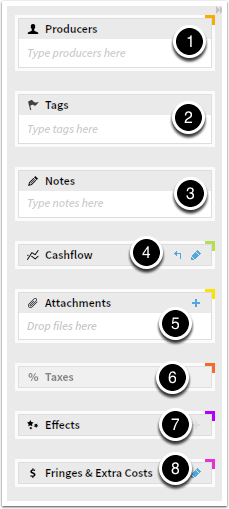
On the right-hand side of the budget you see what we call the "macro" area. Here you can add information to each of your accounts.
(1) Assign an account to a certain producer. This is helpful to divide costs between different producers. You can just type in this field and KOSMA will list the producers already entered. Later, when you print your budget you can display columns for each producer. You can also use producers in SUM and COUNT formulas in your accounts. This is the syntax: SUM_PROD("Producer") or COUNT_PROD("Producer"). You can manage producers in the settings.
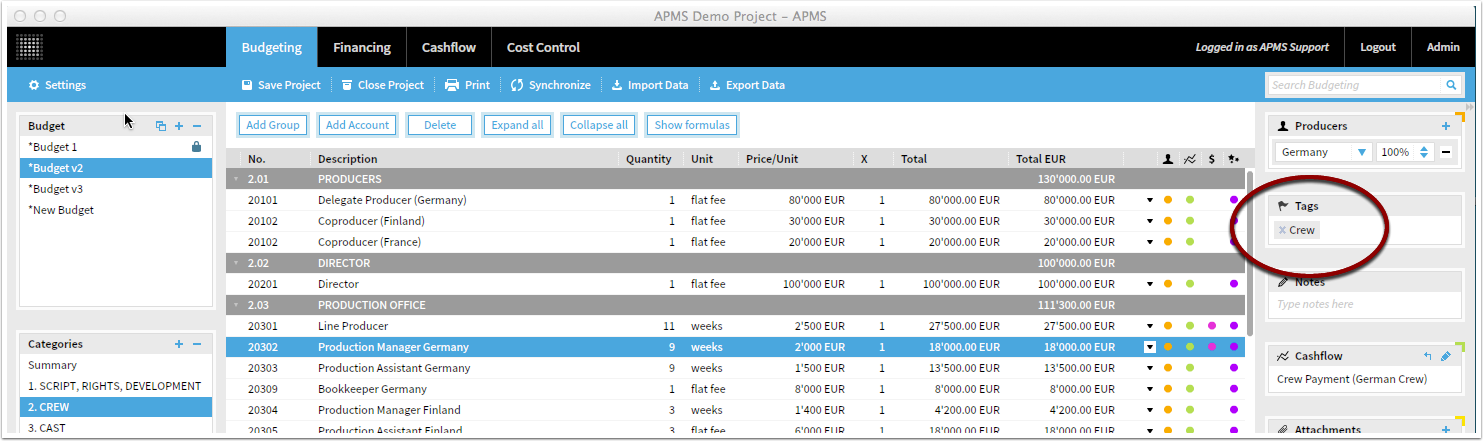
(2) Assign a tag to an account. You can use this for filtering purposes or to mark certain accounts you want to use in a formula calculation. Just type in any text and a tag is created from it. To use a tag in a calculation in an account, you can use either a SUM or a COUNT formula. This is the syntax: SUM_TAG("Tag") or COUNT_TAG("Tag"). You can manage tags in the settings.
(3) Simply add any kind of notes to an account
(4) Set the cashflow rule for an account (see Cashflow section for more info)
(5) Add attachments to your budget. The maximum size per attachment is 2MB.
(6) Add a tax to the account. Tax definitions are set up in the settings.
(7) Add a spending effect to the account. Effects are set up in the settings.
(8) Add fringes & extra costs to the account. Fringes & extra costs are set up in the settings.
Working with different currencies
Managing Currencies
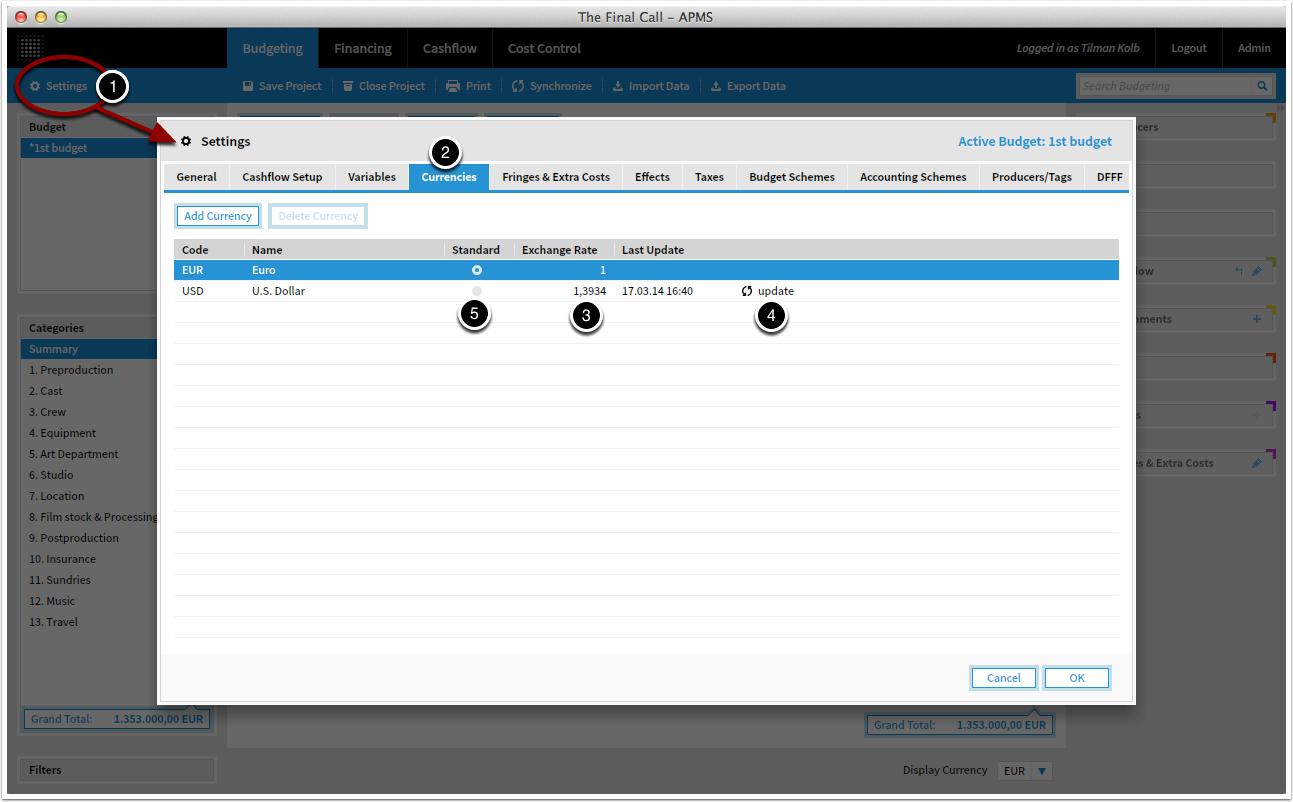
On the desired budget, click Settings (1)
Switch to Currencies tab (2)
Here you can edit the exchange rates (3) or update them online (4).
The standard currency (5) sets the base for the exchange rate.
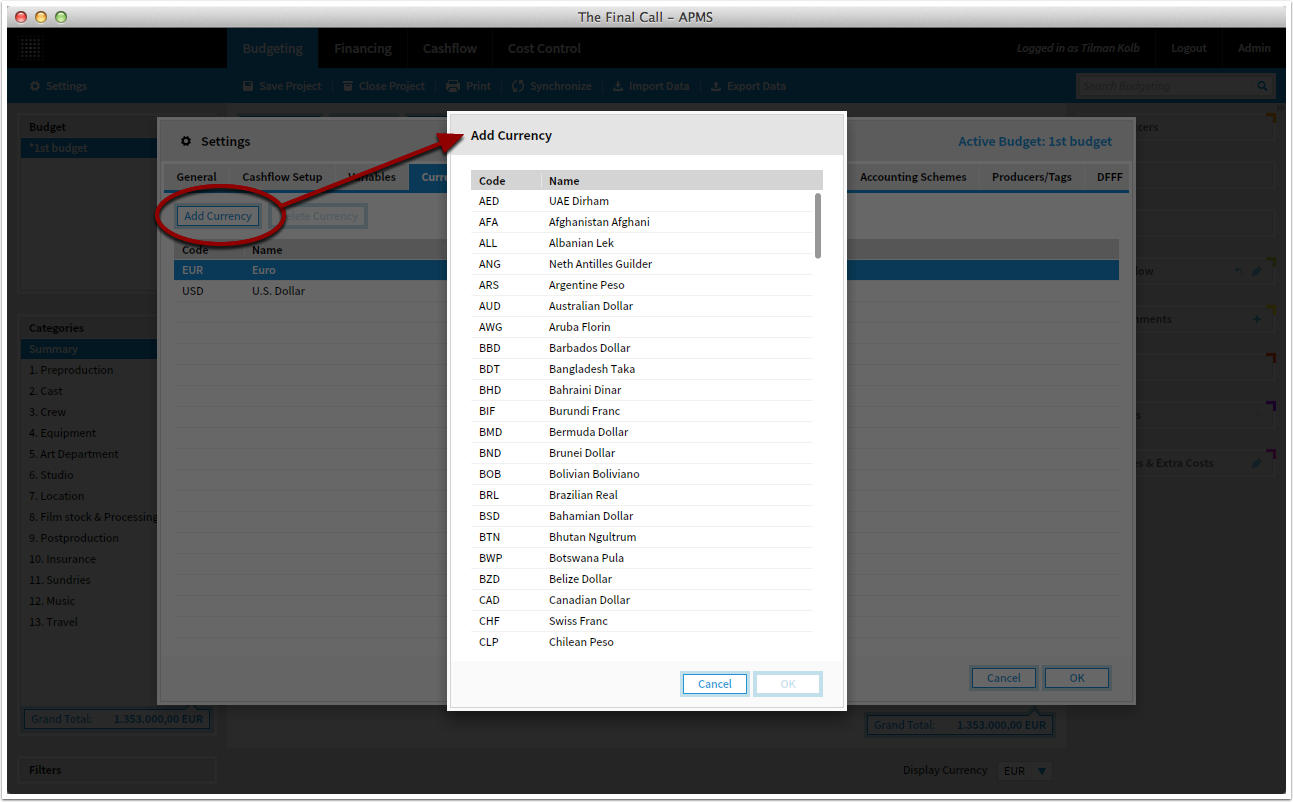
You can add every currency from the list.
Costs with different currencies
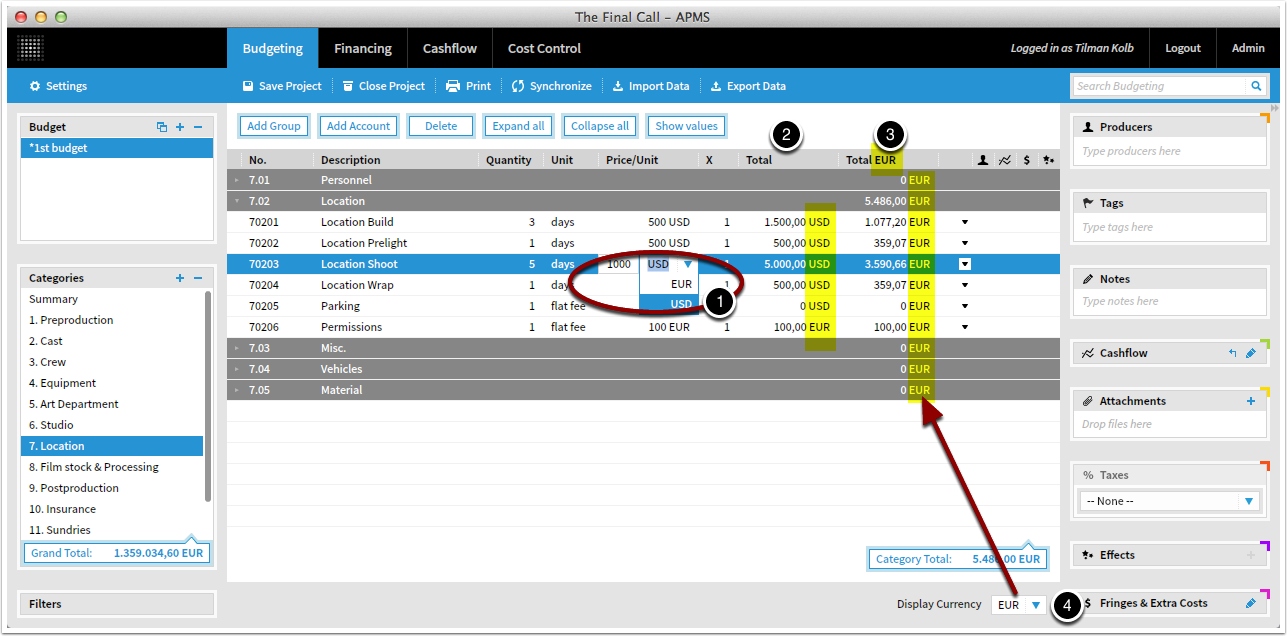
You can add a different currency to every account. (1)
The first Total column (2) always shows the amount in the account's currency. (2)
The second Total column (3) always shows the amount in the selected display currency. (4)
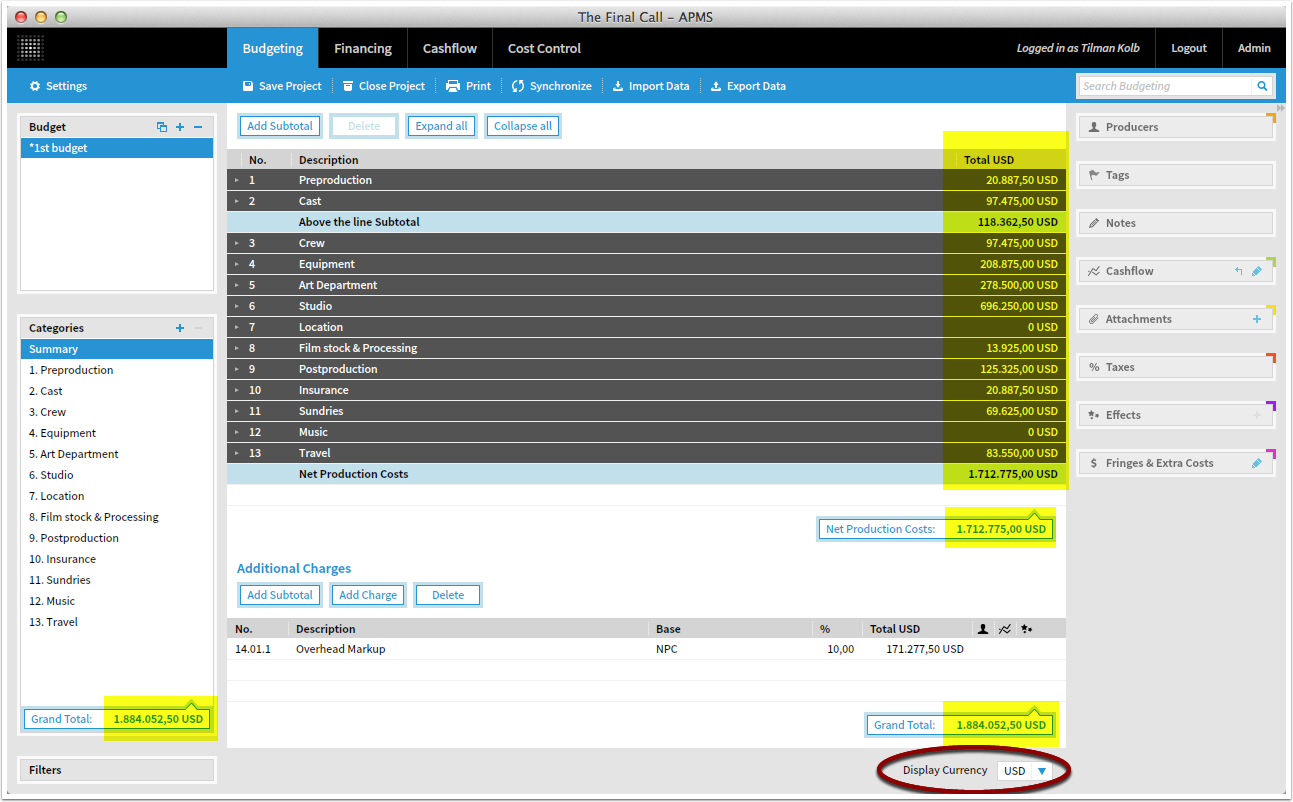
Switch display currency
You can change the currency in which the sums are displayed from the bottom of every screen.
Switching this does not affect the actual budget.
Switch currencies for printing
For every printout, you can choose the currency without changes in the budget.
There's also an option to print the exchange rates as an annex.
Assigning costs to producers

Working with different producers
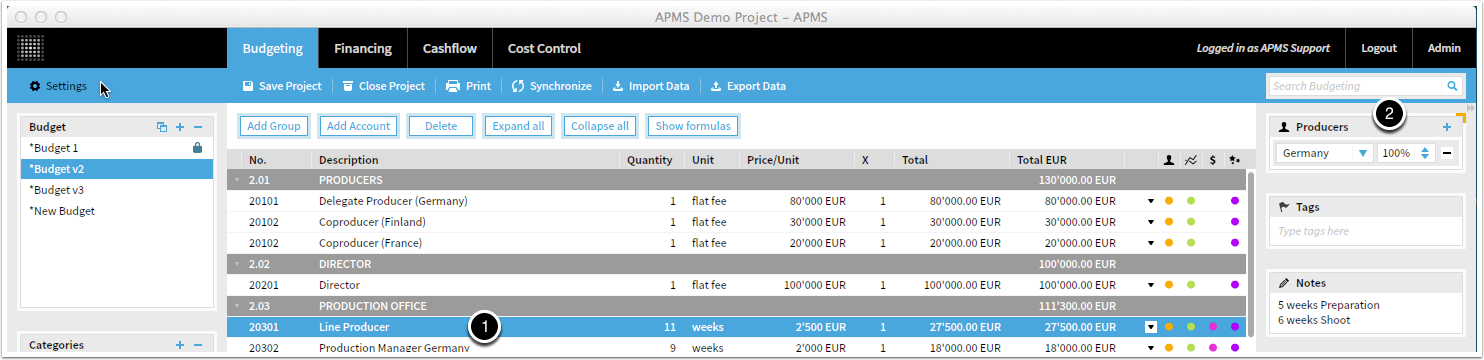
Use the macro panel to attribute the cost of an account to a certain producer. This will allow you to create prints with separated costs for each producer. It also allows you to perform calulations based on the spend of a certain producer.
Creating producers
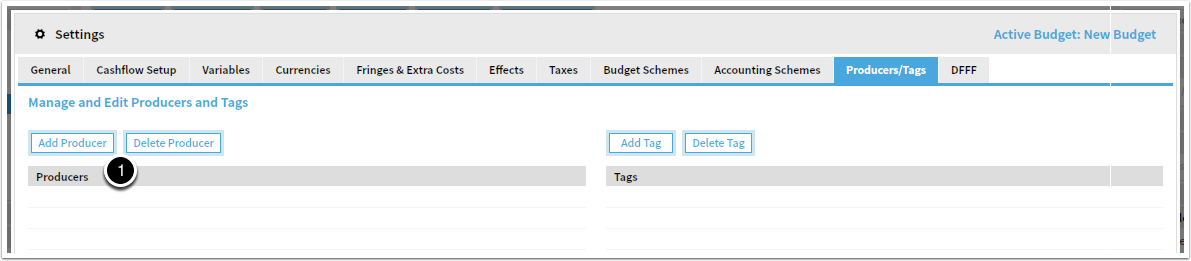
If the producer panel is greyed out and you cannot add any producers, you have not created any. Go to Settings->Producers/Tags.
(1) Create producers by pressing the Add Producer button.
Adding/deleting producers to an account
(1) Choose an account. If a producer has already been added, you will see his name and the percentage of the account cost attributed to him (2). You can add more than one producer by clicking the blue "+" or delete them by clicking the "-". The sum of all percentages cannot be higher than 100.
Print producer columns
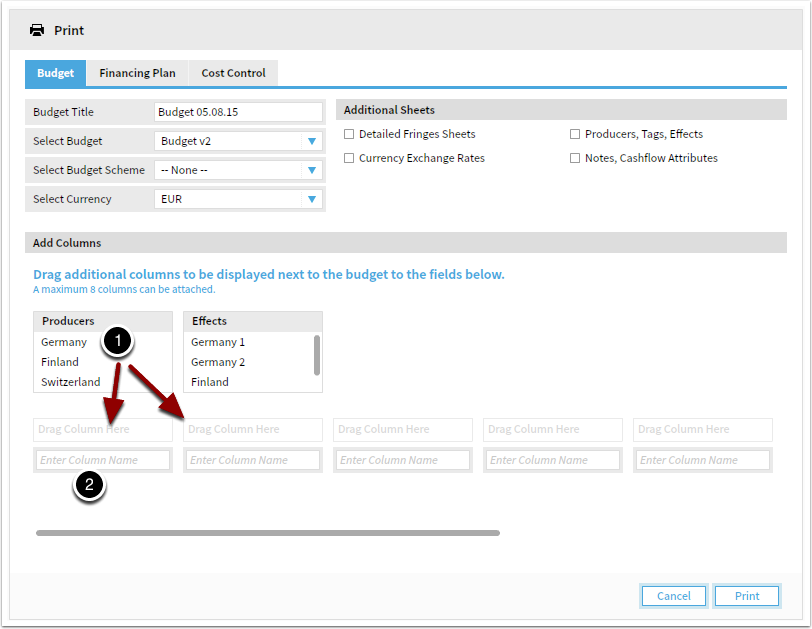
In the print window you can simply drag the producers down to the fields in the order you like (1). You can rename the columns to your needs (2).
Using producers in formulas
There are two types of formulas you can use producers with:
SUM_PROD("producername") will return the sum of all accounts attributed to this producer in the macro panels. This formula does not include producers attributed in ADDITIONAL CHARGES, such that, for example, you can calculate the contingency for a certain producer (1).
COUNT_PROD("producername") will return the number of appearances of a certain producer.
The same syntax is used for formulas with tags.
Formulas can be used in combination with all mathematical standard operations: +, -, /, *
You can use formulas in the quantity and price/unit fields in Budgeting, as well as the base field in additional charges.
Working with tags

Working with Tags
Use the Tags macro panel to attach tags to an account. This allows you to perform calculations by using the tags in formulas or to create custom filters.
To add a tag to an account, just select an account, click in the tag panel and type. To delete it from the panel, click the "x" to the left of the tag.
Managing tags
To delete tags from the list of created tags go to Settings->Producers/Tags.
Using tags in formulas
You can use tags in two ways:
COUNT_TAG("tagname") returns the number of appearances of this tag. Use this formula to count the number of crew members from a certain country that generate visa costs for example.
SUM_TAG("tagname") returns the sum of all accounts with this tag. Use this formula to calculate markups on certain elements for example.
Formulas can be used in combination with all mathematical standard operations: +, -, /, *
You can use formulas in the quantity and price/unit fields in Budgeting, as well as the base field in additional charges.
Working with variables and formulas


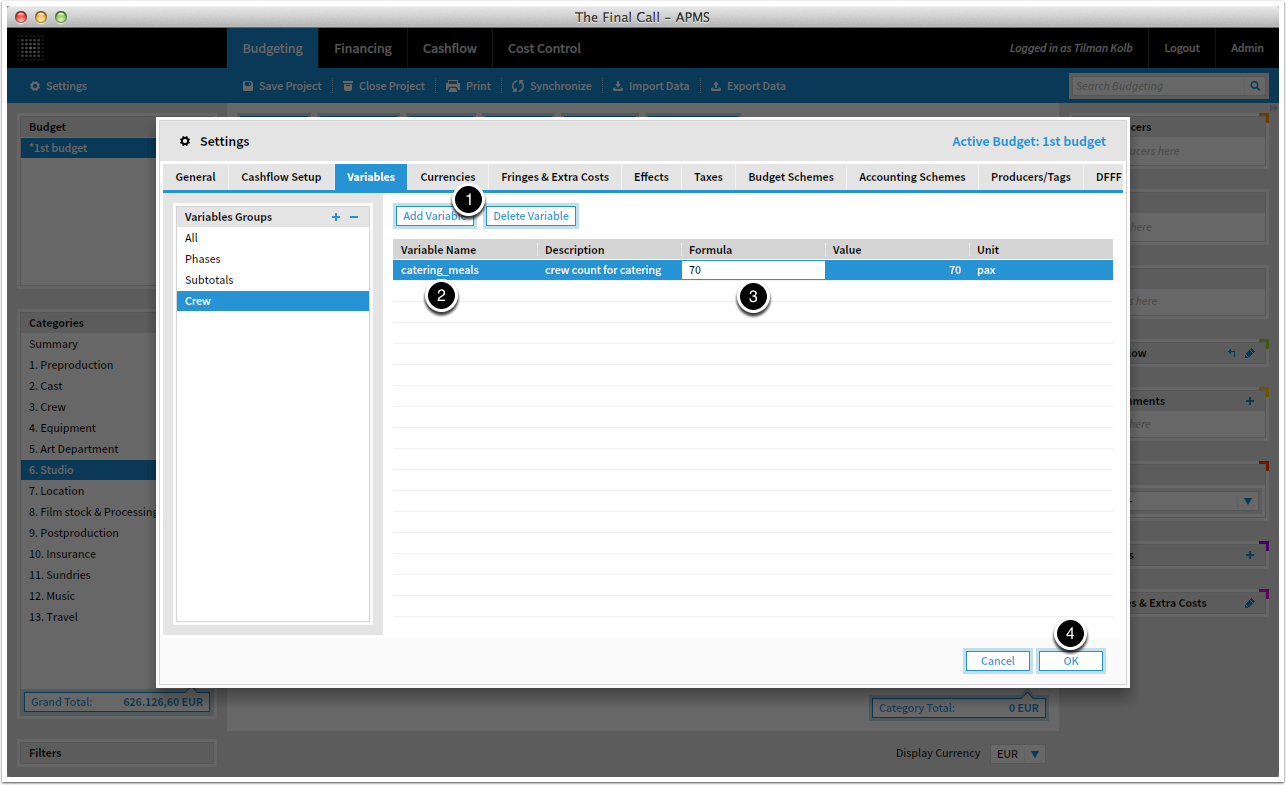
See what variables are available
You can manage all variables from the variables tab (2) in Settings (1).
Some predefined variables are available:
NPC for Net Production Costs
GT for Grand Total
DFFF for the DFFF total value (DFFF is a fund in Germany that requires intricate calculations).
All phases that are set up in Cashflow Setup auto-create two variables: one for the number of days and another one for the number of workdays. (4)
Add custom variable
To create a new variable, first create another group by clicking "+"
Then create your variable by clicking "Add variable" and define the reference name (2) and the value (3). Hit enter to save and click Ok (4) to leave.
You can reference other variables in the formula and use all standard mathematical operations like +, -, * and /.
If you change the value of a variable here, it will affect all parts of the budget were it is used.
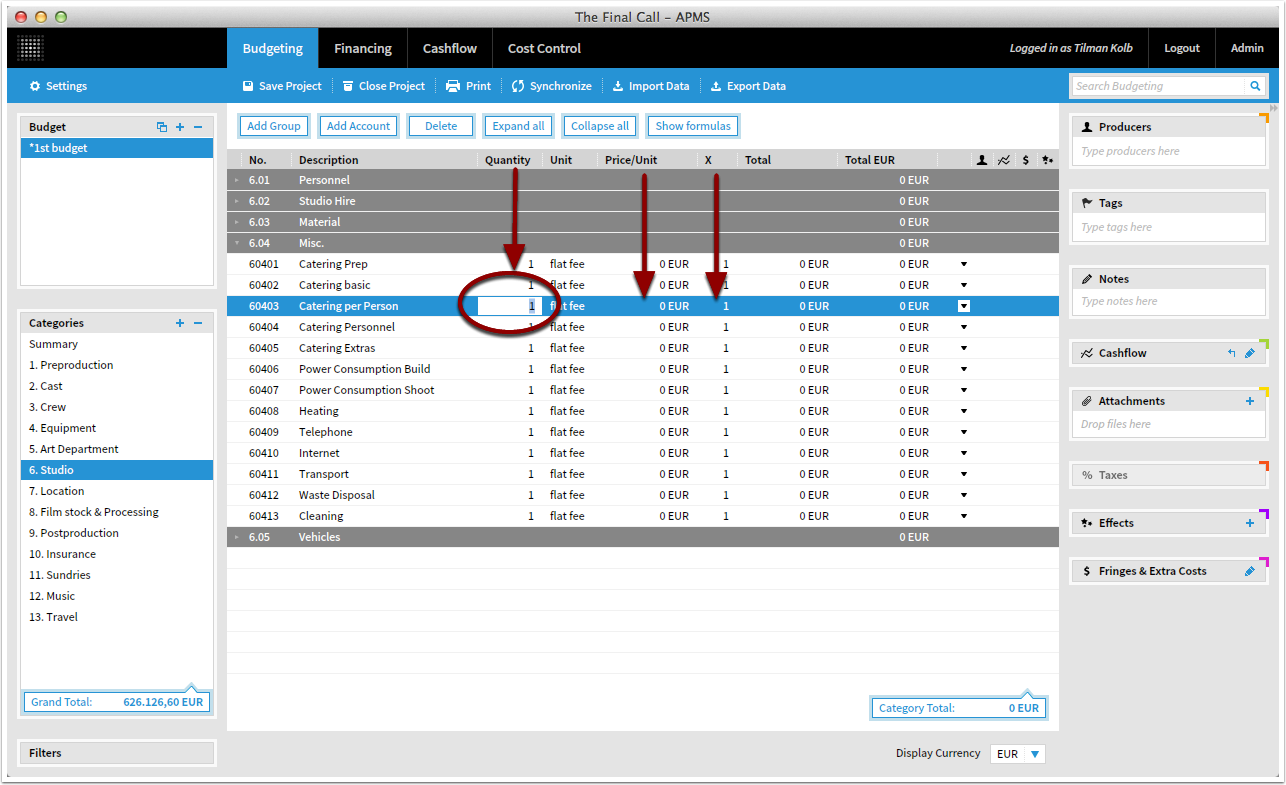
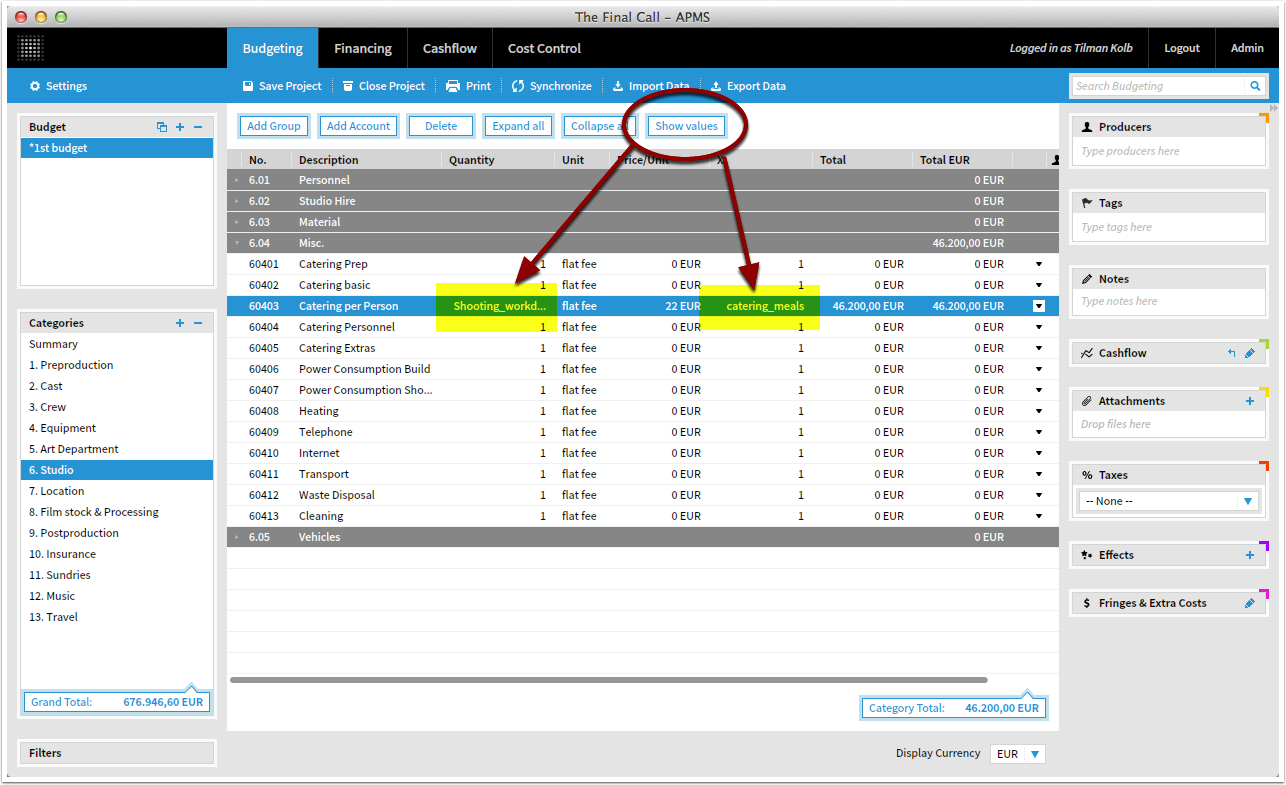
Using variables and formulas
All numeric fields (quantity, price, X) allow the use of formulas.
Formulas include the standard mathematical operations like addition, deduction, multiplication and division (+, -, *, /).
Additionally, formulas may include variables and expressions for tags and producers added to the accounts.
Formulas and variables can be used in Budgeting as well as in Financing.
Variables:
Let's say you have defined a variable "SD" (=Shooting Days). To use it in a formula, just type in the variable name, i.e. SD/5.
Tags & producers:
With tags and producers there are two ways to include them. Either you want to count the number of instances a certain tag (or producer) appears in your budget, or you want to sum up all accounts that have a certain tag (or producer).
This is how you do it:
SUM_PROD("producer") will return the sum of all accounts with this producer
COUNT_PROD("producer") will return the number of accounts with this producer
SUM_TAG("tag") will return the sum of all accounts with this tag
COUNT_TAG("tag") will return the number of accounts with this tag
Example 1: Let's say you want to count the number of people in your crew and have marked all corresponding accounts with a tag "Crew". You are planning to give everybody a gift of 30$. You can type:
COUNT_TAG("Crew")*30
Accounts:
You can also reference another account in a formula:
ACCOUNT("account_number")
Example: You want to add two accounts. Type: ACCOUNT("10101")+ACCOUNT("10102")
Show values or formulas in budget
You can toggle values or formulas with the button "Show values" / "Show formulas".
Formula syntax
Syntax
All numeric fields (quantity, price, factor) allow the use of formulas.
Formulas include the standard mathematical operations like addition, deduction, multiplication and division.
Additionally, formulas may include variables and expressions for tags and producers added to the accounts.
Formulas and variables can be used in Budgeting as well as in Financing.
Variables:
Let's say you have defined a variable "SD" (=Shooting Days). To use it in a formula, just type in the variable name, e.g. SD/5.
Tags & producers:
With tags and producers there are two ways to include them. Either you want to count the number of instances a certain tag (or producer) appears in your budget, or you want to sum up all accounts that have a certain tag (or producer).
This is how you do it:
SUM_PROD("producer") will return the sum of all accounts with this producer
COUNT_PROD("producer") will return the number of accounts with this producer
SUM_TAG("tag") will return the sum of all accounts with this tag
COUNT_TAG("tag") will return the number of accounts with this tag
Example 1: Let's say you want to count the number of people in your crew and have marked all corresponding accounts with a tag "Crew". You are planning to give everybody a gift of 30$. You can type:
COUNT_TAG("Crew")*30
Accounts:
You can also reference another account in a formula:
ACCOUNT("account_number")
Example: You want to add two accounts. Type: ACCOUNT("10101")+ACCOUNT("10102")
Working with spending effects

Set up effects from Settings
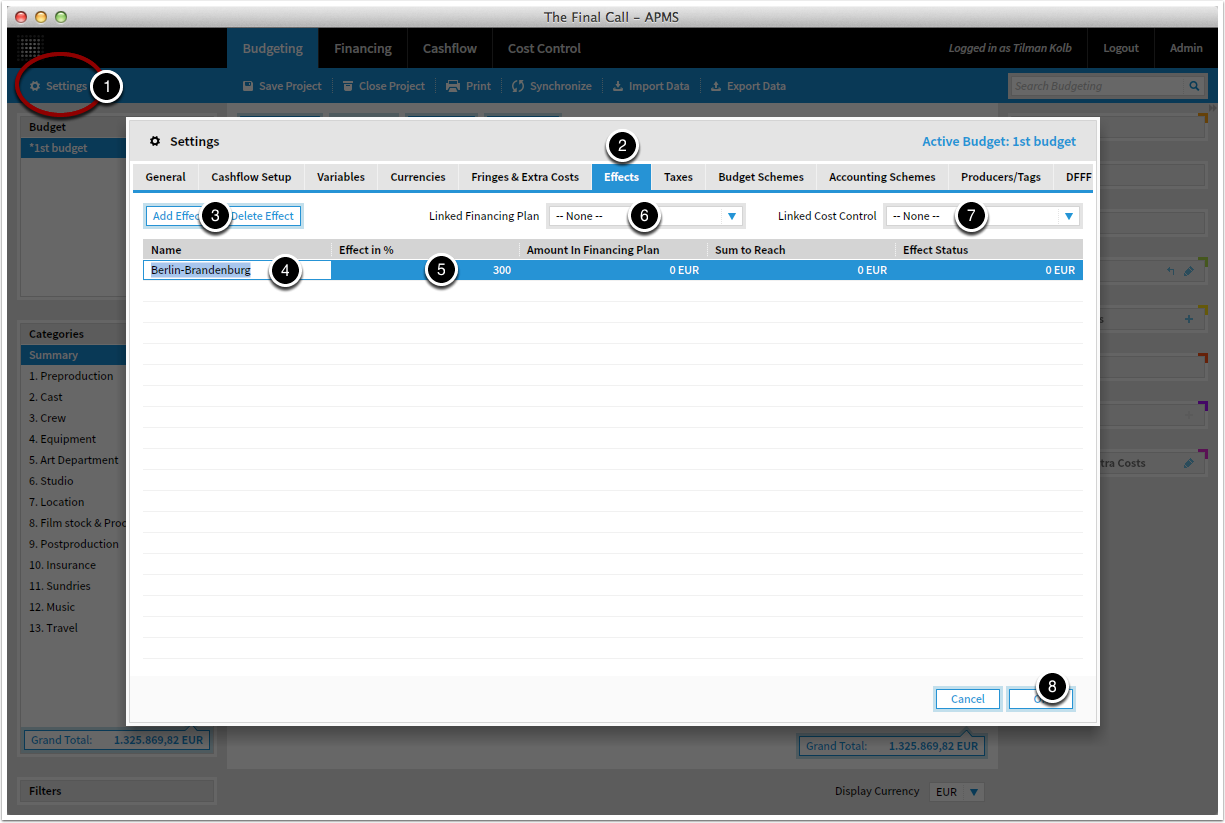
Go to to Settings (1) and switch to the effects tab (2).
Add and delete new spending effects. (3)
Specify the name (4) and the percentage of the spending effect you need to reach (5).
Link a financing plan (6). If there is a financing source linked to the defined effect, you will then see the "Amount in Financing Plan", "Sum to Reach" and "Effect Status".
You can also link a cost control set (7). If you do this, KOSMA will use the values from the chosen cost control set instead of the budget.
To leave this window, click Ok. (8)
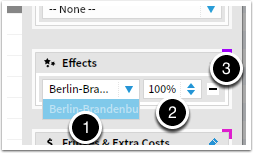
Assign a spending effect to an account
In your budget, select the account (or several accounts by pressing shift or ctrl) to which you want to assign an effect. (1)
Click the small "+" next to Effects in the macro area. (2)
Choose effect and a percentage
Select the effect (1) and type in the percentage of the account total that qualifies for this effect (2).
You can set more than one effect to an account.
Click "-" to remove an effect.
To view the effect status either go to Settings->Effects or filter your budget for a certain effect (the filter tab is on the bottom left of the window).
Working with fringes
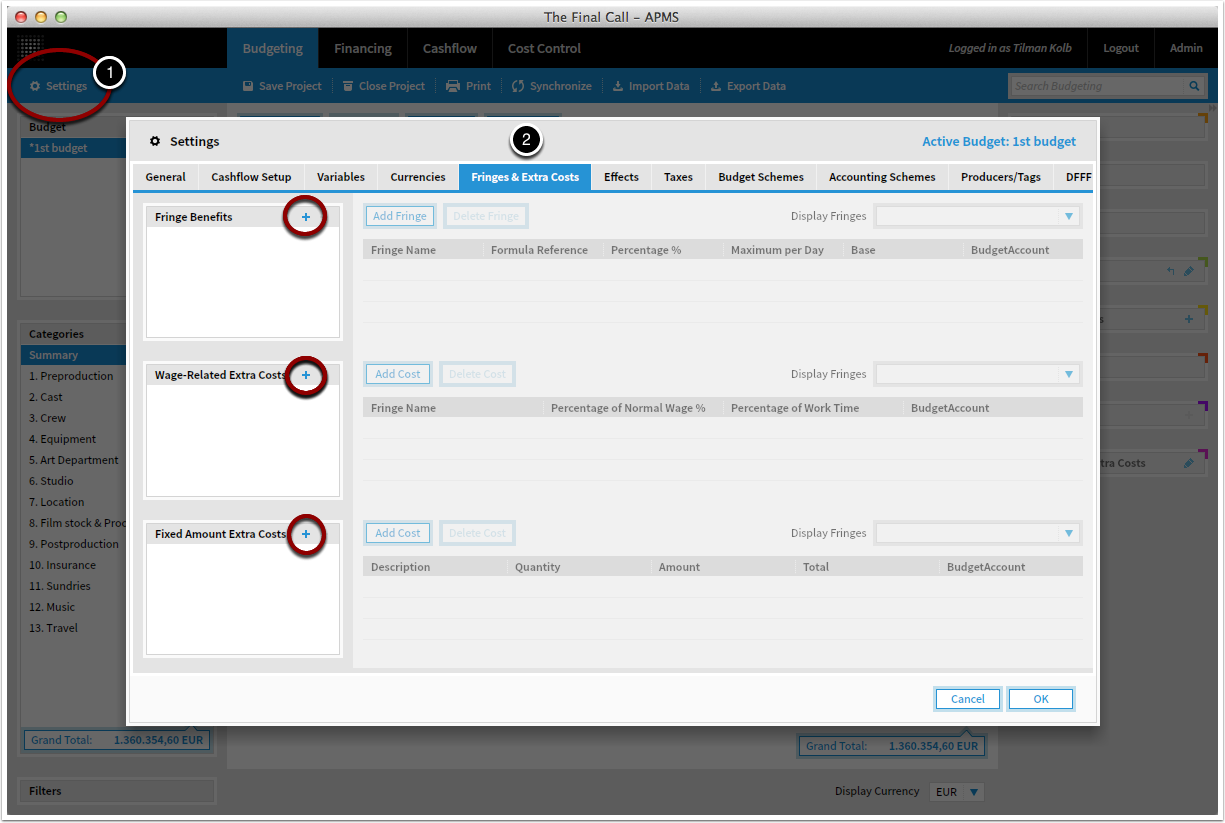
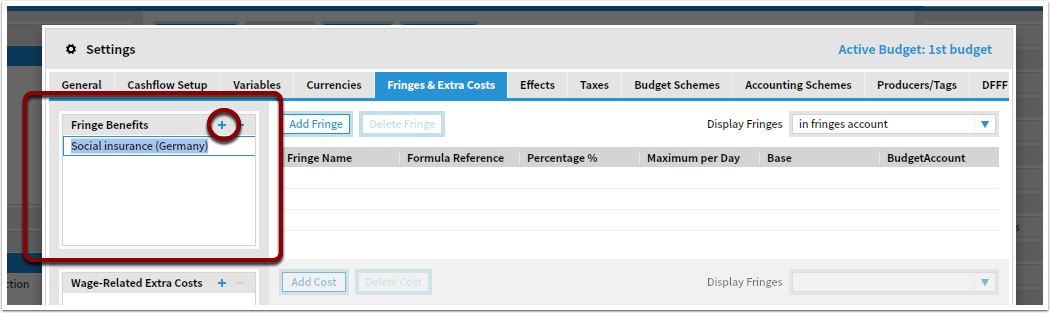
Add and manage fringes
To manage fringes, go to Fringes & Extra costs tab in Settings
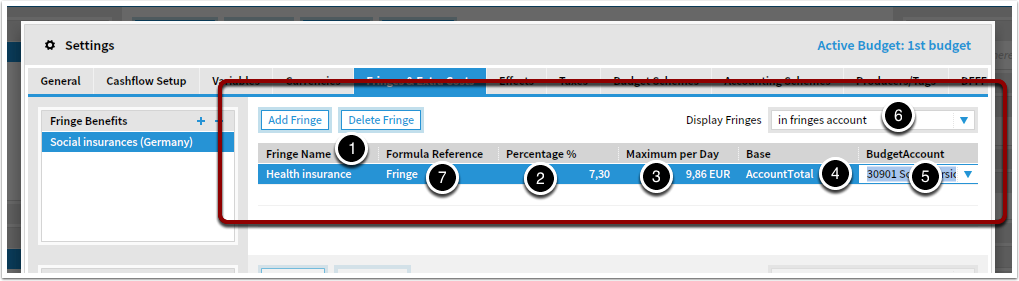
Set up fringe benefits
First, create a group / set that will hold the fringes.
Set up fringe benefits
Then, please specify:
- a name for the fringe (1)
- the percentage (2)
- a maximum amount per day if applicable (3)
- the base* on which the fringe is calculated on (4)
- plus the budget account for the fringe (5)
Note that the budget account must be specified. Otherwise your fringes will remain 0.
Select where your fringes should be displayed in the budget (6). If you choose "in account they belong to" fringes will be shown in italic below the respective account. Note that this is just a display option. The data will still be stored in the specified fringe budget account.
* Usually, the fringe will be calculated on the account total, but you can change the base using the formula reference (7). Default value in Base (4) is always "AccountTotal". Add or substract the formula reference to change the base, i.e. "AccountTotal+Fringe".

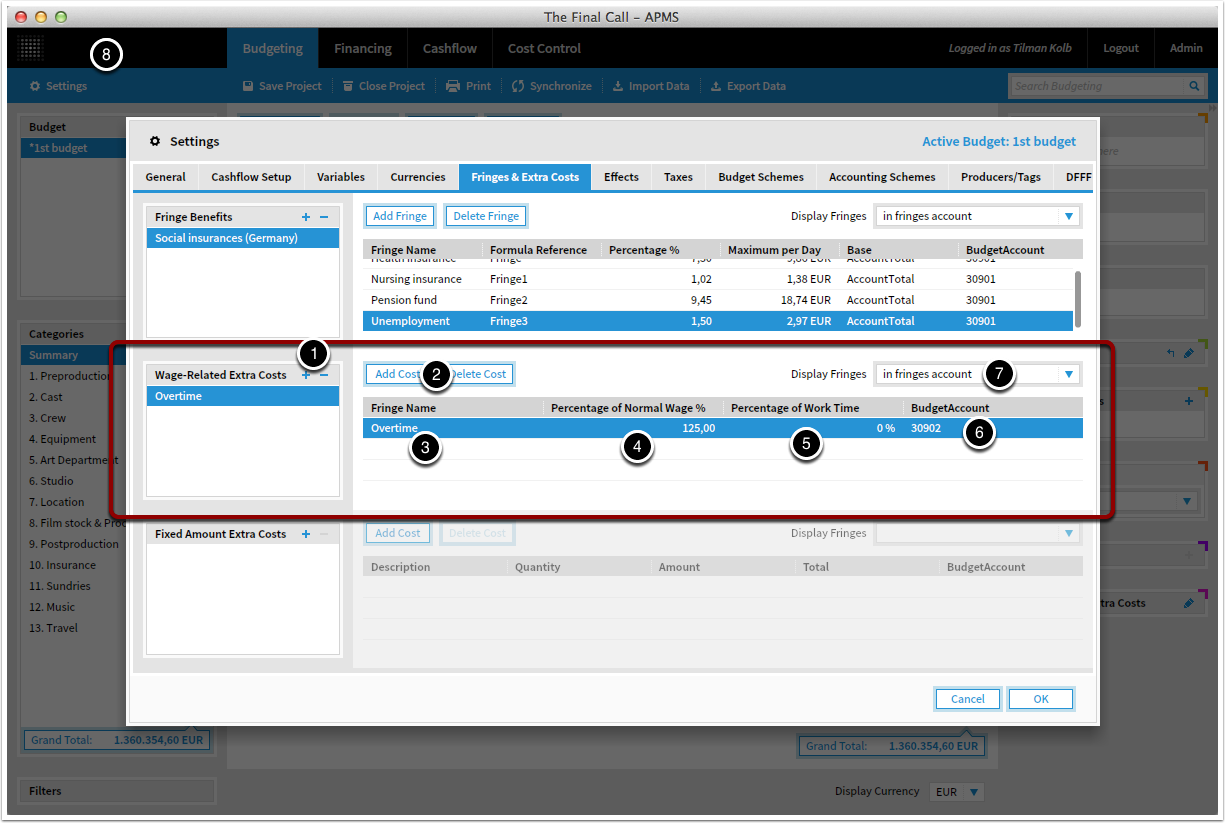
Set up wage-related Extra Costs
Add or delete a new group with "+" and "-". (1)
Add or delete single fringes with the buttons (2)
Please specify:
- a name for this wage-related extra cost (3),
- the value of the wage-related extra cost in % (4) (For a 25% surcharge on every overtime hour type "125%")
- and on what percentage of work time the fringe does apply. (For 2 hours of daily overtime on a 10 hour workday, type "20%")
- the budget account for that fringe (6)
Note that the budget account must be specified. Otherwise your fringes will remain 0.
Select where your fringes should be displayed in the budget (7). If you choose "in account they belong to" fringes will be shown in italic below the respective account. Note that this is just a display option. The data will still be stored in the specified fringe budget account.
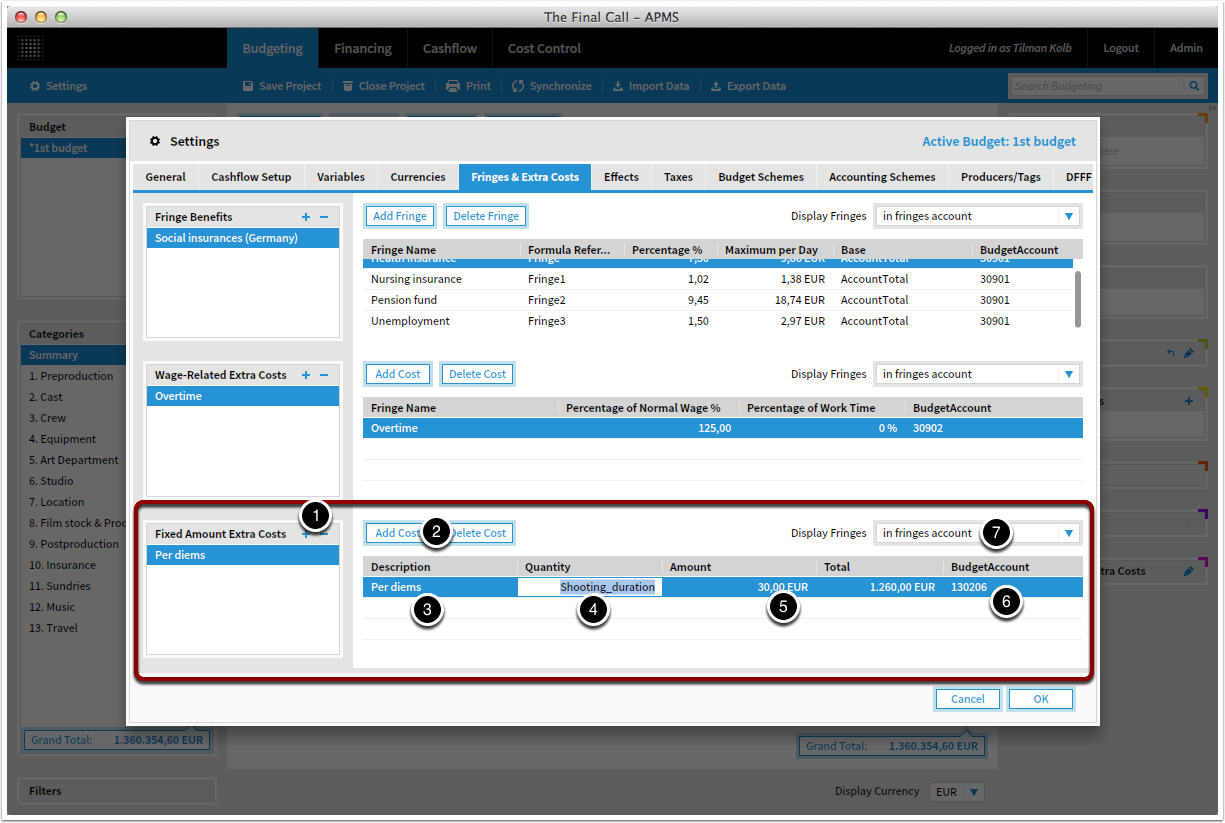
Set up Fixed Amount Extra Costs
Add or delete a new group with "+" and "-". (1)
Add or delete single fringes with the buttons (2)
Please specify:
- a name for this fixed amount extra cost (3),
- the quantity of this extra cost as number or using a variable (4) (eg. number of per diem days or hotel nights.)
- as well as the price (5)
- the budget account for that fringe (6)
Note that the budget account must be specified. Otherwise your fringes will remain 0.
Select where your fringes should be displayed in the budget (7). If you choose "in account they belong to" fringes will be shown in italic below the respective account. Note that this is just a display option. The data will still be stored in the specified fringe budget account.
Working with taxes
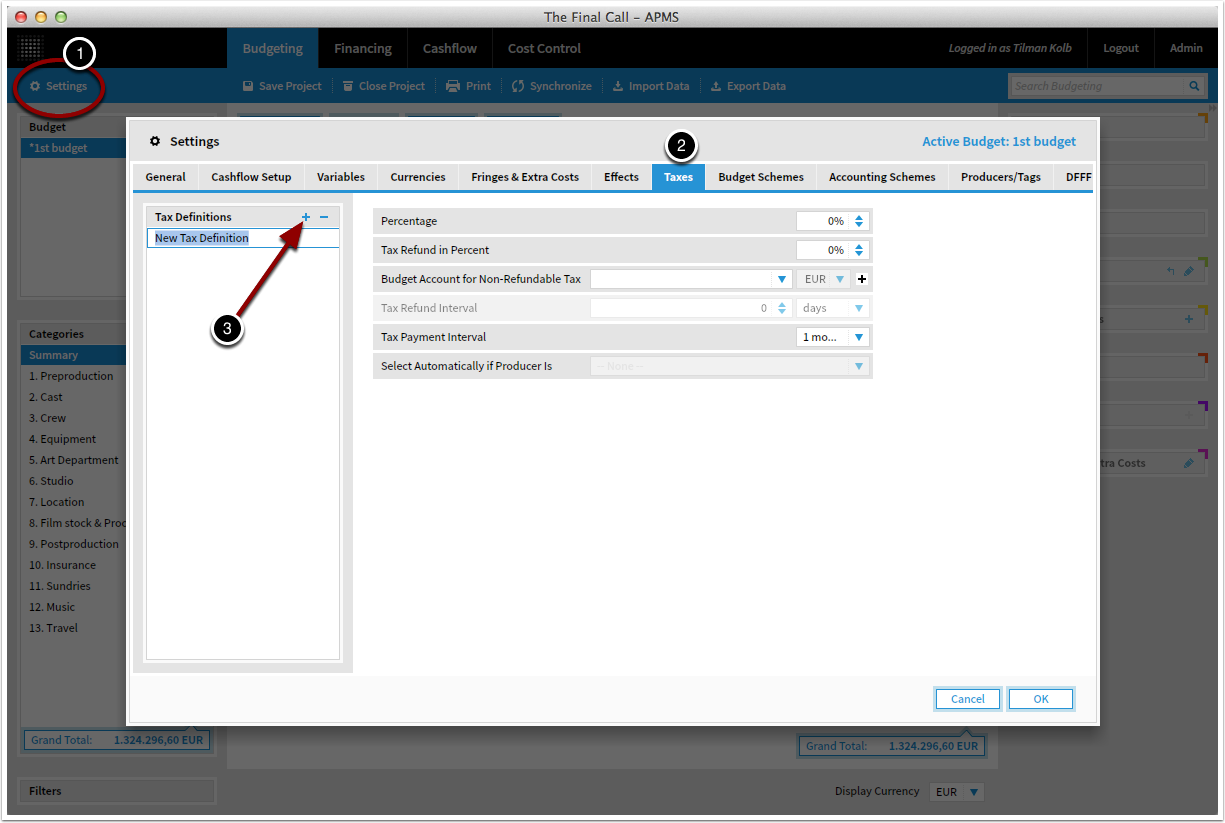
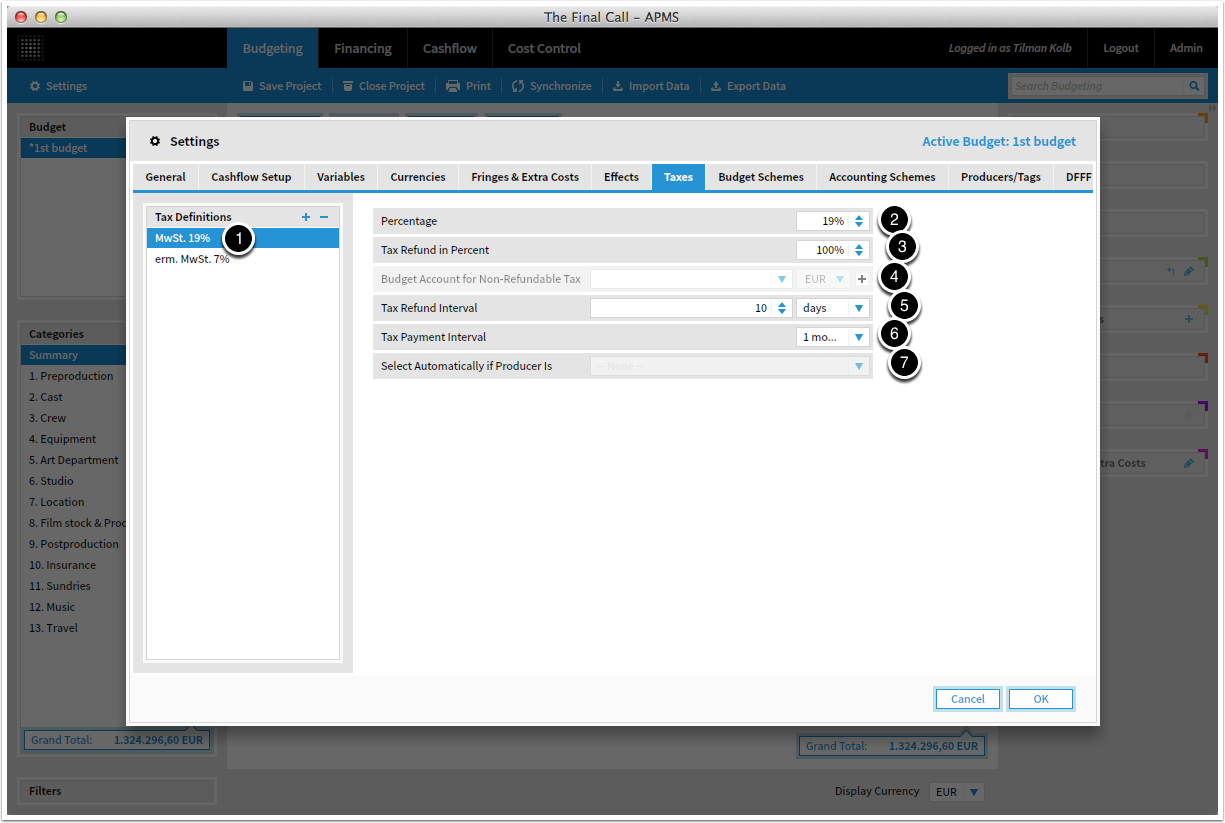
Manage taxes
Set up taxes by clicking Settings (1), switching to the Taxes tab (2) and clicking the small "+" (3).
Define taxes
The description (1) should help you to choose taxes when budgeting.
Percentage (2) is the tax percentage
Tax Refund in Percent (3) means how much of the tax can be refunded. In most countries this is 100%.
If parts of the tax are non-refundable, you can specify the budget account where these costs are budgeted. (4)
In (5) and (6) you can specify the intervals for tax payment and tax refund. These intervals are important for the cashflow.
If you are using producers in your budget, you can choose to set taxes automatically to all their costs (7)
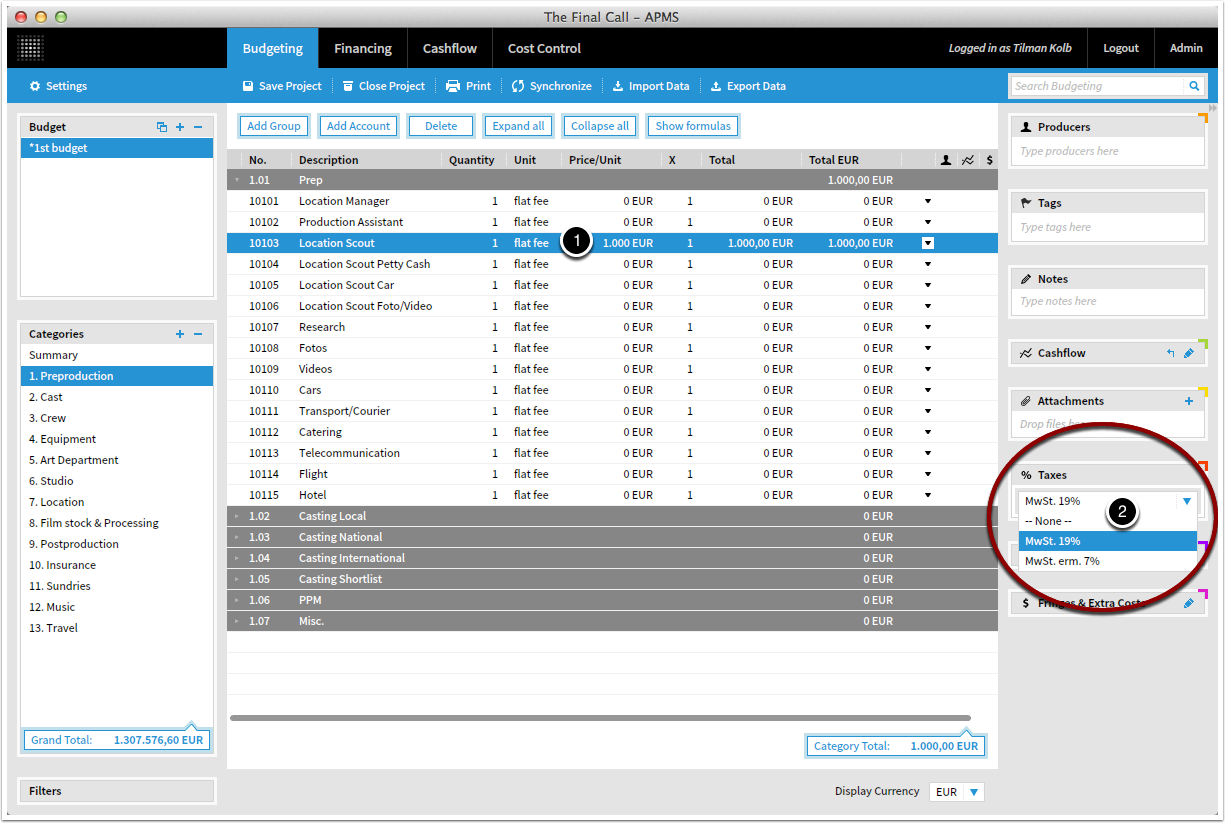
Assign taxes
To assign taxes to an account, select it (1) and then choose a tax from the macro area (2).
Working with budget schemes
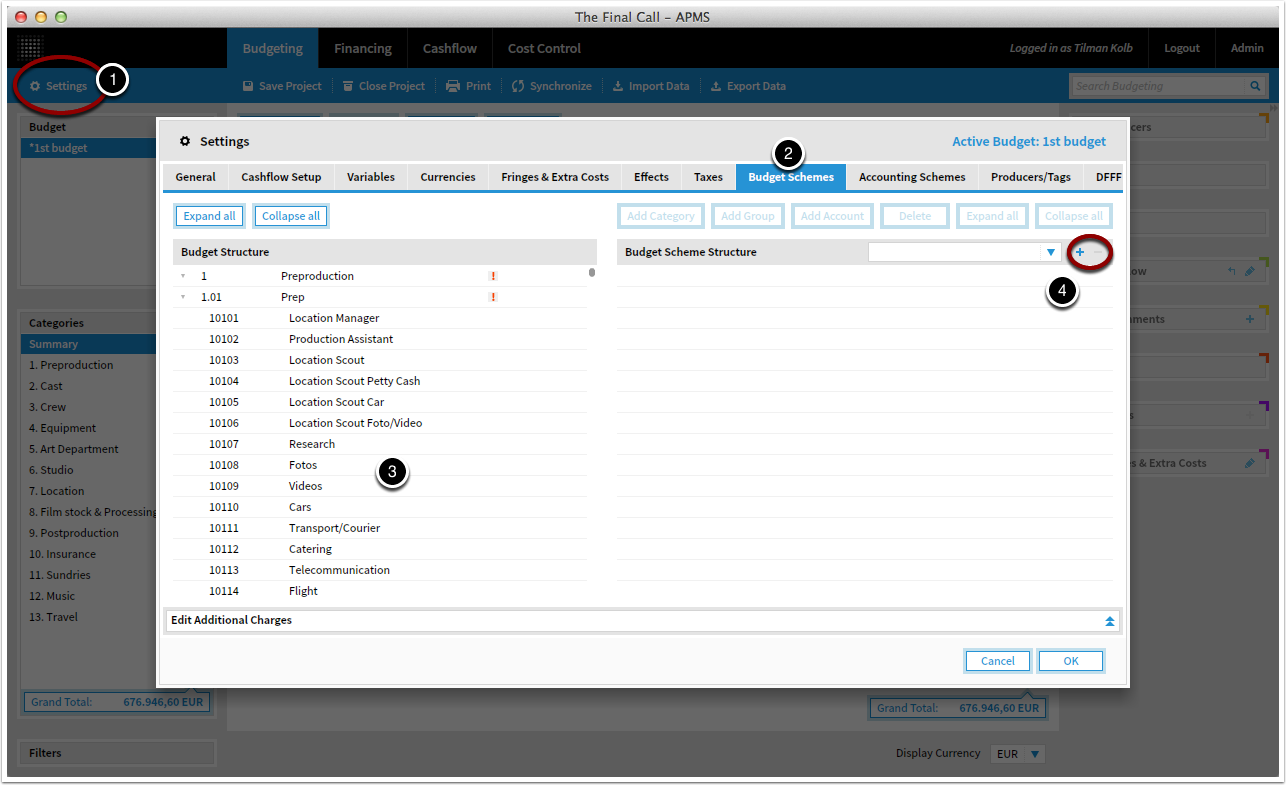

Managing budget schemes
Budget schemes can be used for printing the budget in another structure than it was created. This is useful in coproductions when you need to apply a different structure for the budget.
Budget schemes have to be set up manually.
You can manage budget schemes from the tab (2) at Settings (1).
On the left side you see the structure of your budget at KOSMA. (3)
On the right you can add, delete and edit your budget schemes. (4) Click "+" to create one.
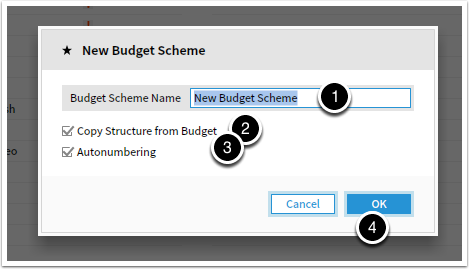
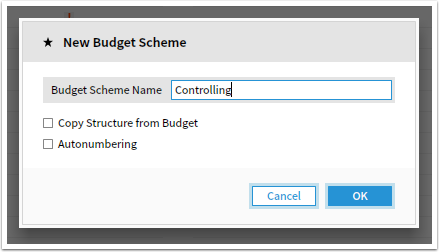
Adding a bugdet scheme
Type in a name for your new budget scheme (1).
Choose if you want to build a budget scheme from scratch or if you want to start with the KOSMA structure (2) and autonumbering (3).
Click Ok. (4)
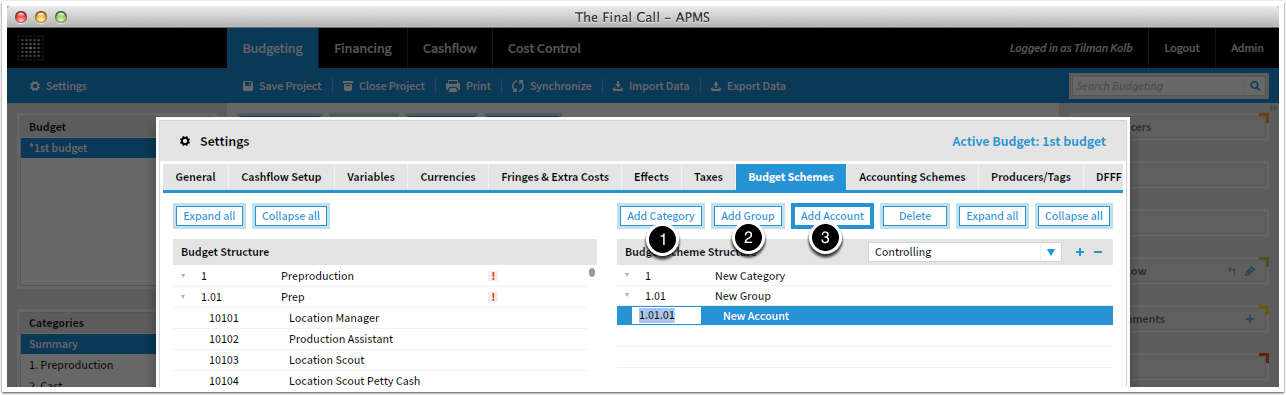
Example
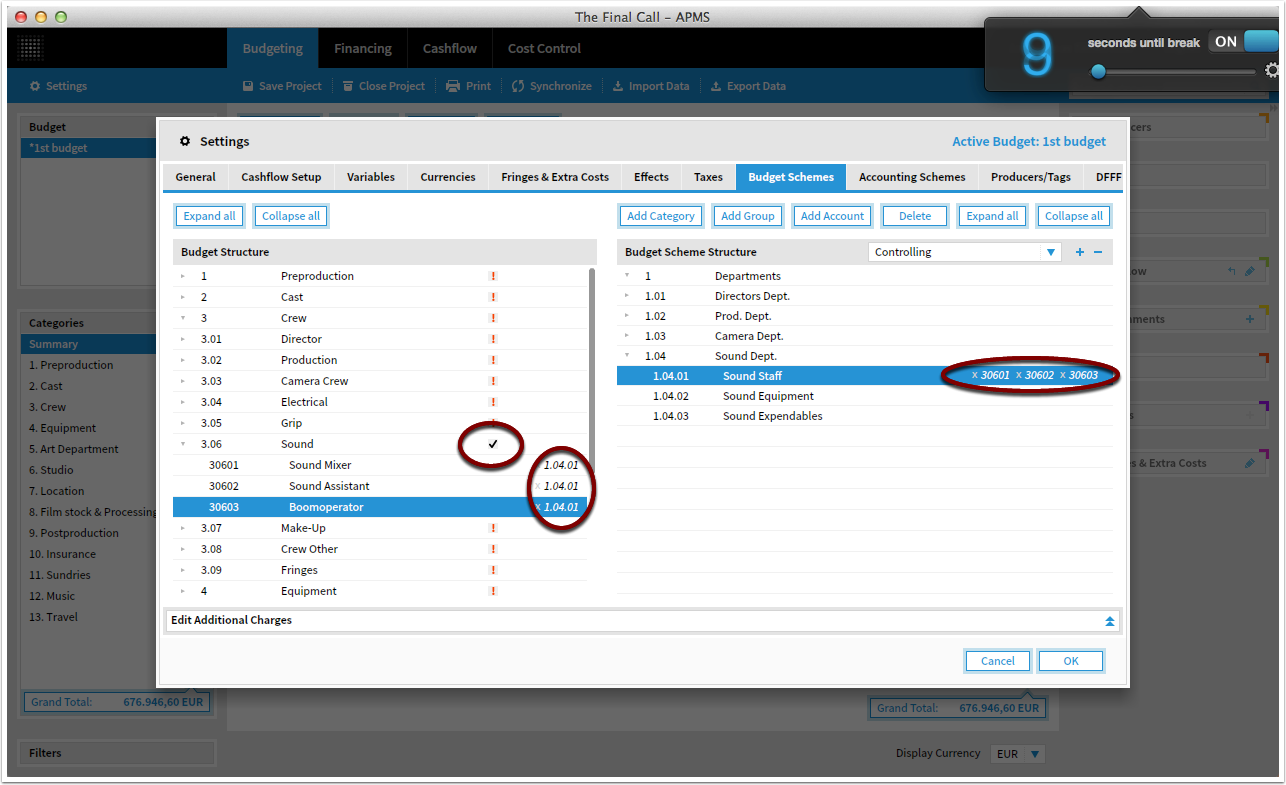
For example, we want to create a very simple structure and start from scratch.
Example
Start building your budget scheme by adding categories (1), groups (2) and accounts (3).
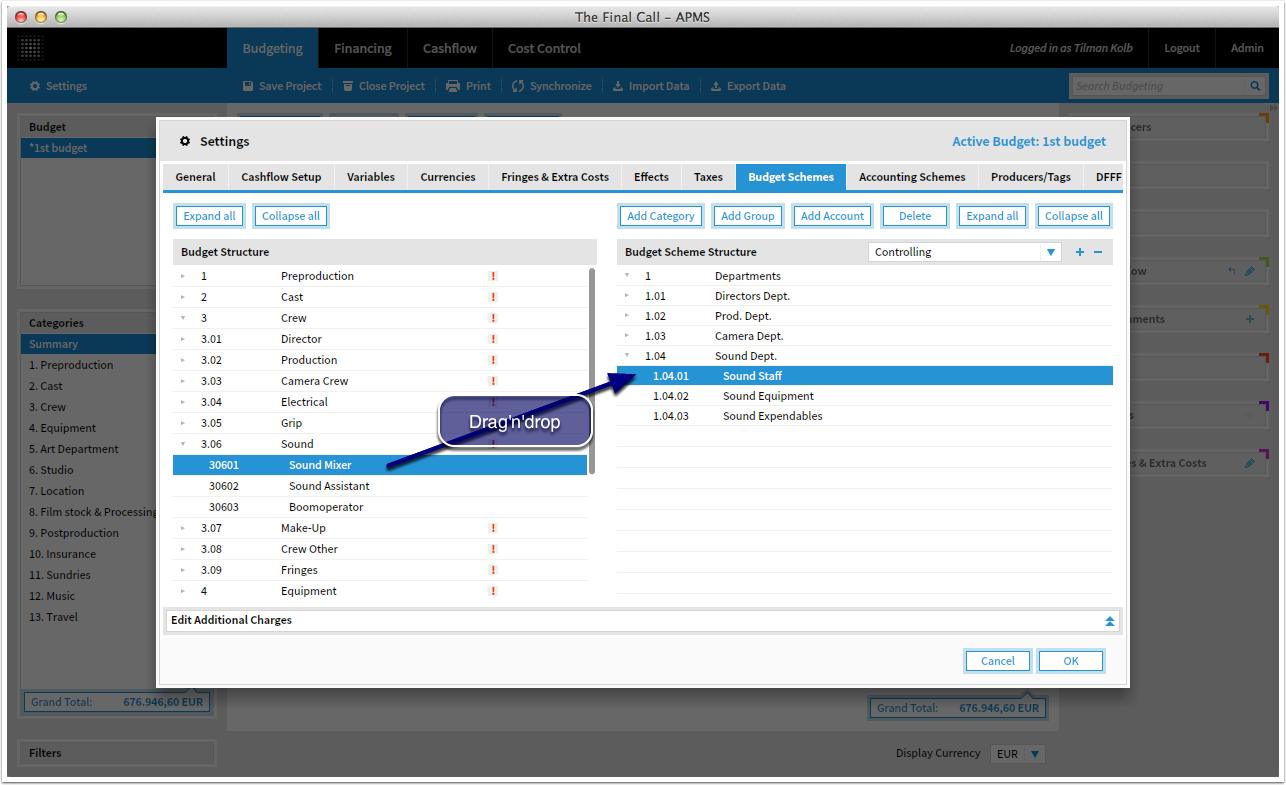
Example
When you have created the structure you need, match accounts per drag'n'drop.
Simply click and hold an account on the left side and move it onto another account on the right side.
(Note: This process cannot be automated because KOSMA uses flexible budget structures that can be changed by the user.)
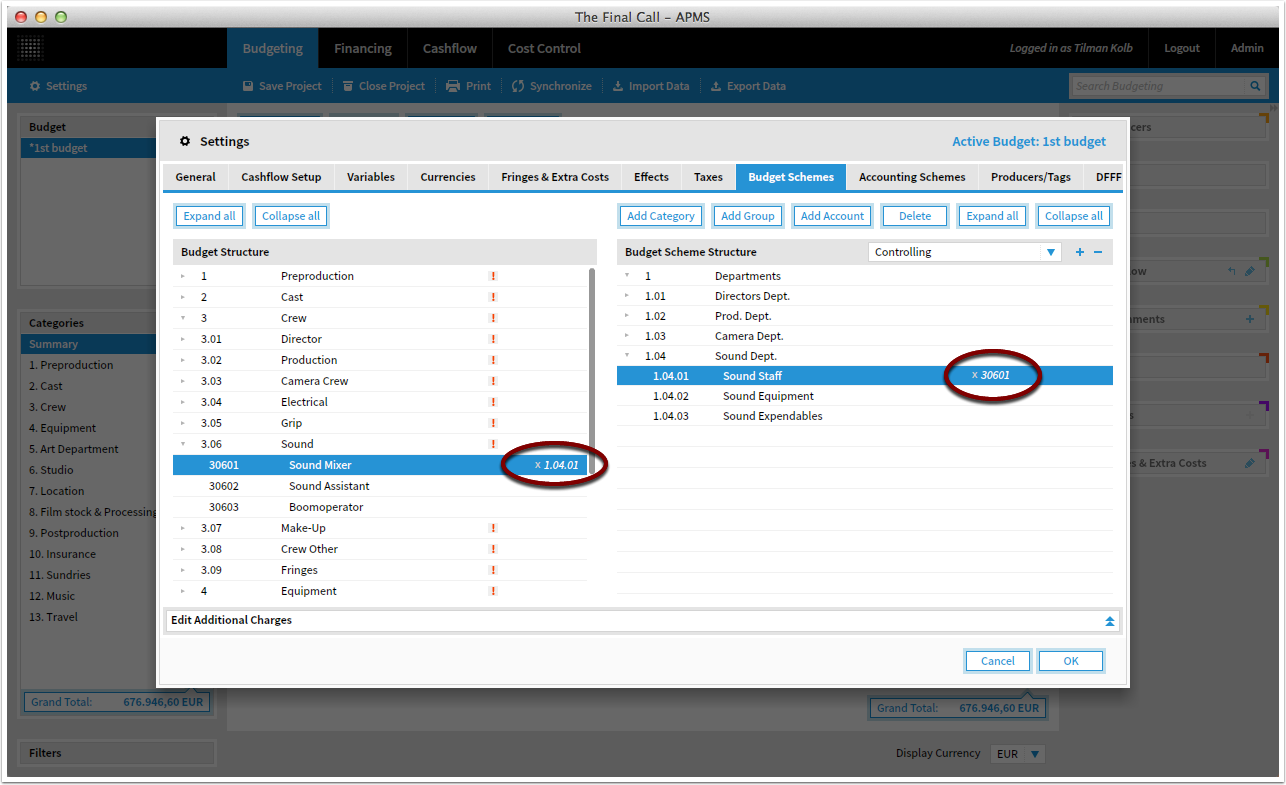
Example: Matching accounts
If the accounts are matched, the account numbers will show up.
Example: Matching multiple accounts
You can also match more than one account on one budget scheme account.
Example
The small red "!" means that there are unmatched accounts within a group. Beware that costs might not show up if matching is incomplete.
Click on the "Edit Additional Charges" bar (1) to match the additional charges in the same way as described above.
Click Ok when you are ready.
Printing with another budget scheme
The budget schemes you have created are then available for printing.
Import a budget


Excel file
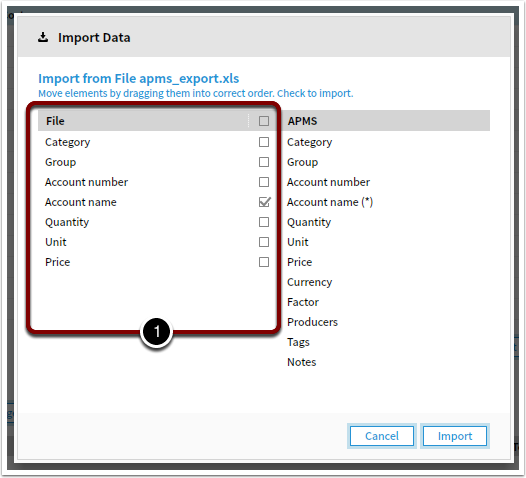
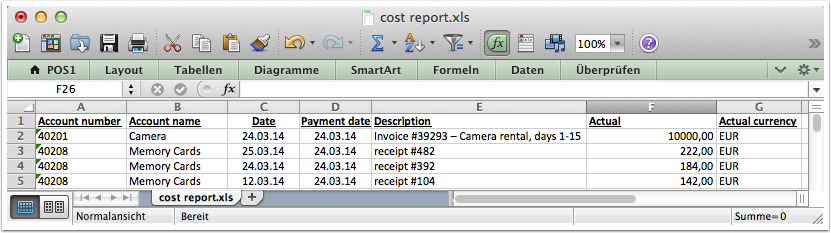
The import from .csv files via Excel is an easy way to set up a certain budget structure from scratch. Set up the file as shown below and save it as .csv before importing.
The column headers in the first row are important. The account name column is the only column required to import. All others can be left out.
Import options
After you have selected the desired file to import, you need to help KOSMA understand the format specifications of your file. If you are not importing any numbers, just click ok.
(1) Select the character that separates each row in your file. This depends on how you exported the file from your accounting software. In most cases it will be a semicolon (;). You can check this if you open the import file in a text editor.
(2) Select the character that separates the decimal values. Either a comma (1,5) or a period (1.5).
(3) Select the character that groups the numbers. Either a quote (1'000), a comma (1,000).
(4) Not applicable, can be left empty
Import data
On the left side you now see the column titles from your import file. Select which should be imported. (2)
Match columns
Drag and drop the columns into the desired order…
…so that all columns checked for import match.
Click "Import".
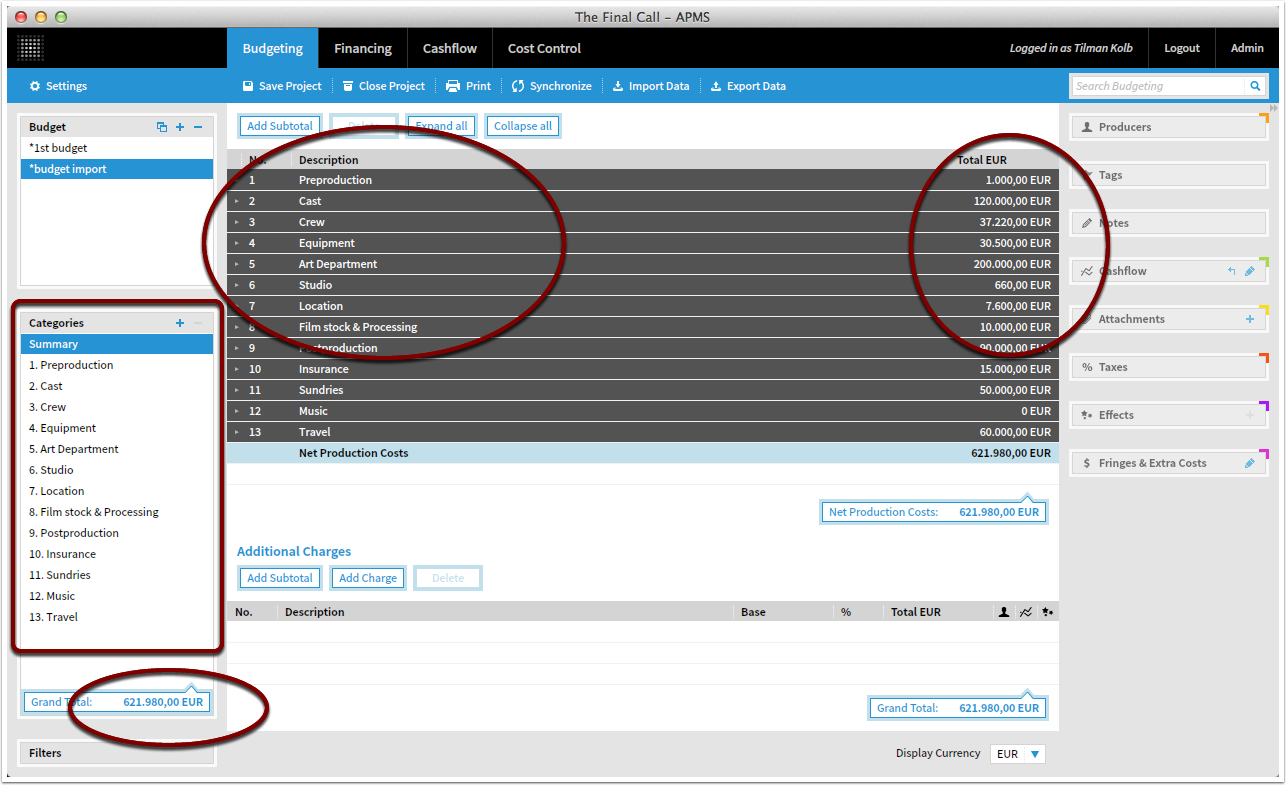
Checking the import
You should now see the fully imported budget. Please carefully check the group sums and totals for missing fringes or add. costs, currency settings, etc. These elements can't be imported.
Export a budget
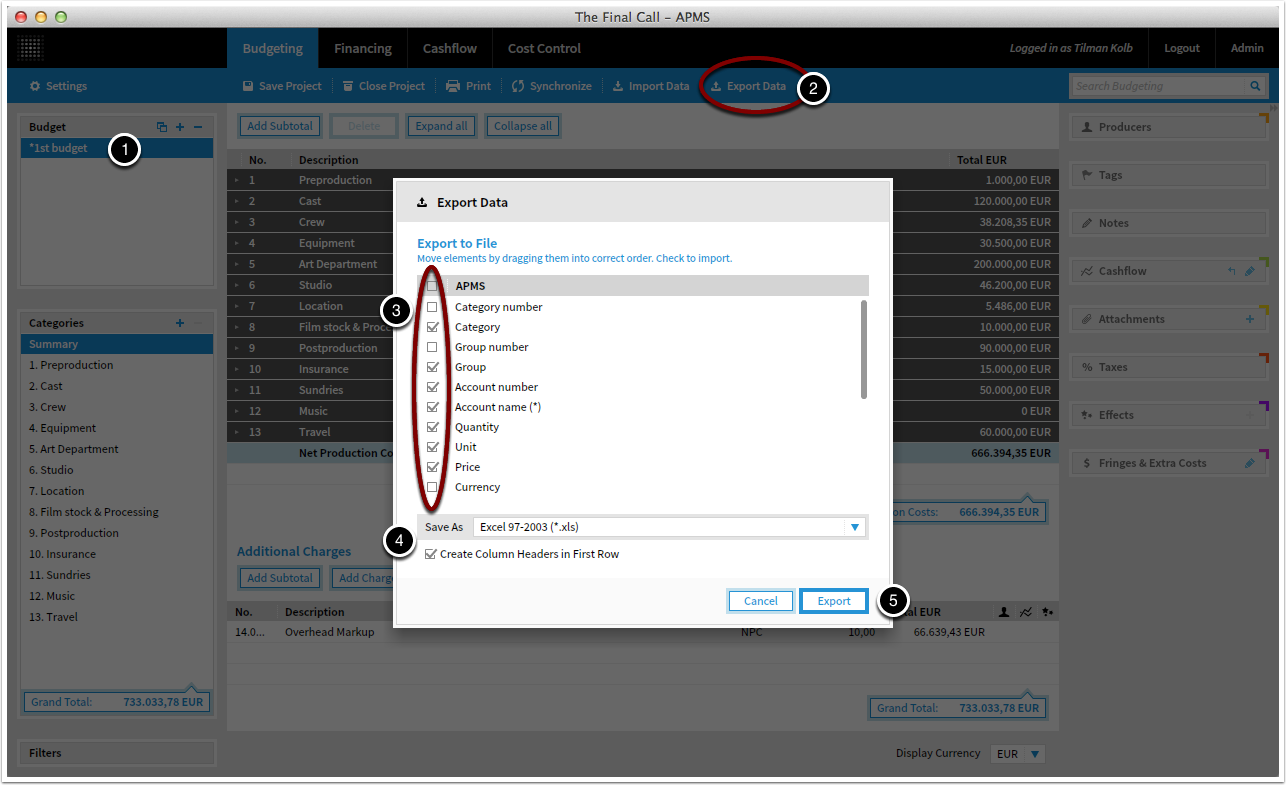
Export budget
Choose the budget you want to export (1) and click Export Data (2).
Now choose the columns you want to export (3) or click the grey checkbox to mark all.
Then, choose a file format and column headers if you like (4),
and click Ok (5).
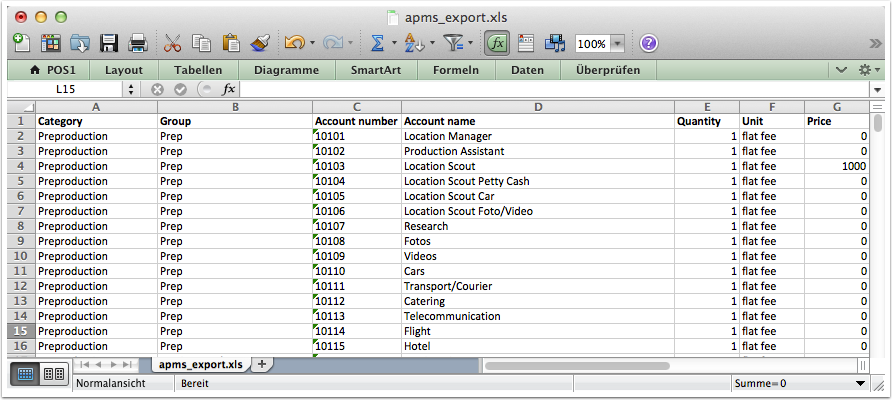
Excel file
The export makes KOSMA data available for other software. However, some data (like additional charges or fringes) can't be exported.
Using data filters


Open filter area
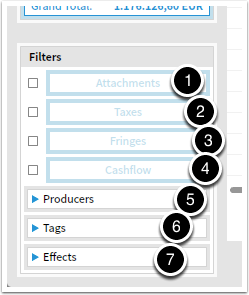
To use filters, first open the filter area by clicking "Filters".
Filter featues
You can filter the whole budget or cost report by any combination of
- positions with or without any attachments (1)
- positions with or without any assigned taxes (2)
- positions with or without any assigned fringes (3)
- positions with or without any cash flow metadata (4)
- positions with or without a specific producer (5)
- positions with or without specific tags (6)
- positions with or without specific effects (7)
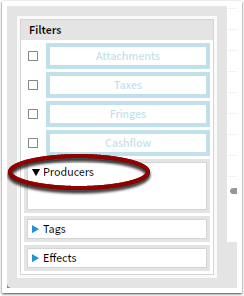
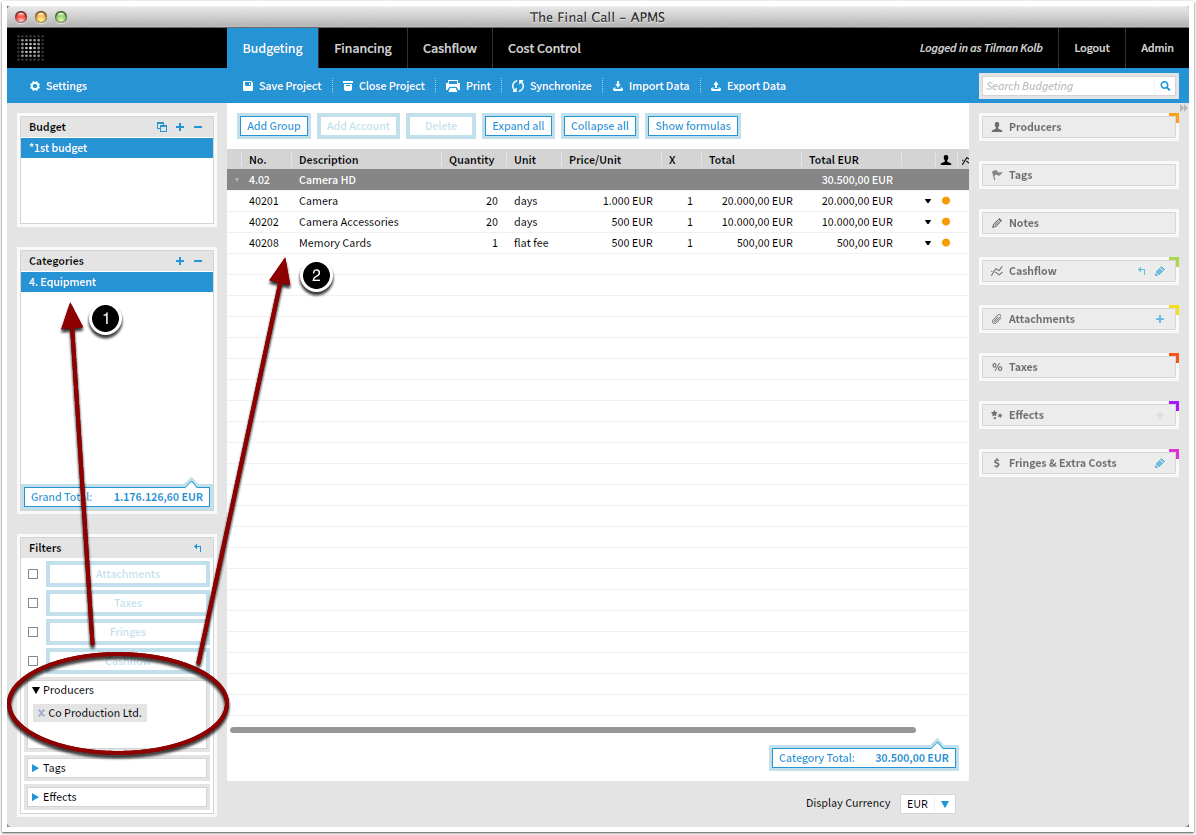
Example: Filter for a producer
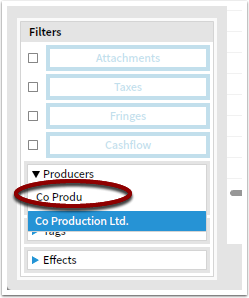
To filter for a specific producer, click the "Producers" field…
…start typing the first letters of the producer and hit enter to confirm the auto-complete suggestion…
…to see all categories that contain matching positions (1) and all matching positions in the currently selected category (2).
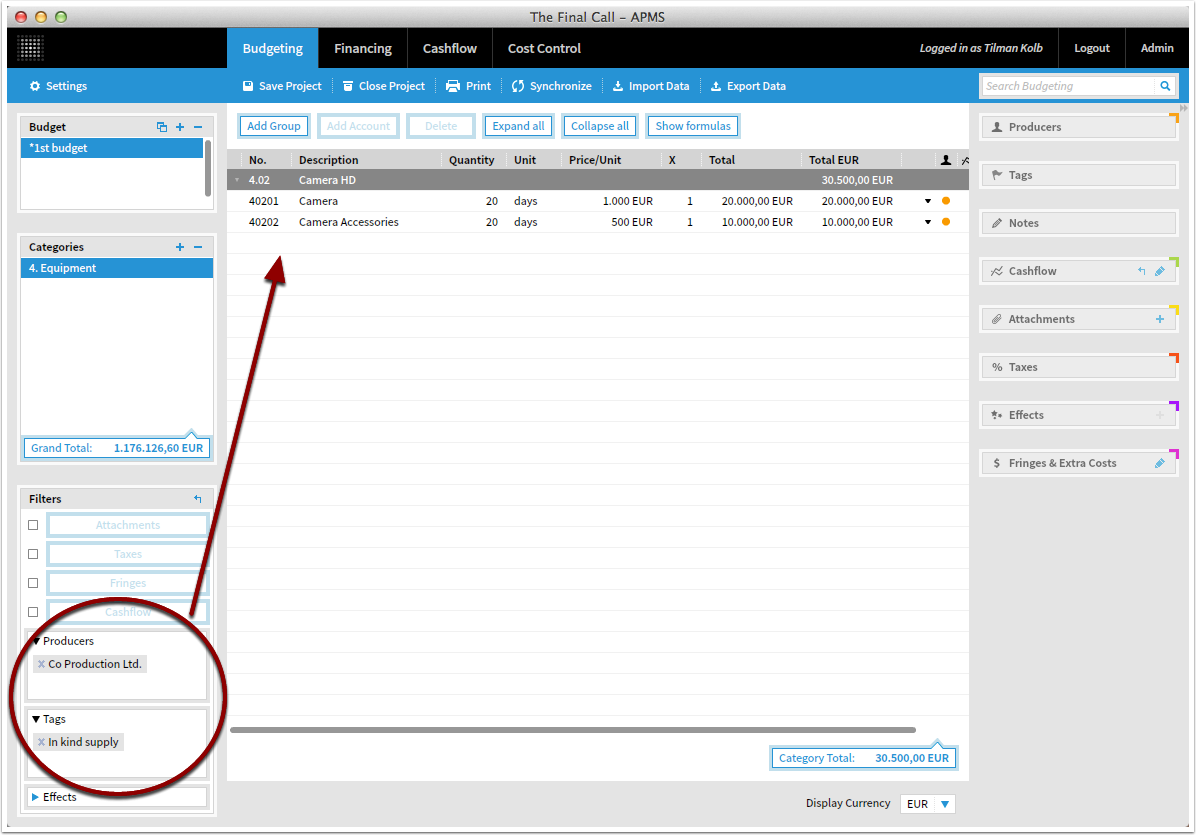
Filter for a tag and a producer
If you have added a tag "in-kind-supply" to some accounts and now see all in-kind-suppy by that producer, add a tag filter.
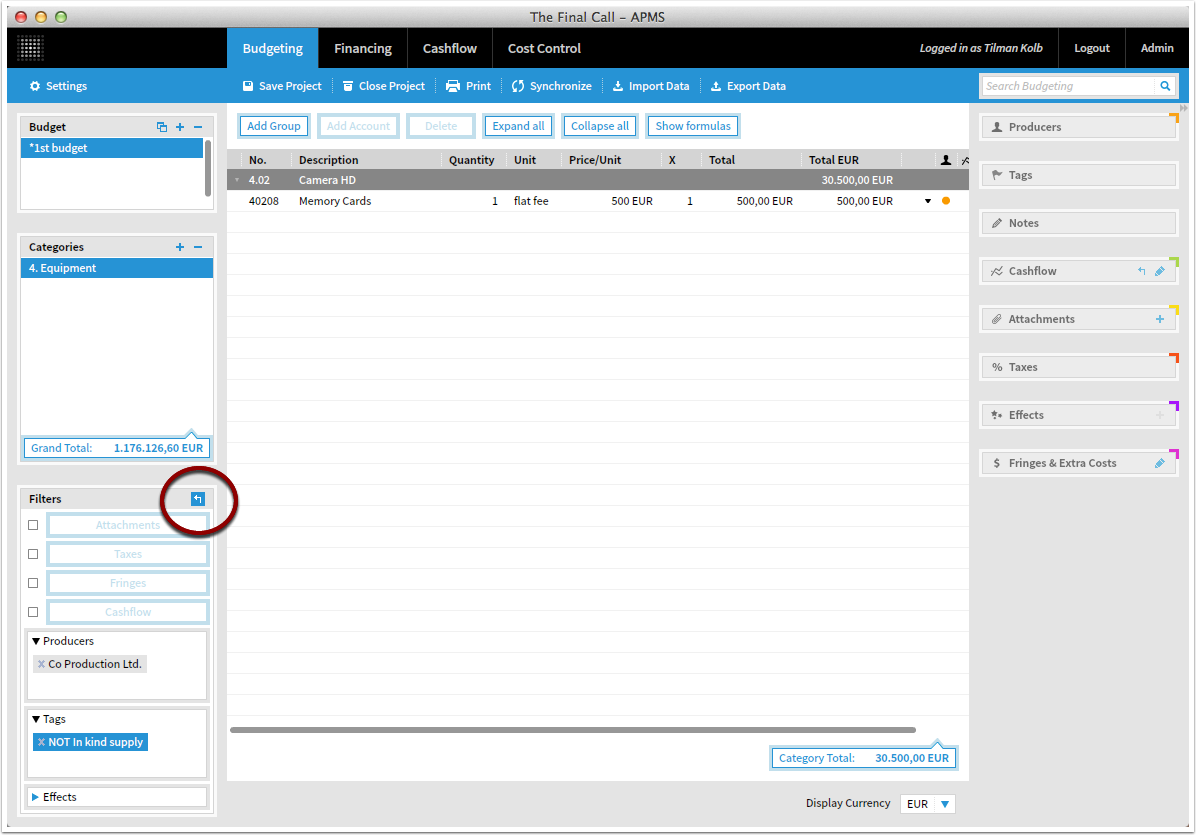
Filters with NOT
You can invert all filters by clicking them directly.
The tag filter for "in kind supply" becomes a filter for all positions that are NOT assigned to the tag "in kind support":
Reset filter
To reset a filter, click the small arrow…
Reset filter
…to see the whole data again.
You can close the filter area by clicking "Filters" again. (1)
Overview Financing module
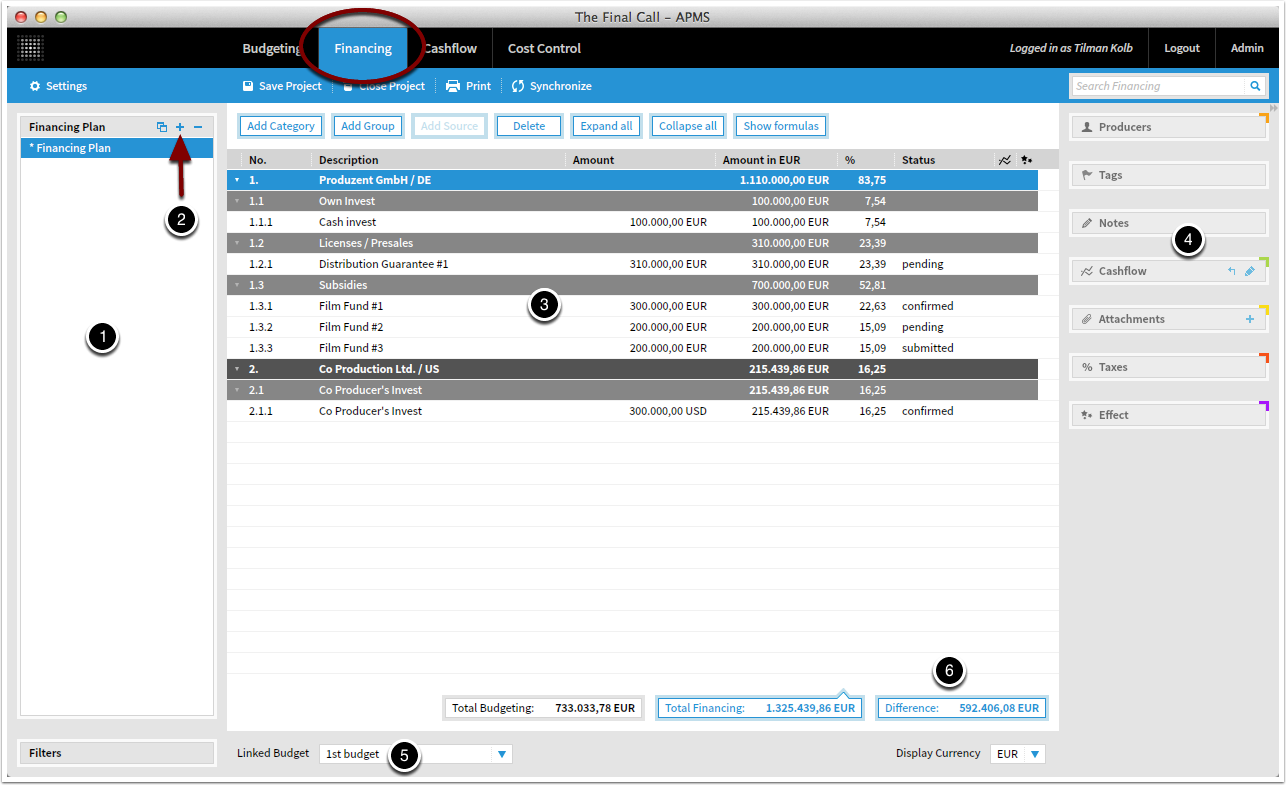
Overview Financing module
Here you create financing plans for your project. The module is only available with a Pro license.
The navigation area shows all financing plans of the project. (1)
Add, delete or duplicate financing plans with the corresponding buttons. (2)
Just like budgets, financing plans consist of categories, groups and sources. (3)
You can add producers, tags, notes, cashflow dates, attachments, taxes, and effects at the macro area. (4)
All financing plans have to be linked to a budget. (5)
You can check the difference to that budget in the difference field. (6)
Create a new financing plan
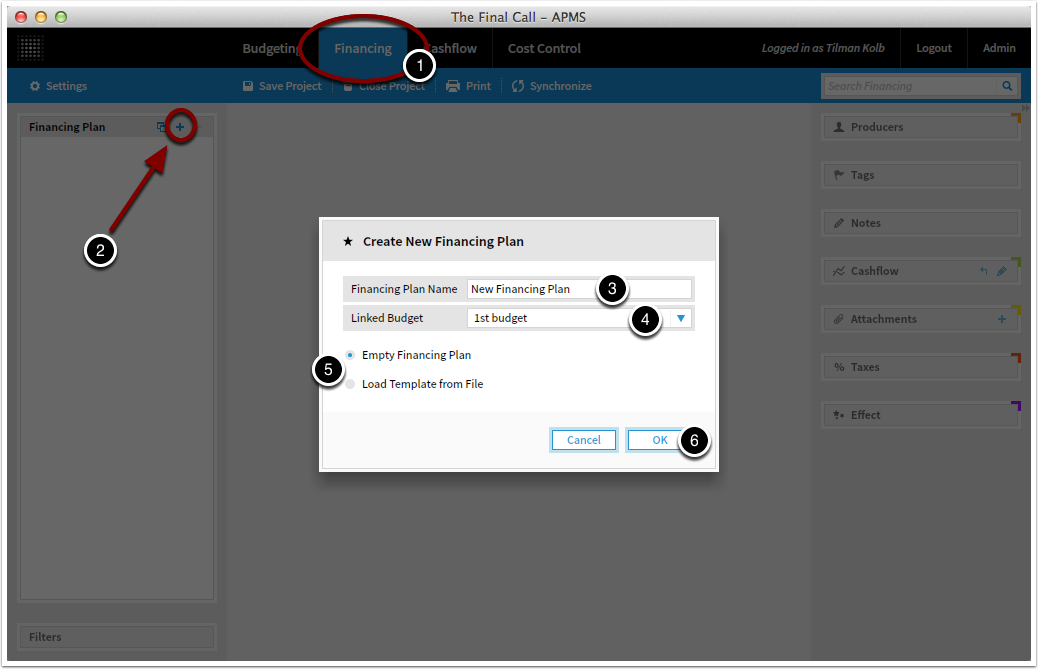

Switch to the Financing module (1) and click "+" (2).
Choose a name (3) and a linked budget for this plan (4), that will be used for project settings.
Decide if you want to start from scratch or use a financing plan template file (*.kost) (5)
(You can save an existing financing plan as a template in MENU->PROJECT->SAVE FINANCING PLAN AS TEMPLATE)
And click Ok. (6)
If you decided to start with an empty plan, start by creating Categories, Groups and Financing Sources (1).
Groups have to be inside a category. Sources have to be inside a group.
Link financing plan to a new budget

The budget to which a financing plan is linked is shown at the bottom of the financing screen. You can change it by selecting a new budget from the list.
ATTENTION: The financing plan uses all settings from the linked budget, like currencies, producers, taxes, effects and cash flow dates. If you link a financing plan to another budget, all data in the macro area of the financing plan will be reset.
Assigning a financing source to an effect
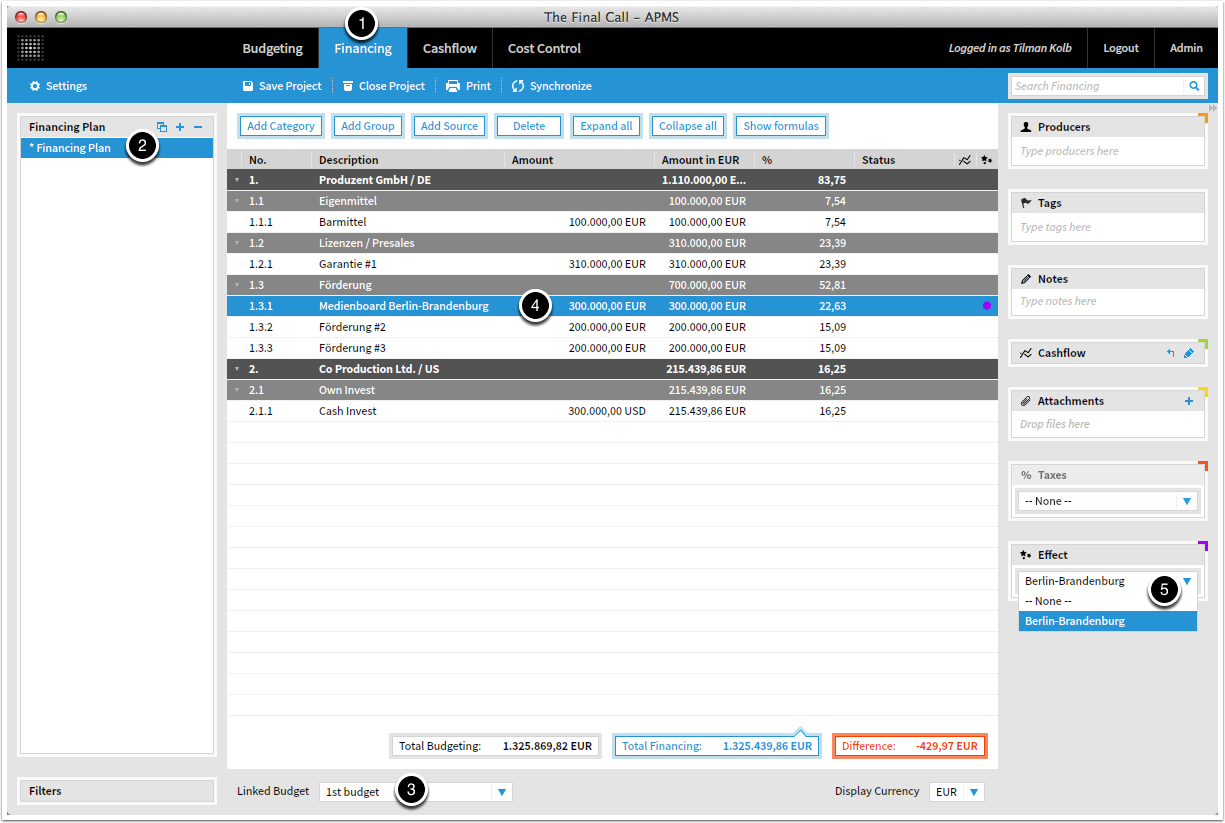

Assign a financing source to an effect
To manage a financing source that requires an effect, switch to the financing module (1) and the specific financing plan (2).
Make sure the financing plan is linked (3) to the budget for which you want to calculate a spending effect and the effect is already created in the settings.
Just like assigning an effect to a budget account, you can assign the financing source (4) to the effect by selecting the effect name in the macro area (5).
Check effect Status
You can always check your effect status from the effects tab (2) in the settings (1).
Choose a financing plan from (3),
to see what amount is assigned from the financing plan (4) and what amount should be reached (5) with the percentage defined.
If you already assigned accounts in your budget, you can read the budgeted sum and percentage under Effect Status (6).
If you already work in Cost Control, you can assign a cost control set (7) to filter the costs instead of the budget.
How Cashflow works in KOSMA
Cashflow Setup
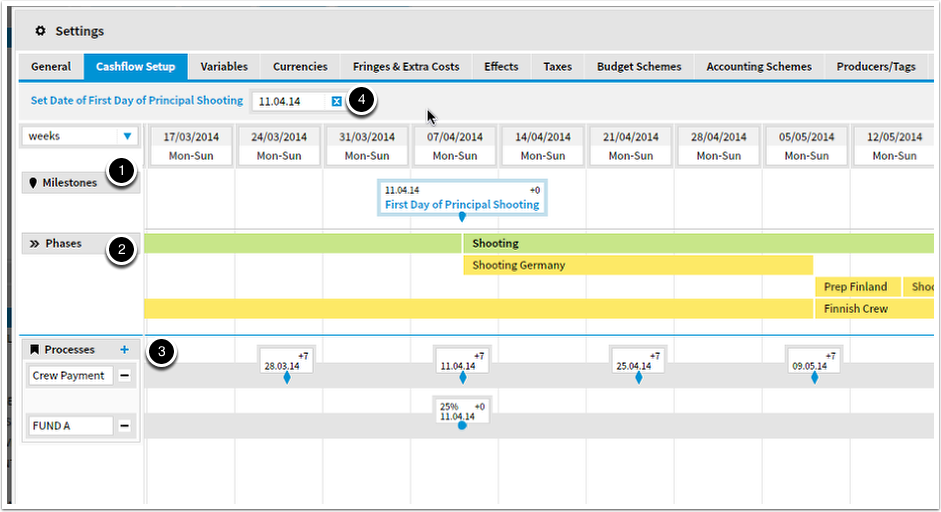
In KOSMA you set up the cashflow in Settings->Cashflow Setup with three elements that define your production on an abstract timeline.
1. MILESTONES are single important events like "The first day of principal shooting", "End of shooting", "Final cut" or whatever you think is an important milestone for your production.
2. PHASES define time spans for various phases of your production, like "Shooting", "Postproduction", "Editing" or whatever you think are important phases to set up your cashflow.
3. PROCESSES are series of events on the timeline, e.g. recurring payments like crew payments, or payments by a fund connected to milestones.
With these three elements you set up your production on an abstract timeline. In the budgets and financing plans you can use these elements to assign cashflow rules to the accounts.
The advantage of this is that you do not have to care about dates while in planning stage. You only have to define one single date (4) at the end and everything on the timeline will have a date as well. And if something changes in the planning of your production you will not have to change every single cashflow definition in your budget, but you can centrally control everything from this settings tab.
So these are the steps to your cashflow plan:
1. Set up the milestones, phases and processes
2. Apply cashflow rules to all accounts
3. Display the Cashflow in the cashflow module
Add a milestone, phase or process

Add/edit a milestone, phase or process
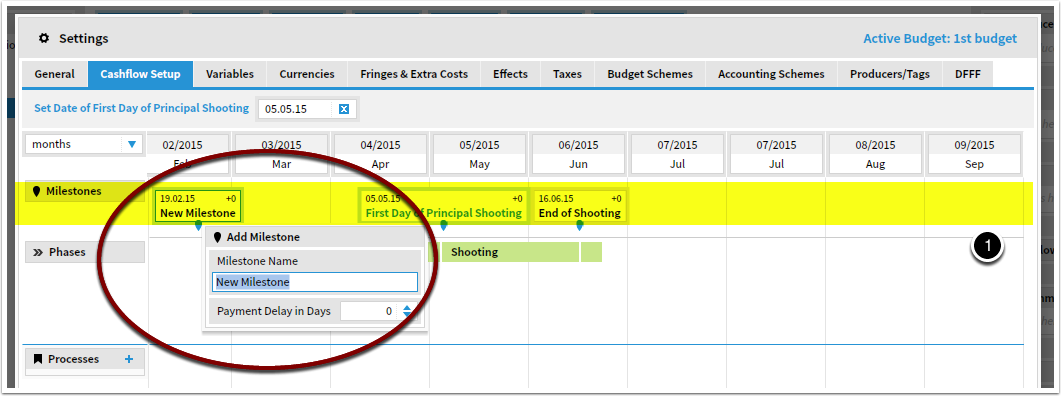
Go to Settings, Cash Flow Setup. Click Settings (1) and switch to the Cash Flow Setup tab (2).
Create a new milestone
Create a new milestone by double clicking in the milestone area. You can drag the milestone by mouse to the desired position. Enter a name for the new milestone. To create a phase or a process, do the same in the phase or process area.
Adding cash-flow rules
Add cashflow rules to your budget
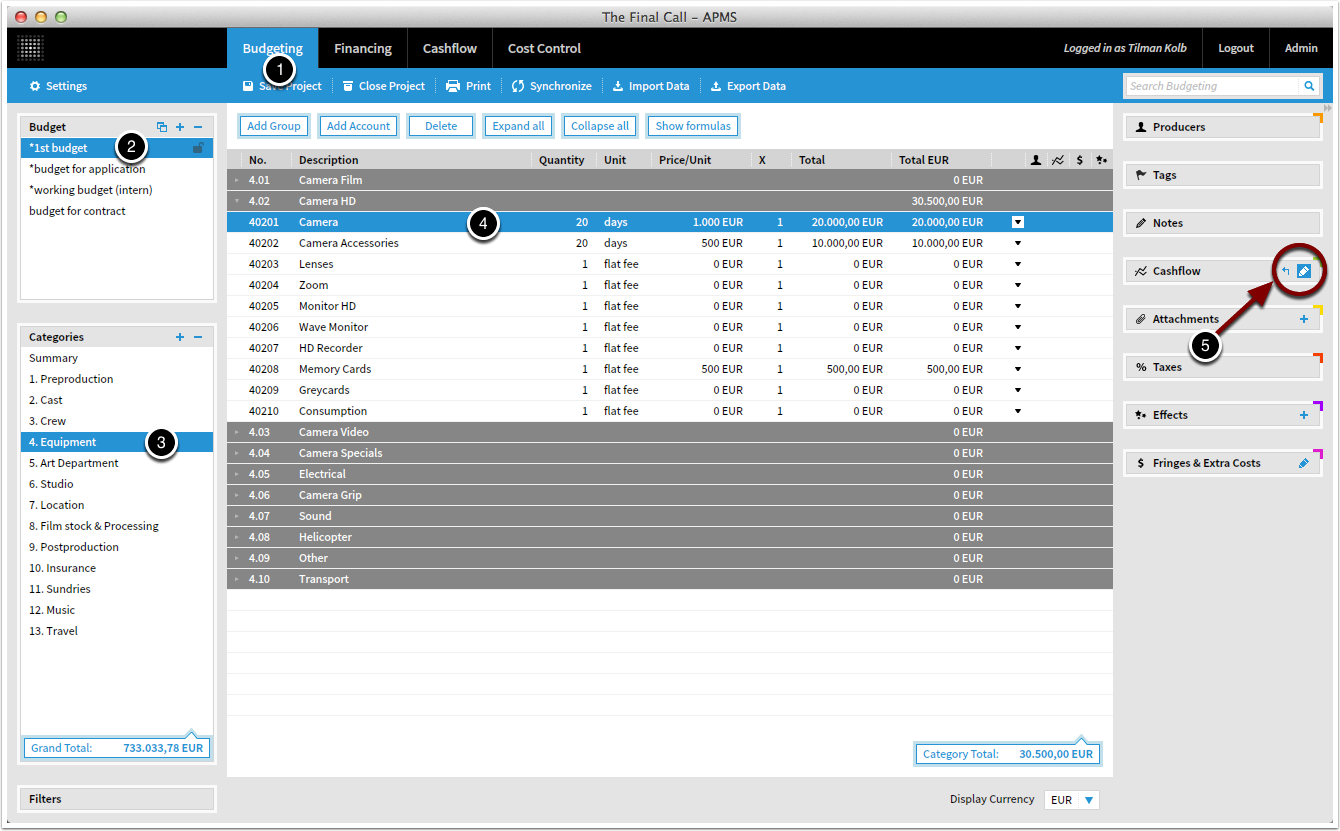
To cash flow your budget, open the Budgeting module (1) and go the budget (2), category (3) and account (4) you want to adjust in cash flow.
Now click the small blue pen symbol next to Cashflow in the macro area (5).
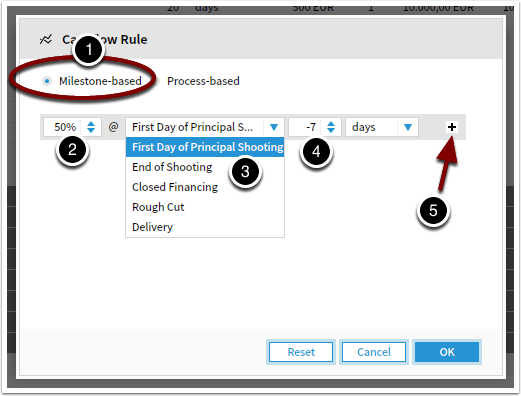
Define a cashflow rule with milestones
Select milestone-based (1) and choose your first milestone.
For example, you can schedule the camera rental payment in a 50% (2) installment seven days before (4) shooting begins (3), and add a second milestone by clicking "+" (5)…
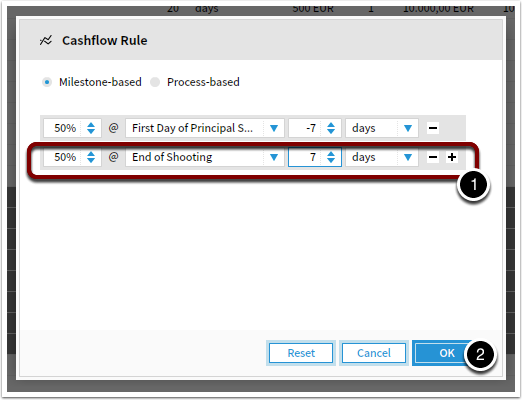
Second milestone
…to add the final payment of another 50% seven days after shooting has ended. (1)
Click Ok (2) to proceed…
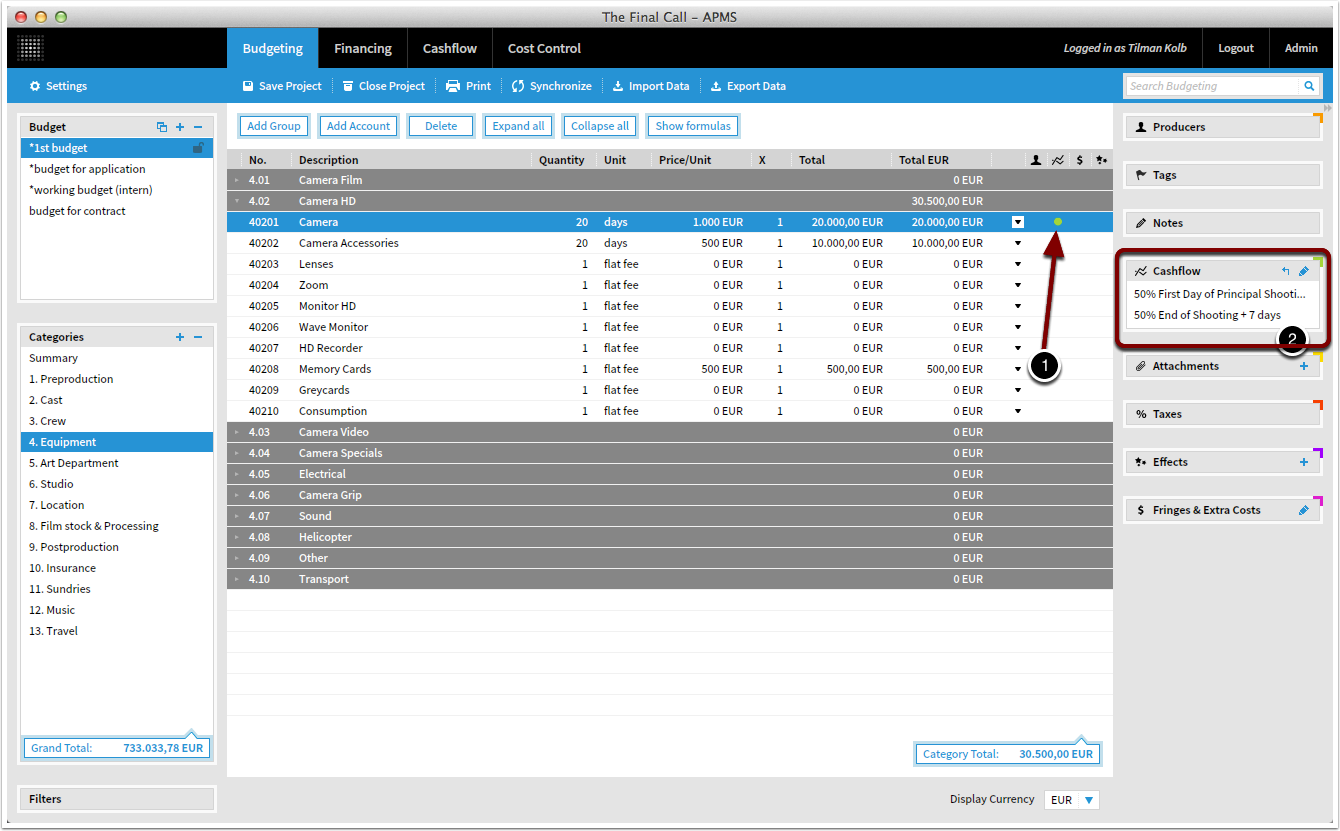
Result
…and see that a green circle (1) indicates this account has cash flow data, whereas the details can be seen in macro panel (2).
Using a cashflow process to cash flow a financing source

Using a cashflow process to cash flow a financing source
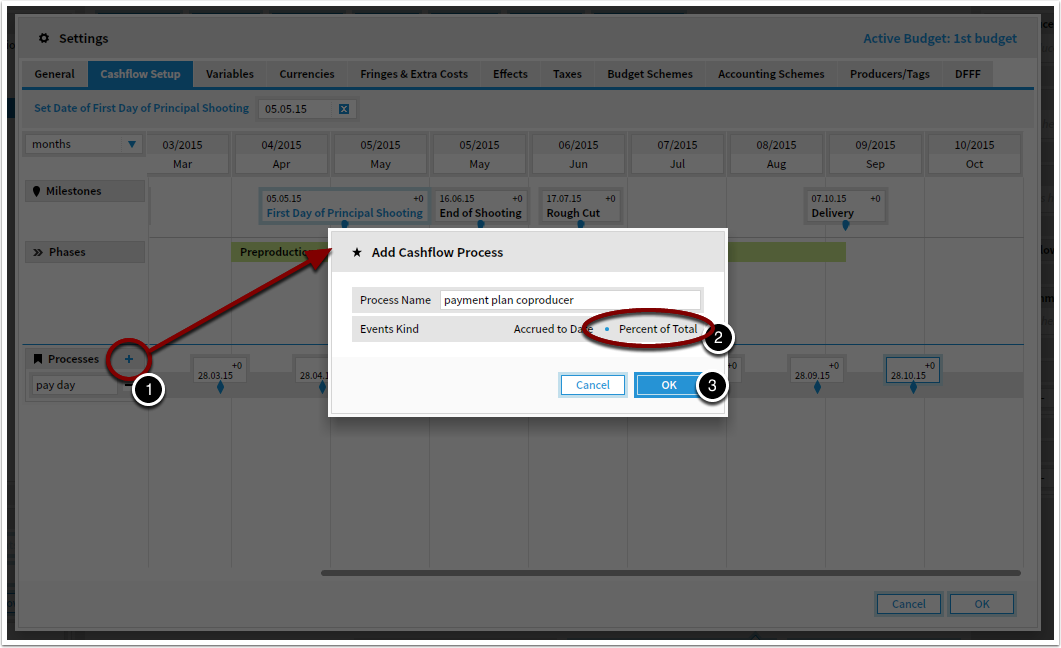
Click Settings (1) and switch to the Cash Flow Setup tab (2).
Create a Cashflow Process by percentage (Payment plan)
To create a cashflow process, click the small "+" (1) and enter a name.
Choose costs should be split by percentage (2) and not by time in this process and click Ok (3).
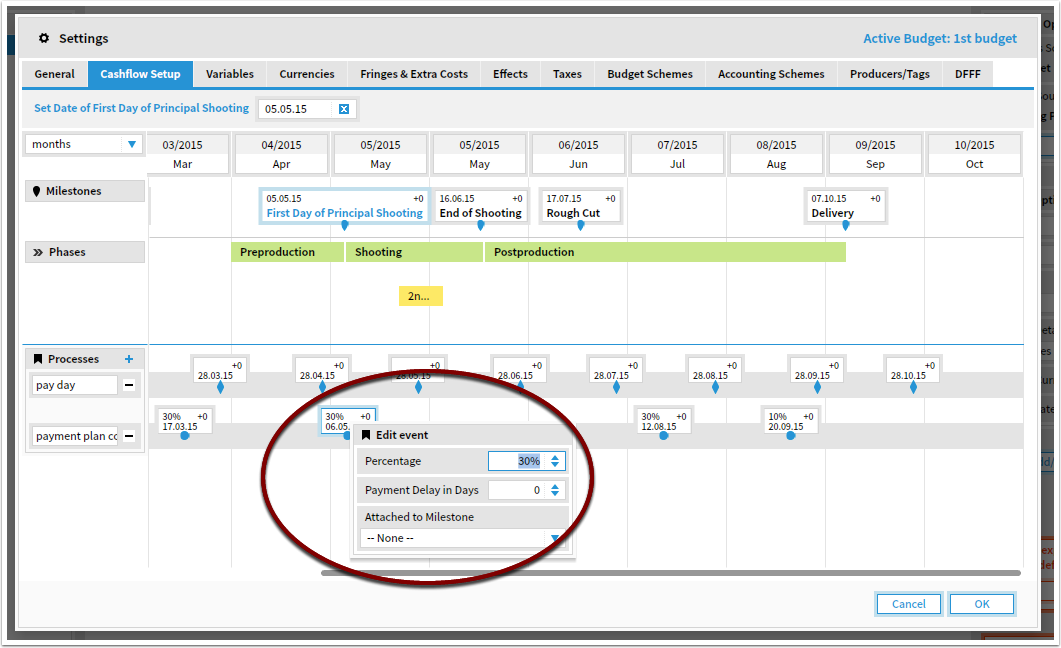
To add events to the process, double click in the timeline. You have to define a certain percentage for every event.
Assign cashflow rule to financing source
You can now use the process you just created to time budget accounts and financing sources. If, for example, your coproducer agreed to pay by this payment plan, try this:
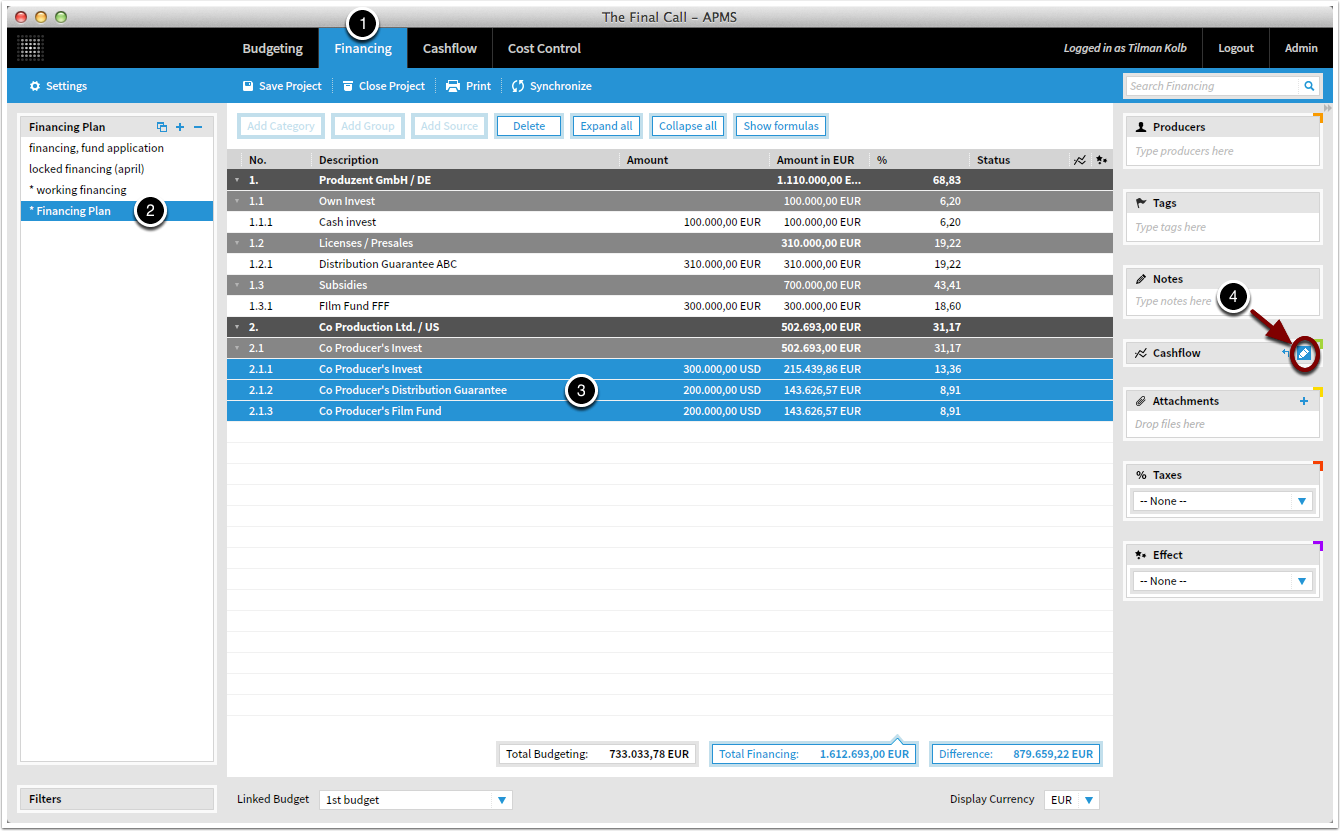
Open the Financing module (1) and go to the finaning plan (2) you want to cash flow.
Now select all your coproducer's sources by holding Shift key (3) and click the small blue pen symbol (4) next to Cashflow in the macro area.
Assign payment plan to financing source
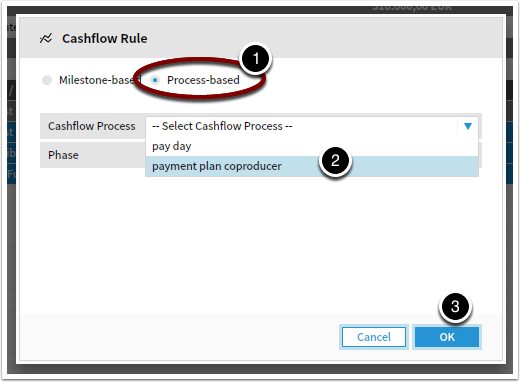
Click "process-based" (1) and choose the process (2).
Click Ok (3) to proceed.
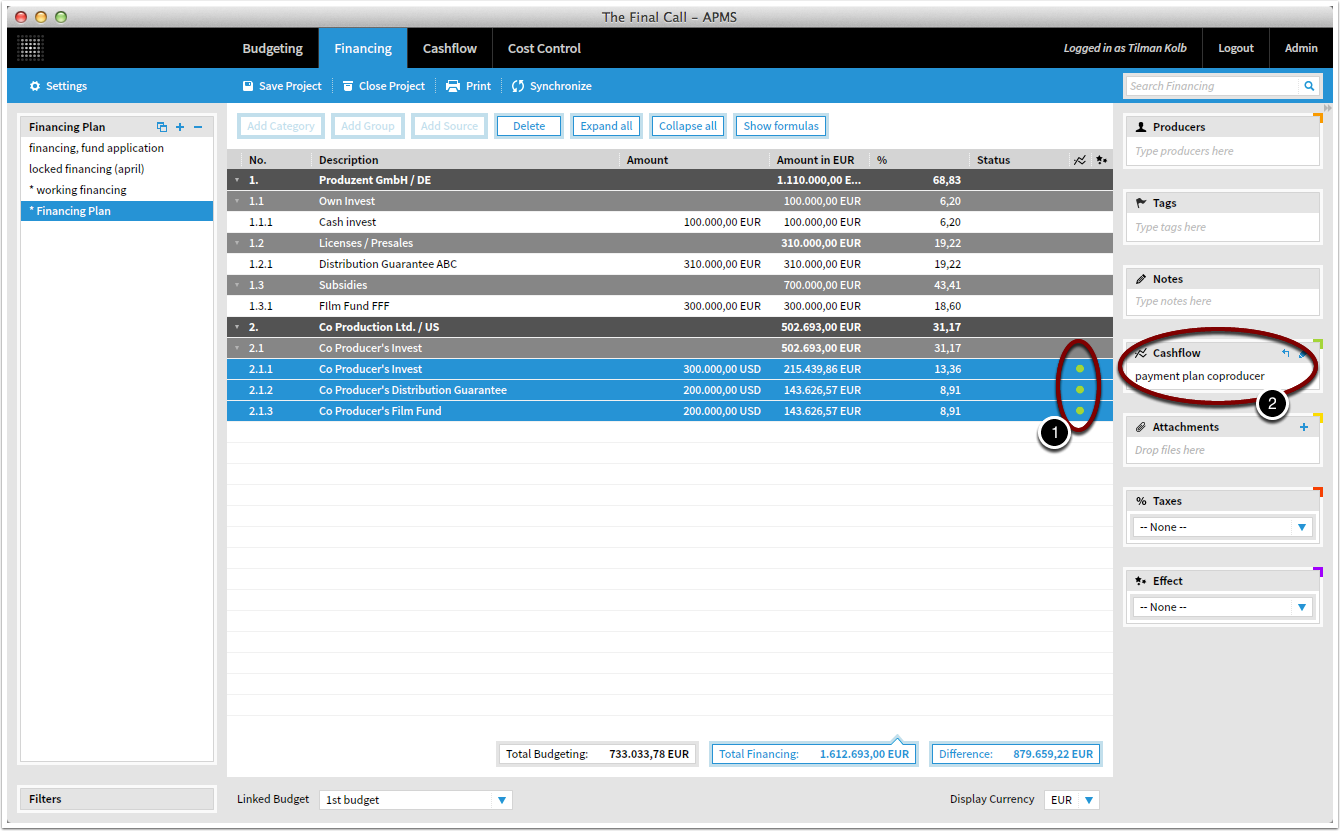
Result
You will now see that green dots indicate that these sources have been assigned cash flow data (1) and see the details at the macro area (2).
Create a new cash-flow set


Create a new cash-flow set
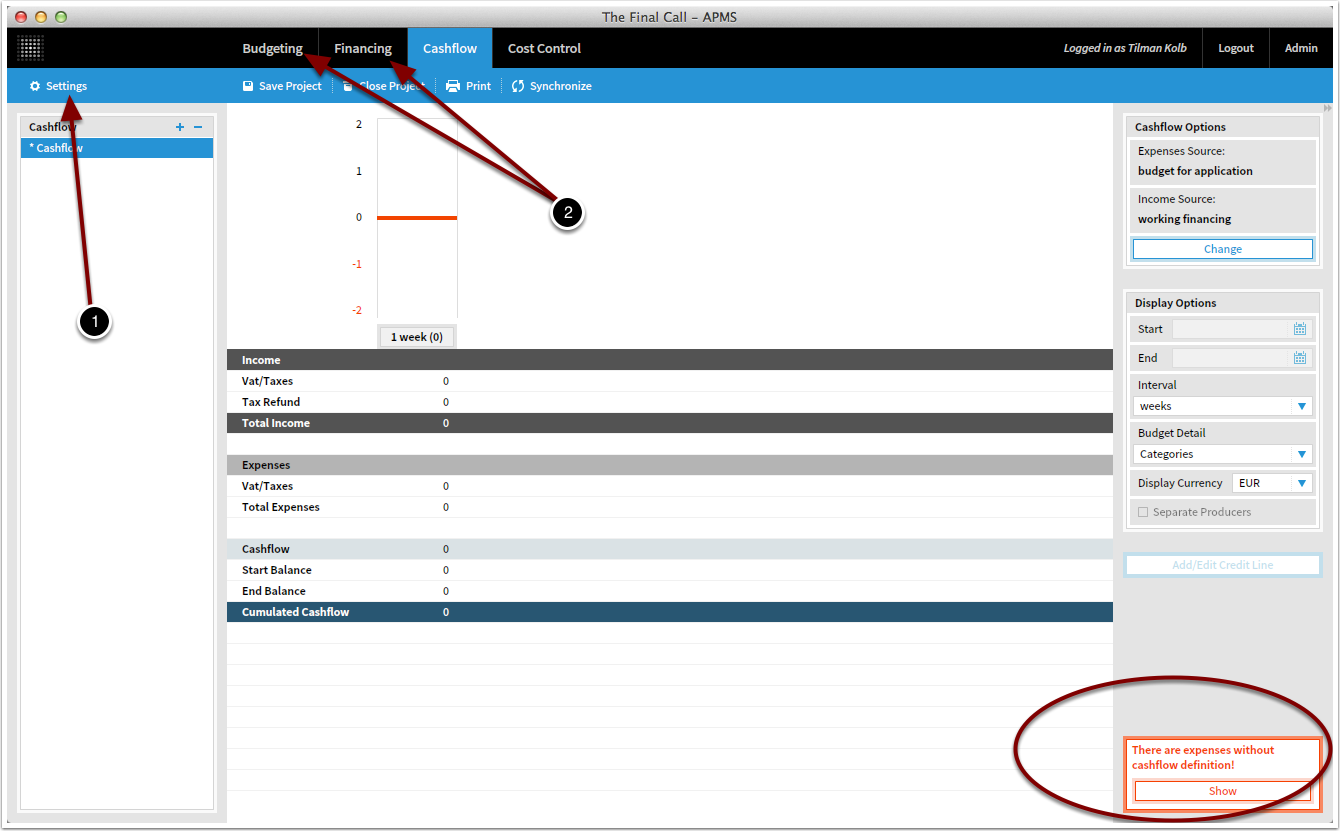
Go to the Cashflow module (1)
Hint: If you do not see the Cashflow module, make sure you upgrade to the Pro License.
Click the small "+" (2)
Choose a name, select which budget or cost control set to use as the expenses source, and which financing plan to use as the income source. (3)
…then click Ok (4)
Start with your cash flow
If your cashflow looks similar to this, you need to define cash-flow rules for your expenses and incomes first.
Define cashflow milestones and phases in the Settings (1) and add cashflow rules for all accounts in Budgeting and Financing (2). For further info, please watch the other tutorials and FAQs about Cashflow.
Set up the first day of shooting
You can work with the cash flow module without setting a precise date, yet we suggest you set a first day of shooting for better usability.
To do so, go to Settings (1), Cash Flow Setup (2), and click the date field (3).
Click Ok to leave the window. (4)
Overview Cost Control module


Overview Cost Control
Overview
KOSMA Cost Control allows you to create cost reports as a mix between estimates and actuals. This makes cost reports more precise than ever. It also allows you to track spending effects, producer expenses and cashflow.
The logic behind cost control is that you compare the cost of your project against a defined budget. When you create a cost control set the structure of the selected budget is copied.
Hint: If you do not see the Cost Control module you must upgrade your license to Medium or Pro..
In the navigation area on the left you see all cost control sets of the current project (1) and the categories of the currently selected Cost Control (2).
In the edit area you will recognize the accounts and cost items (3).
You can also search for items (4) or use the filter (5) or add a missing account (6).
When an account is selected, the macro area displays the information that was inserted in the linked budget (7).
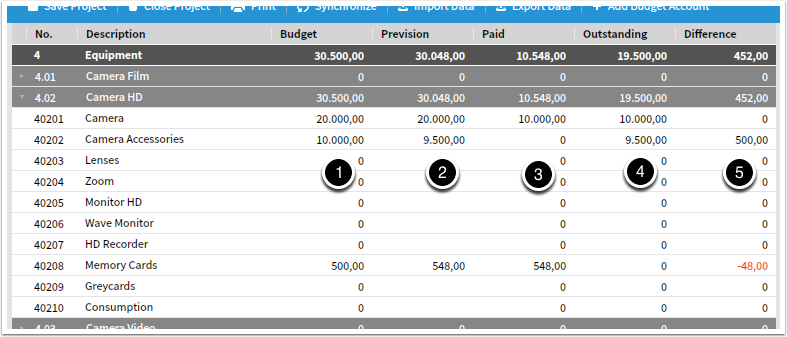
Understanding the columns
In difference to the budget there are some new columns:
Budget (1) – the amount from the initital budget
Prevision (2) – the amount currently estimated either by the Global Estimate of the account or its cost items
Paid (3) – the sum of all cost items with actuals (instead of estimates)
Outstanding (4) – is the difference from paid (3) to prevision (4)
Difference (5) – is the difference from budget (1) to prevision (2)
(positive amounts mean you are within your budget, negative / red amounts mean you are over budget)
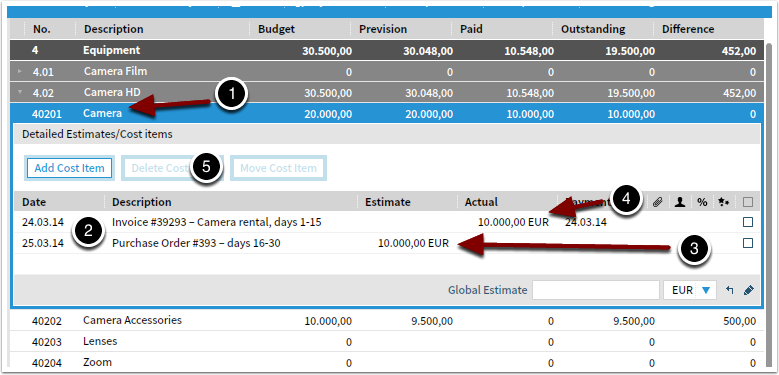
Understanding cost items
When you click an account (1), you see all the account's cost items (2).
A cost item can be an estimate (3) or an actual (4). Actuals are usually imported from accounting (including a payment date), while estimates are costs that are not certified yet. Logically, actuals always override estimates.
Example: If you get a quote for some equipment rental you enter that as an estimate. When the company sends the invoice and it was paid, you enter the final cost as an actual.
An account can contain any number of cost items.
You can add, delete and move items with the toolbar (5)
Global Estimate
Global estimate (1) is a feature to quickly set a new estimated total for an account without entering any specific cost items.
When there are detailed cost items or estimates in the account, you can choose if these are included in the global estimate or if they should be counted on top of the global estimate by clicking the checkboxes (2)
Adding information to cost items in the macro panel
Just like for account in Budgeting, you can add information to your cost items in the macro panels. You can edit the following panels:
- Producers: Add the producer who pays this cost item to keep track of a producers' expenses
- Tags
- Notes
- Cashflow: Add specific cashflow information if you have it. For actuals with a payment date this info will be overridden of course.
- Attachments: Add the invoice or contract if you like. If you do this consequently you have a complete and verifiable archive for this project.
- Taxes: Add taxes for your cost estimates. For actuals this panel is not available because taxes are imported as a cost.
- Effects: Add effects to your cost items to keep track of the spending effects
Add a new Cost Control set
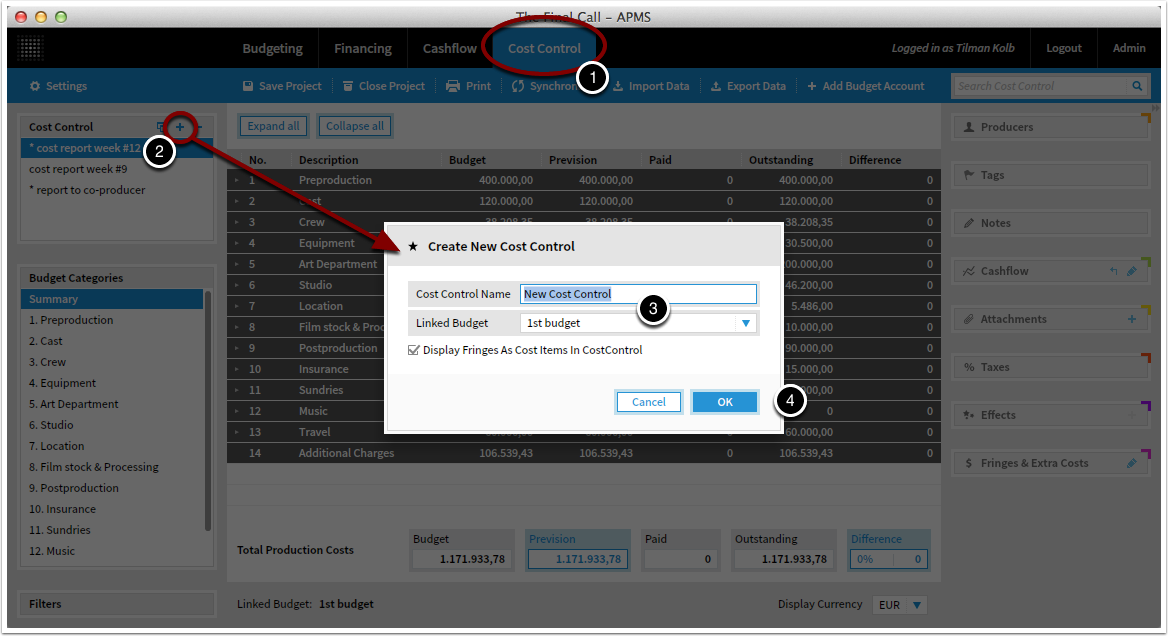
Add a new Cost Control set
Open the Cost Control module (1) and click the small "+" (2) to create a new cost control set.
Hint: The Cost Control module can only be seen with Medium or Pro licenses.
Choose a name and select the budget on which the cost control set should be based on (3).
Click Ok (4) to create.
Creating and managing Accounting Schemes
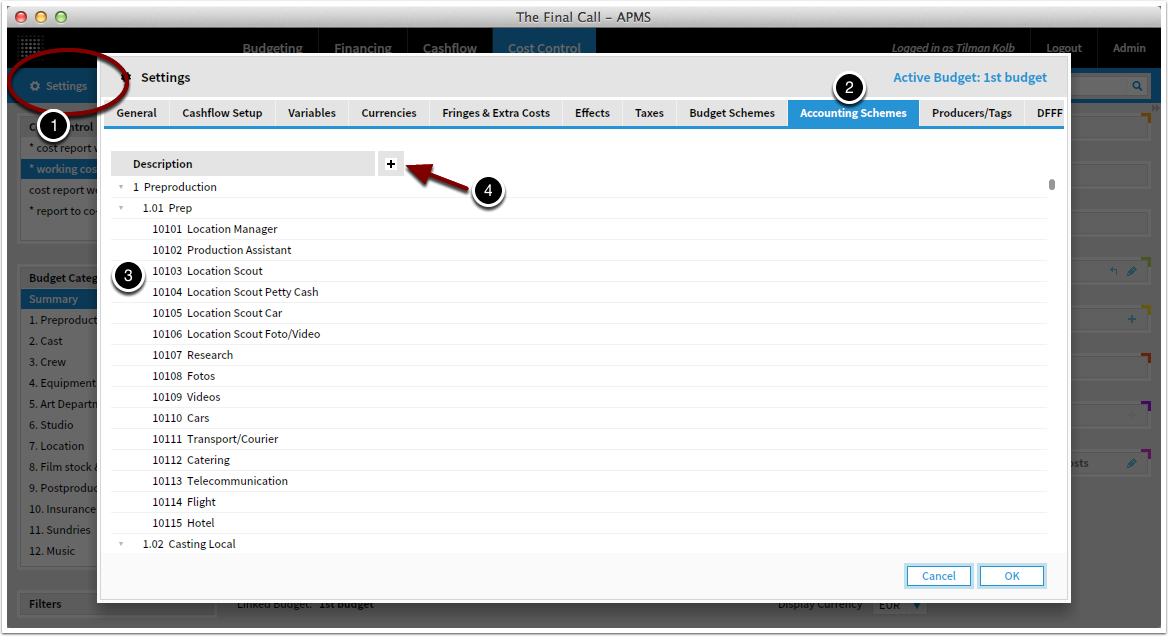
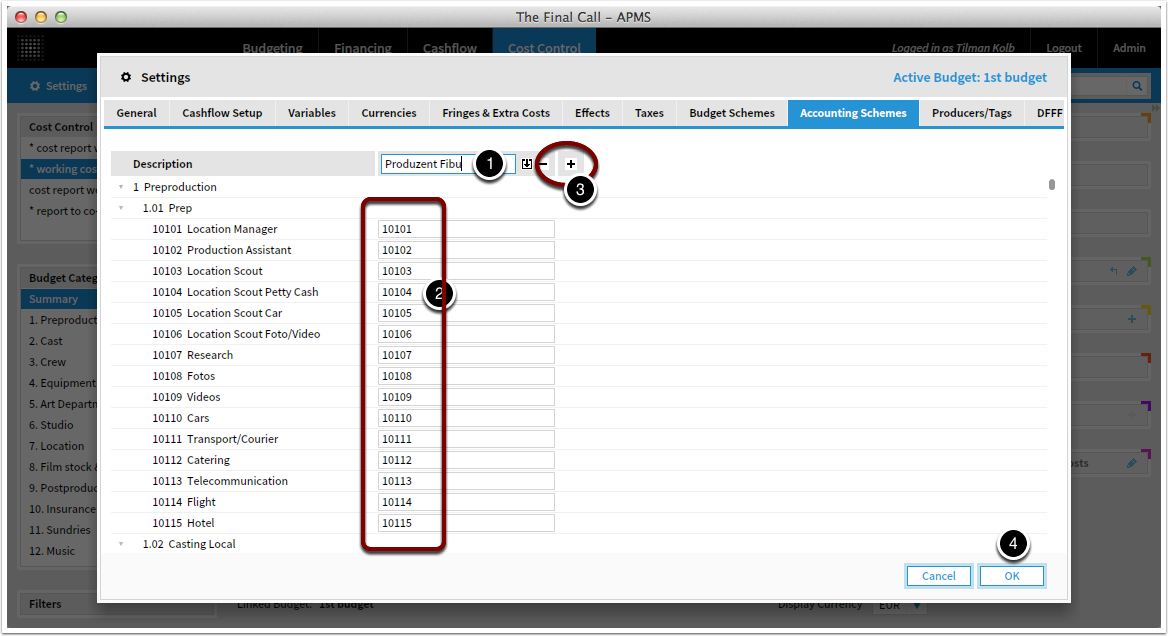
Adding Accounting Schemes
Before you can import any data from accounting into your cost control set, you need to define an accounting scheme. You must tell KOSMA, which account in your accounting data should be linked to which account in your budget.
Go to Settings (1), Accounting Schemes tab (2).
On the left you see your budget accounts along with the budget account numbers (3).
Create the first accounting scheme by clicking "+" (4)
Manage Accounting schemes
You can choose a name (1) for your accounting scheme that you have to select when importing later.
If you have the same account numbers in accounting like in your budget (which we do recomment), press the "arrow" to the right of the name (1) to copy the numbers. Otherwise type in the account number for each budget account (2).
Most likely you will have one accounting scheme per accounting department or coproducer. Add or delete accounting schemes by "+" and "-" (3).
Click Ok (4) when you are finished. You are now ready to import compatible files to cost control.
Import accounting data


Export data from accounting software
KOSMA imports .csv files. Most accounting software can export this kind of file. You can also export an Excel file and then save it as .csv in Excel. The easiest way to look at a .csv file is to open it in Excel.
When you export the data from your accounting software, make sure you include the column names in the first row. The order of the columns does not matter.
Click Import Data
To import accounting data from file into a cost control set, open the cost control module (1) and select a cost control set (2). Now click "Import Data" (3).
A valid accounting scheme is required to import. If there is no accounting scheme defined yet you will see an alert. See "Creating and managing accounting schemes" for more information on accounting schemes.
Import options
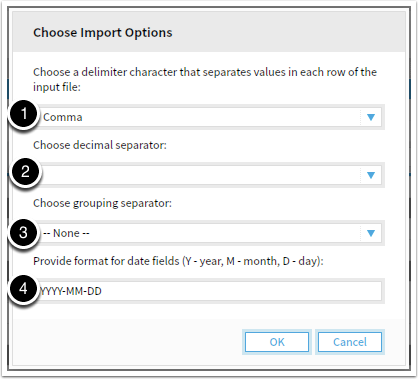
After you have selected the desired .csv file to import, you need to help KOSMA understand the format specifications of your file.
(1) Select the character that separates each row in your file. This depends on how you exported the file from your accounting software. In most cases it will be a semicolon (;). You can check this if you open the import file in a text editor.
(2) Select the character that separates the decimal values. Either a comma (1,5) or a period (1.5).
(3) Select the character that groups the numbers. Either a quote (1'000), a comma (1,000).
(4) Choose the date format of your file. D=day, M=month, Y=year. (i.e. 20.01.2014 = DD.MM.YYYY)
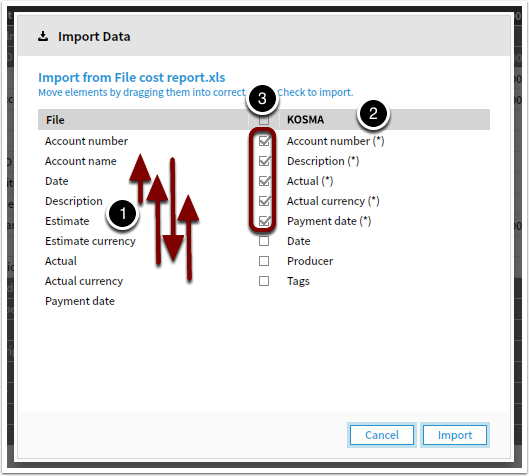
Import the file into KOSMA
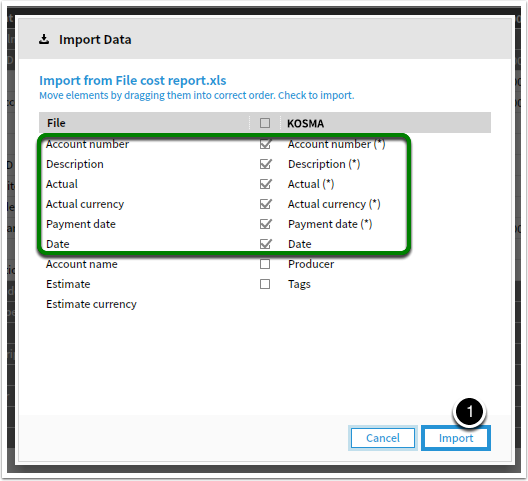
Once you have selected the import options and clicked okay you then have to match the columns. On the left side you see the column headers from the file. Drag them around (1) so they match the KOSMA columns on the right side (2). If there are some necessary columns missing in your import file, go back to Excel and add them.
Check all fields you want to import (3). The fields with an (*) must be imported.
Import the file
When all columns are matched, click "Import" (1).
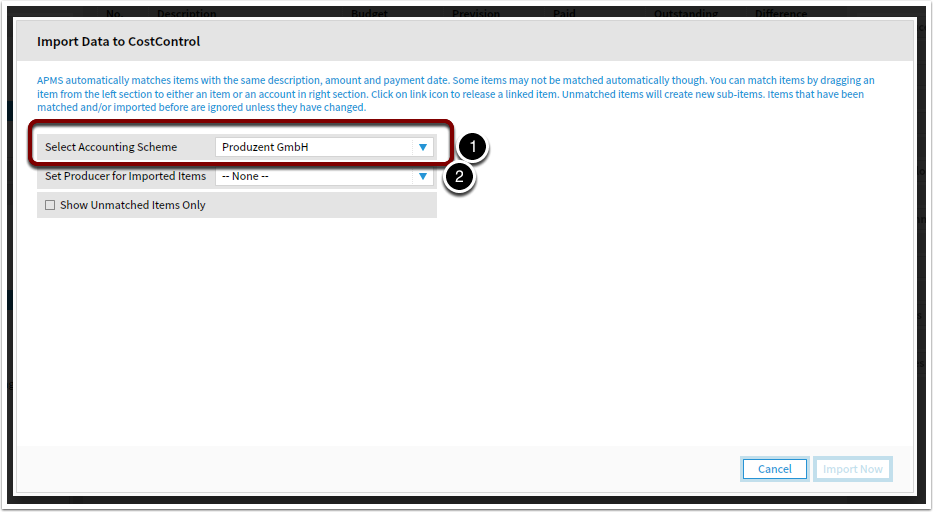
Match data
Now choose an accounting scheme that translates the account numbers from the file to KOSMA budget account numbers. (1)
If you want, you can also choose a producer to attach on all imported items (2)
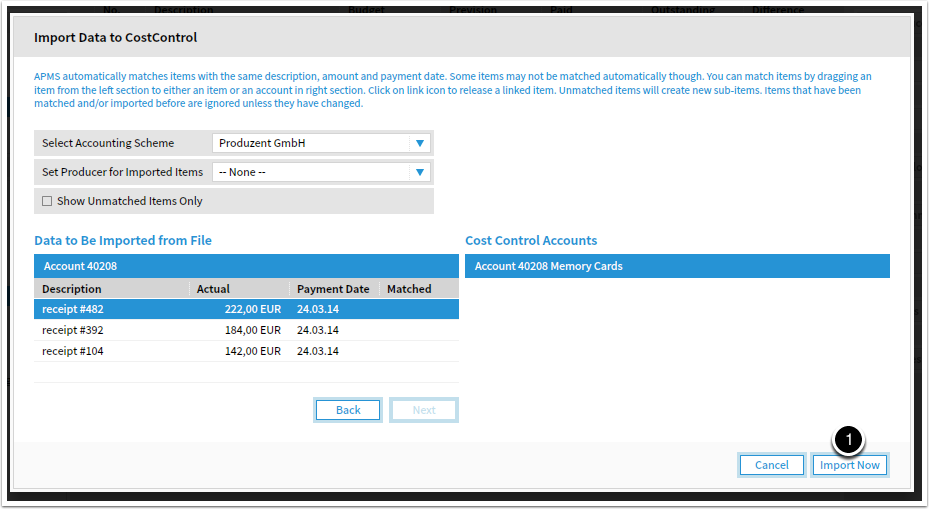
Match data
On the left side you see, account per account, all cost items that KOSMA could read from the file. (1)
At the same time, you see the specific KOSMA account on the right side (2). If you see a cost item that already exists in the account, you can match it by dragging it from (1) to (2) in order to avoid duplicates. So you are able to update your cost control by importing complete accounting statements on a regular basis.
Items that have been imported once are automatically matched in the next import.
To move between the accounts, click "Back" and "Next" (3)
Match data
When you are ready to import your data, click "Import Now" (1).
Results
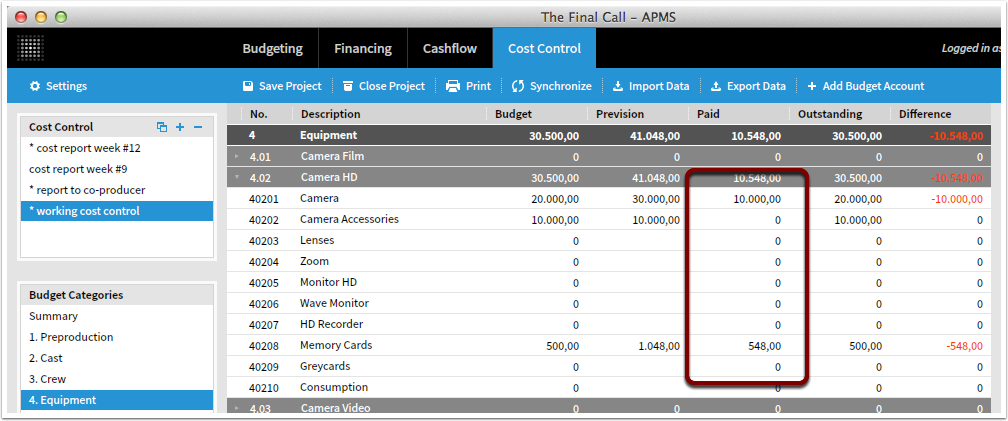
The cost items are imported from the file and matched. You'll see that the paid column now has updated values.
Note that all imported items are imported as actuals. You cannot import estimates.
Inviting other users
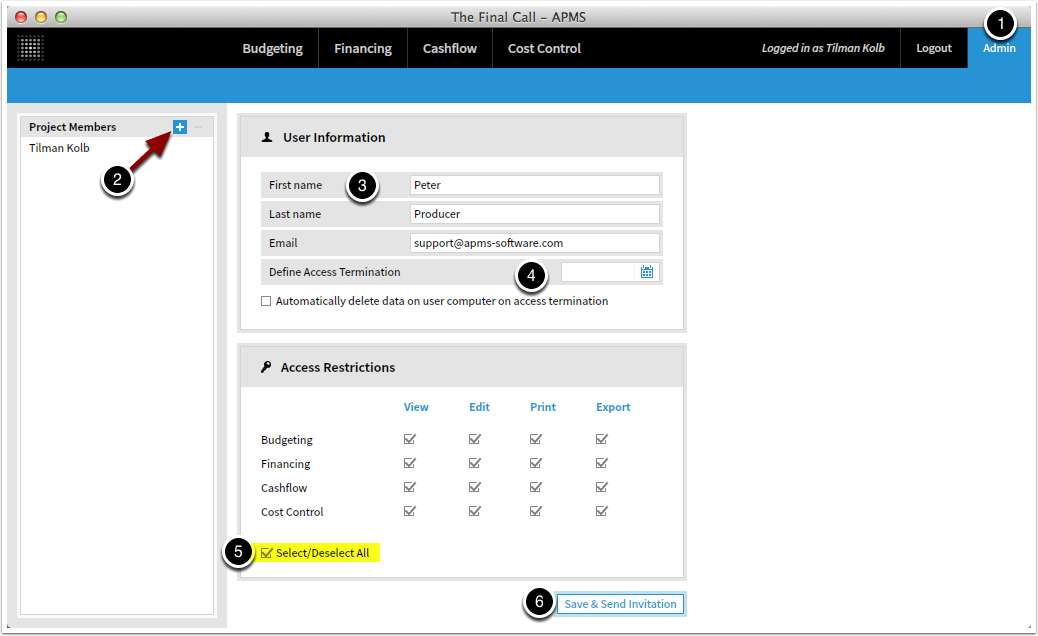
Add user from Project Admin panel
Switch to the Admin panel (1)
Click the small "+" (2) to add a new user to the current project.
Enter at least the email adress the other party is using as KOSMA log in (3).
You can define an access termination date for this user (4).
Set access restrictions or "select all" (5)
Click "Save & Send Invitation". (5)
When the new user opens KOSMA, he or she will see the project in the project manager.
NOTE: Do not forget to sync your project, otherwise the new user will not see any data!
Projects show up in Project manager
Projects to which you are invited will show up with Guest permission.
Your own projects will show up with Admin permission.
Printing
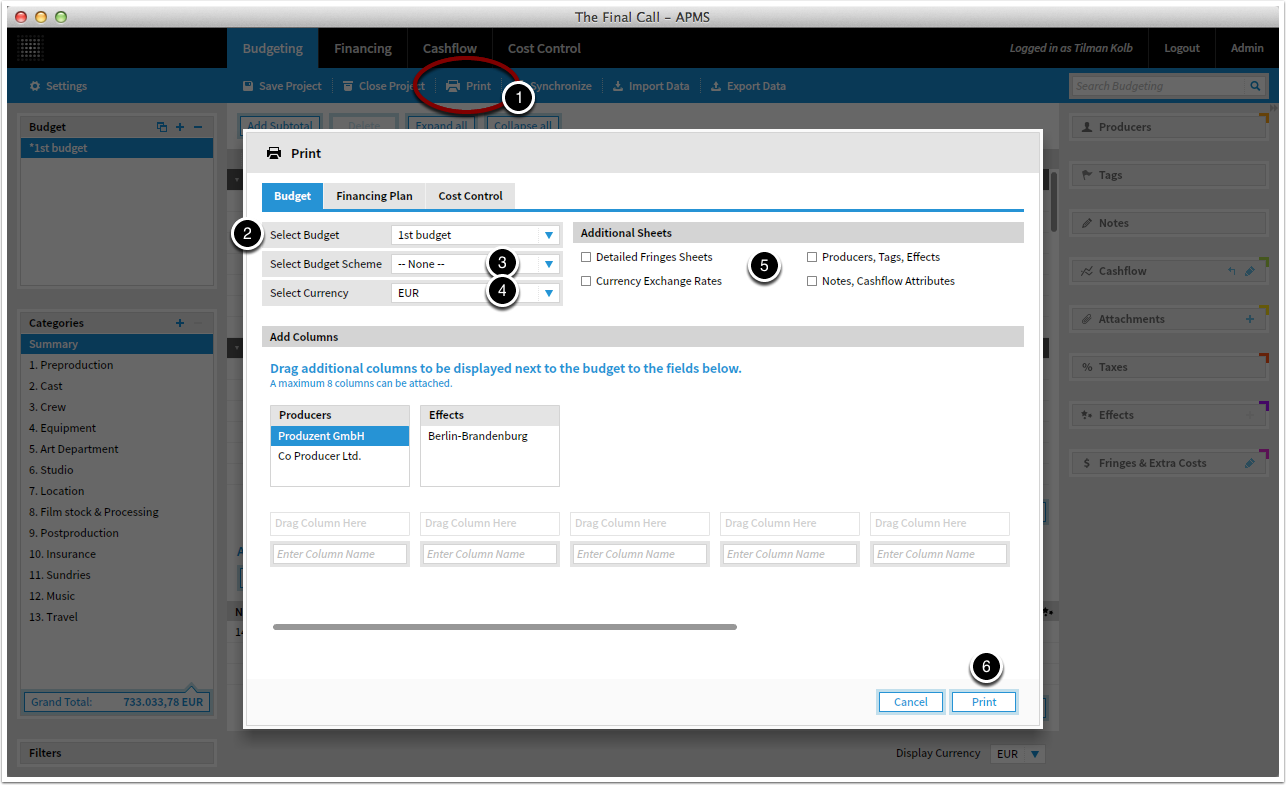
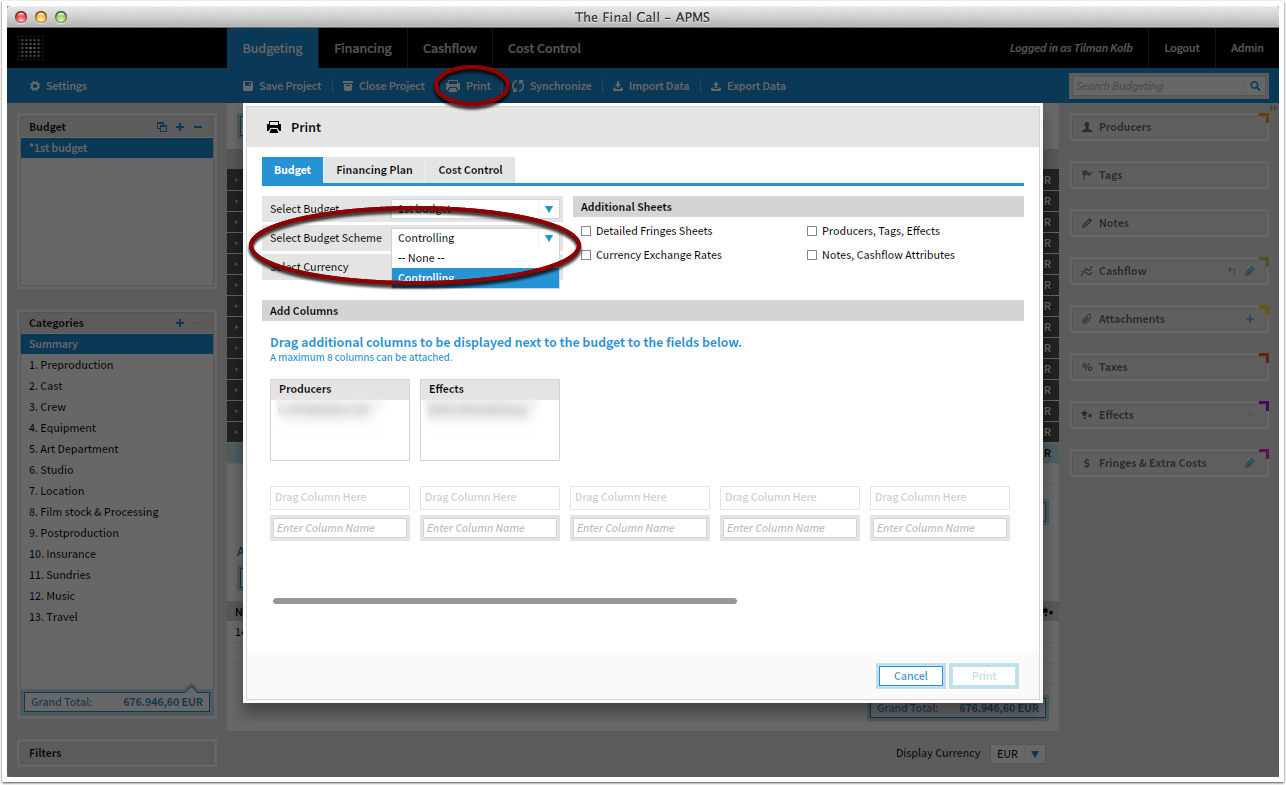
Print window
Click "Print" at the toolbar (1) or press Cmd-P to print.
Choose a budget (2), financing plan or cost report.
If you want to print the budget using a different budget scheme than the standard structure of your budget, you can do so by creating Budget Schemes in Settings and choose them here (3).
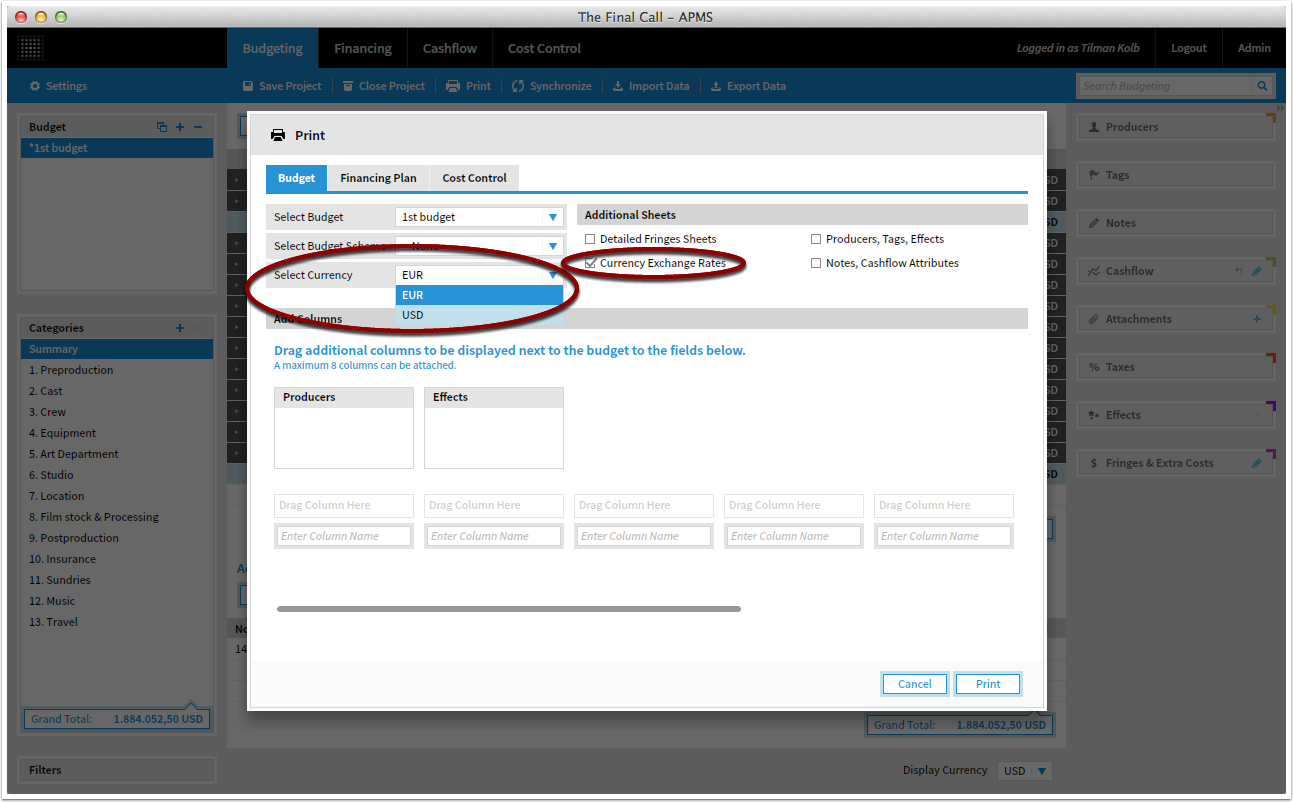
You can also choose the currency (4) and additional sheets (5).
Click "Print" when you are ready. (6)
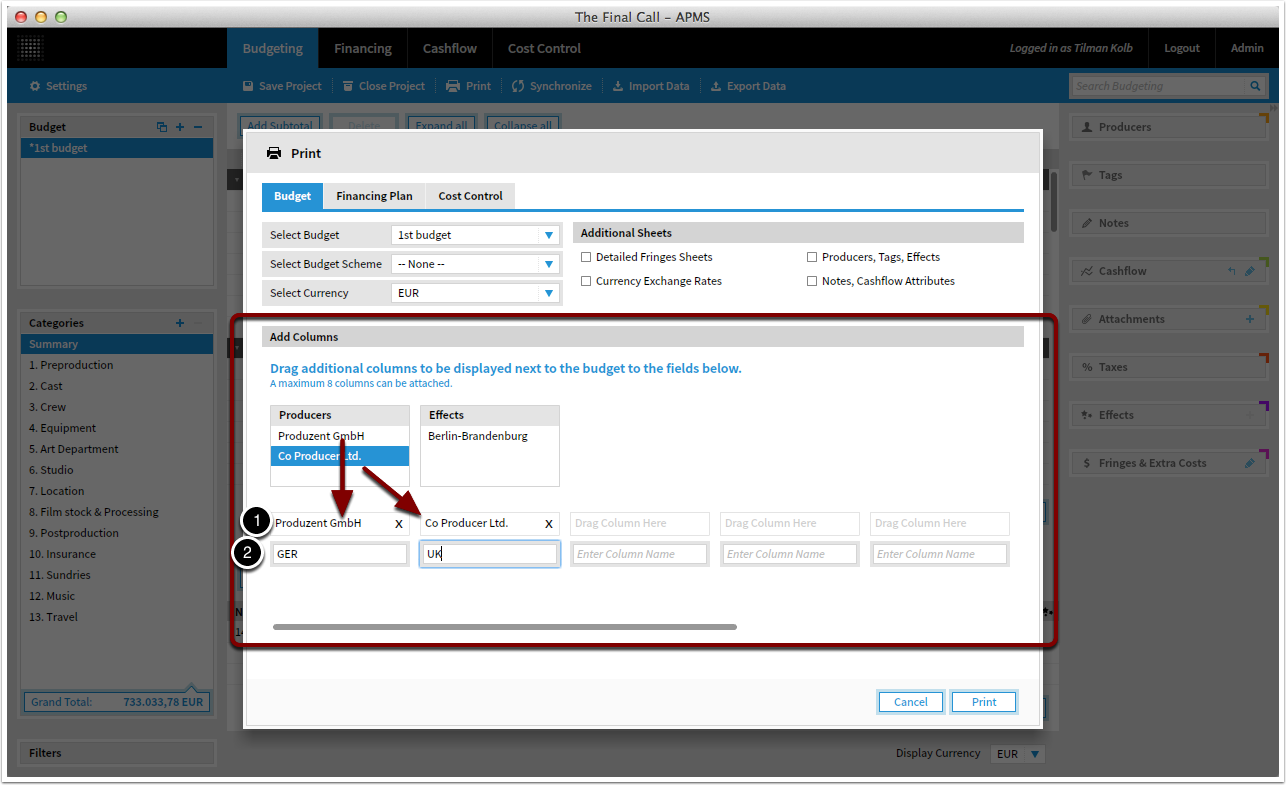
Printing additional columns
You can choose to print seperate columns for producers or effects.
To do so, simply click and drag them to the upper boxes (1) and name the column titles below (2).
Synchronization
Synchronizing / upload and download
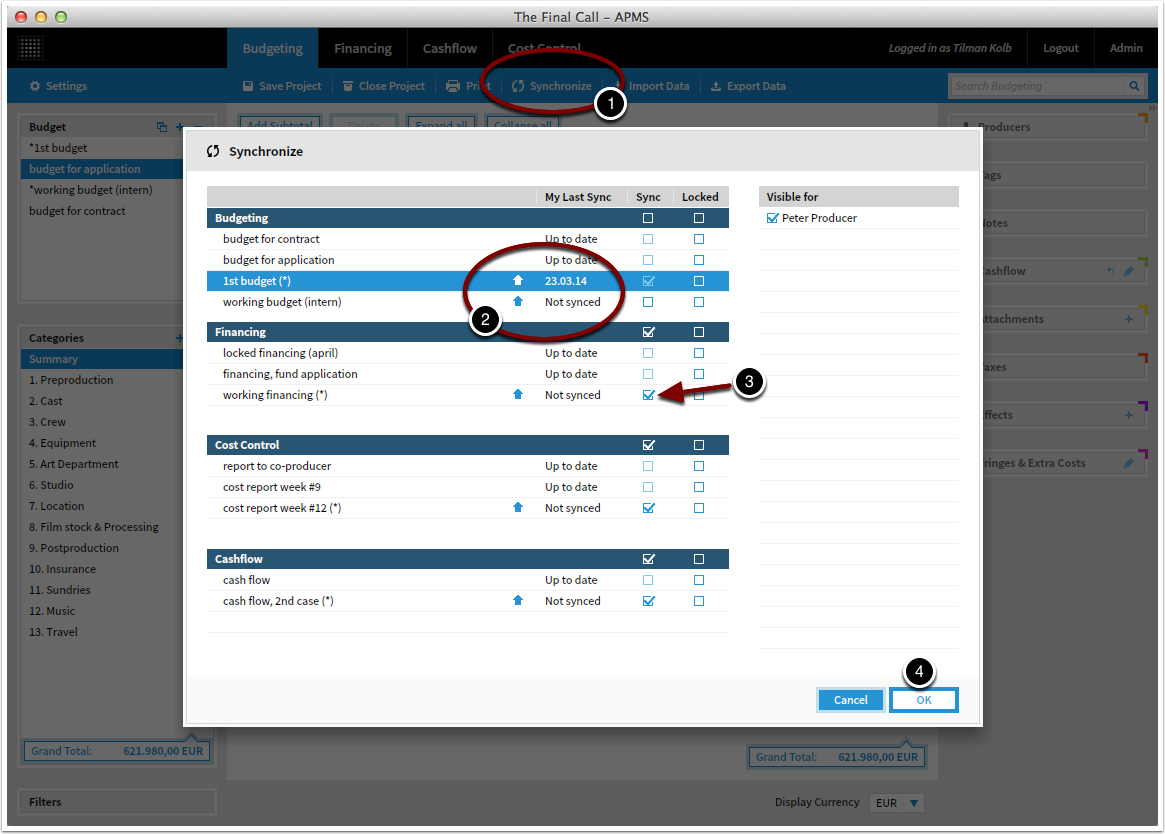
Click Synchronize (1) to open the sync window.
Here you will see all files in the different modules of your current project.
The blue symbols (2) indicate if you can upload your version to the cloud or download a newer version from the cloud. Do not worry about losing data when several people are working on the same file. KOSMA will ask you whether to create copies if a sync conflict should arise.
Check the sync boxes (3) of the files you want to synchronize and click Ok (4).
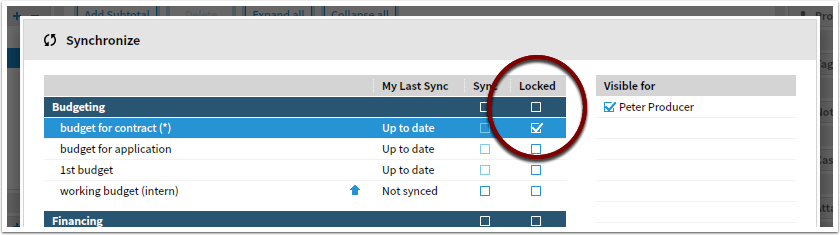
Locking an item
You can lock files to protect them from being changed by other users.
Just click the checkbox and sync again.
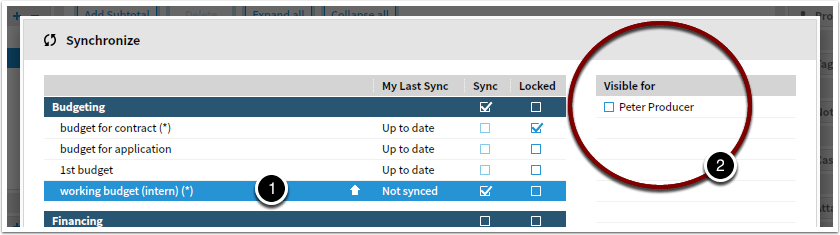
Hiding an item from other team members
In case you want to sync a file only for certain users, you can select the visibility option.
First, choose file to sync. (1)
Then, check and uncheck the users that should have access to that item. (2)
And sync again.